
How do I build a containerized app on Mirantis OpenStack with native Docker tools?
Last month, we talked about the pros and cons of some of the different ways to handle containers in OpenStack, including native tools, Murano applications, and Magnum-based operations. Before we get too deep into how to create different types of applications using OpenStack tools, we thought we'd take a look at what's really going on behind the scenes by building a containerized application on OpenStack using native Docker tools.
Docker has soared in popularity, but while there are some huge applications running on it, very few of the millions of developers and organizations using it are doing so in production, despite the fact that there are now multiple ways to create a reliable and robust infrastructure.
At present, the most common way to deploy container “hypervisors” is to first provision a virtual machine, and then install Docker and the appropriate containers on that VM. The drawback of this method is latency while the VM spins up, but the advantage is 100% isolation and security. OpenStack, of course, lends itself to this approach of creating Docker hosts on a private cloud, so let's see how that works.
Machine is a single binary which can create Docker hosts on a variety of providers -- including OpenStack -- and eventually link them in order to create distributed Docker infrastructures with hosts running on different providers at the same time. (If you're thinking, "Hey, that's hybrid cloud," yes, you're right.)
Using Machine is as straightforward as downloading the binary and launching it with the right parameters. The only requirements are:
As for machine, you just pull and execute the binary, verify the version and list the current machines list. (Adapt the operating system version to yours; here we're using amd64 for linux.) Follow these steps:
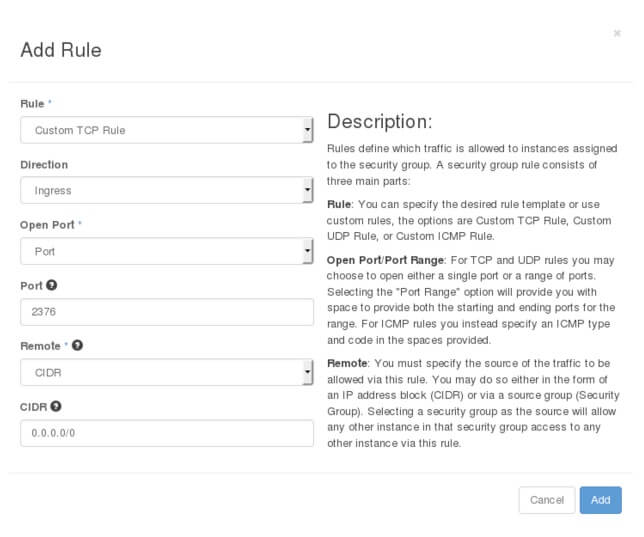
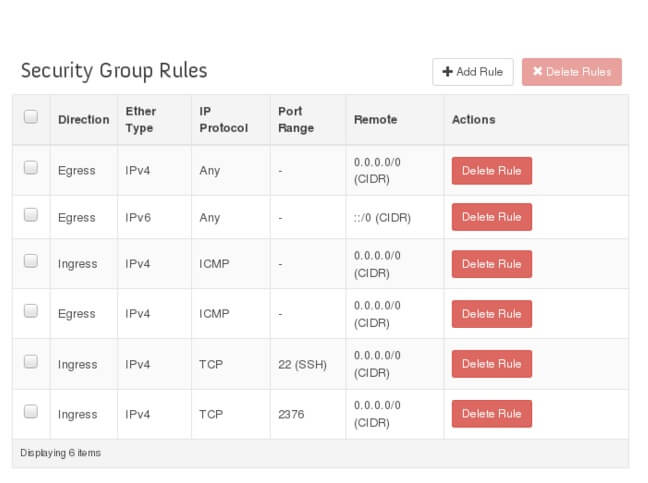
Docker-machine uses port tcp/2376 for the Docker daemon to listen, and port tcp/22 (SSH) to configure the host. It can operate on internal networks or on floating IP, preferring the latter if present. Some security options must be configured. You can add a special security group “machine” for machine, enabling incoming ports 22 and 2376, in Horizon
Once you've created the groups, create the rules:
After sourcing the OpenStack credentials of a non administrator user, but with the tenant privileges, with the environment variables OS_AUTH_URL, OS_TENANT_ID, OS_TENANT_NAME, OS_USERNAME, OS_PASSWORD, from an openrc file, we can easily create an OpenStack Docker machine with a self-explanatory command like:

After installation, which may require a few seconds, this host is immediately usable, if you import the environment variables with the command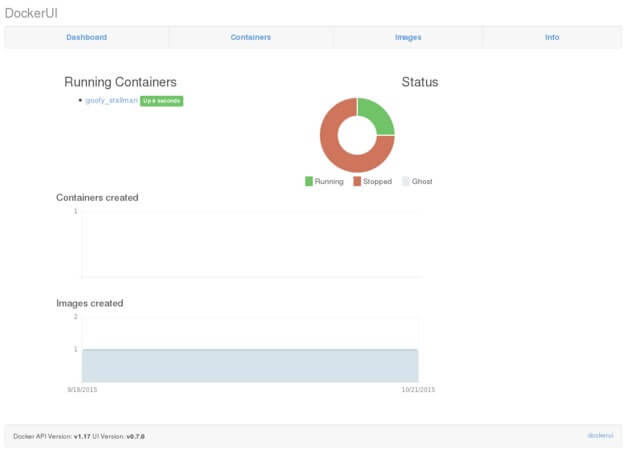
Your first Docker host running on OpenStack is ready! You can tell by running the docker info command:
To accomplish this, we’ll demonstrate the usage of another tool from the Docker ecosystem: Compose. For those who know Dockerfiles, Compose adds some nice features with some syntactic sugar. The task of Compose is to set up a set of containers depending on a local configuration written in YAML.
First, install locally Compose:
There are tons of tutorials on the Internet on how to setup microservices in seconds, with Compose (for example here, here, here). We’ll demonstrate the usage of Compose by using a ready YAML configuration installing Owncloud. Let’s clone the following github repo and set up the app accordingly:
As you can see, it's working.
In upcoming articles, we'll look at other methods of running containerized applications in OpenStack, such as OpenStack Magnum or OpenStack Murano and Kubernetes.
Docker has soared in popularity, but while there are some huge applications running on it, very few of the millions of developers and organizations using it are doing so in production, despite the fact that there are now multiple ways to create a reliable and robust infrastructure.
At present, the most common way to deploy container “hypervisors” is to first provision a virtual machine, and then install Docker and the appropriate containers on that VM. The drawback of this method is latency while the VM spins up, but the advantage is 100% isolation and security. OpenStack, of course, lends itself to this approach of creating Docker hosts on a private cloud, so let's see how that works.
Deploy a Docker hypervisor on OpenStack
Before you can run a single Docker container, you will need to install a Docker host. You can do this manually, or with tools such as Puppet or Ansible, but why reinvent the wheel or recycle configuration management code and adapt it, when Docker has already released a tool that does this? It's called Docker Machine.Machine is a single binary which can create Docker hosts on a variety of providers -- including OpenStack -- and eventually link them in order to create distributed Docker infrastructures with hosts running on different providers at the same time. (If you're thinking, "Hey, that's hybrid cloud," yes, you're right.)
Using Machine is as straightforward as downloading the binary and launching it with the right parameters. The only requirements are:
- An OpenStack tenant. You'll need to have access to an OpenStack tenant, or project, in which you can launch a medium instance.
- The Docker engine. The simplest way to install Docker is to simply type:
sudo apt-get install docker- Exact configuration of the tenant security options. We'll create the security group in a moment.
- A clean installation of Ubuntu. This can be a tiny VM running on openStack or even VirtualBox, rather than actual metal. (This isn't a strict requirement, but if you're having issues, this may clear them up.)
- A Ubuntu Trusty Tahr image with a 3.13+ kernel
As for machine, you just pull and execute the binary, verify the version and list the current machines list. (Adapt the operating system version to yours; here we're using amd64 for linux.) Follow these steps:
$ sudo suIf we check the current setup:
$ curl -L https://github.com/docker/machine/releases/download/v0.5.6/docker-machine_linux-amd64 > /usr/local/bin/docker-machine
$ chmod +x /usr/local/bin/docker-machine
$ docker-machine --version
docker-machine version 0.5.6, build 61388e9
$ docker-machine lsOf course, no machines exist yet.
NAME ACTIVE URL STATE URL SWARM DOCKER ERRORS
Docker-machine uses port tcp/2376 for the Docker daemon to listen, and port tcp/22 (SSH) to configure the host. It can operate on internal networks or on floating IP, preferring the latter if present. Some security options must be configured. You can add a special security group “machine” for machine, enabling incoming ports 22 and 2376, in Horizon
Once you've created the groups, create the rules:
After sourcing the OpenStack credentials of a non administrator user, but with the tenant privileges, with the environment variables OS_AUTH_URL, OS_TENANT_ID, OS_TENANT_NAME, OS_USERNAME, OS_PASSWORD, from an openrc file, we can easily create an OpenStack Docker machine with a self-explanatory command like:
$ docker-machine create \We are creating a Docker host named u1 based on Ubuntu 14.04 Trusty (http://releases.ubuntu.com/trusty/) on a medium size flavor, attaching to it a floating ip, and booting the instance in the security group machine.
--driver openstack \
--openstack-image-id 98011e9a-fc46-45b6-ab2c-cf6c43263a22 \
--openstack-flavor-id 3 \
--openstack-floatingip-pool public \
--openstack-net-id 44ead515-da4b-443b-85cc-a5d13e06ddc85 \
--openstack-sec-groups machine \
--openstack-ssh-user ubuntu \
u1
$ docker-machine lsWhat Machine does is boot and wait for the instance availability, then inject some values with cloud-init, configure security, certificates and keys, SSH to the instance to update packages, install Docker and finally, launch the daemon. You can check the progress from the instance logs:
NAME ACTIVE DRIVER STATE URL SWARM
u1 - openstack Running tcp://172.18.186.56:2376
After installation, which may require a few seconds, this host is immediately usable, if you import the environment variables with the command
$ eval "$(docker-machine env u1)"Now you can launch any container on it:$ docker run busybox echo “Hello from OpenStack”You can even launch the DockerUI, for example. Just make sure you open the required port in the security group. Usually the DockerUI runs on tcp/9000, so add the rule to the security group. Once you've done that, you can run the UI:
Hello from OpenStack
$ docker images
REPOSITORY TAG IMAGE ID CREATED VIRTUAL SIZE
busybox latest 2c5ac3f849df 15 hours ago 1.113 MB
$ docker run -d -p 9000:9000 --privileged -v /var/run/docker.sock:/var/run/docker.sock dockerui/dockeruiYour first Docker host running on OpenStack is ready! You can tell by running the docker info command:
$ docker infoNow that you know how to use Machine to spin things up, let's look at the Docker Compose tool.
Containers: 4
Images: 6
Storage Driver: aufs
Root Dir: /var/lib/docker/aufs
Backing Filesystem: extfs
Dirs: 14
Dirperm1 Supported: false
Execution Driver: native-0.2
Logging Driver: json-file
Kernel Version: 3.13.0-55-generic
Operating System: Ubuntu 14.04.2 LTS
CPUs: 2
Total Memory: 3.861 GiB
Name: u1
ID: QTYT:CLJH:RVZW:KHRJ:QEGW:OGSJ:3VXV:LZ6D:Z6BN:2HAJ:ZEV6:CWDX
WARNING: No swap limit support
Labels:
provider=openstack
Design an app with Compose
For the purpose of this blog post, we’ll install a simple containerized app running ownCloud.To accomplish this, we’ll demonstrate the usage of another tool from the Docker ecosystem: Compose. For those who know Dockerfiles, Compose adds some nice features with some syntactic sugar. The task of Compose is to set up a set of containers depending on a local configuration written in YAML.
First, install locally Compose:
$ sudo suNow, with the sourced environment variables to use the remote Docker host running on, OpenStack, we can create the app environment.
$ curl -L https://github.com/docker/compose/releases/download/1.4.2/docker-compose-`uname -s`-`uname -m` > /usr/bin/docker-compose
$ chmod +x /usr/bin/docker-compose
$ docker-compose --version
docker-compose version: 1.4.2
There are tons of tutorials on the Internet on how to setup microservices in seconds, with Compose (for example here, here, here). We’ll demonstrate the usage of Compose by using a ready YAML configuration installing Owncloud. Let’s clone the following github repo and set up the app accordingly:
$ git clone https://github.com/sameersbn/docker-owncloud.gitNow we’re ready to set up this app. The structure is fairly simple: 3 containers, one with the Nginx webserver, one with the Postgres database server, and one with the Owncloud code. They are composed automatically starting from the configuration in the docker-compose.yml file:
$ cd docker-owncloud
$ docker-compose up -dThe -d option specifies that you want to run containers in daemon mode. Compose now downloads the images, creates containers, links them, and does some other operations. When the command finishes, if we check, we’ll see that our Docker host now runs the containers:$ docker psOn the docker host, a port redirection is active. So, if OpenStack security groups allow incoming traffic to ports tcp/80 and tcp/443, we can login to the new Owncloud instance:
CONTAINER ID IMAGE COMMAND CREATED STATUS PORTS NAMES
e29ac6f6a394 sameersbn/nginx "/sbin/entrypoint.sh " 7 minutes ago Up 7 minutes 443/tcp, 0.0.0.0:80->80/tcp, 1935/tcp dockerowncloud_nginx_1
91ffba8739fd sameersbn/owncloud:latest "/sbin/entrypoint.sh " 7 minutes ago Up 7 minutes 9000/tcp dockerowncloud_owncloud_1
2d08e6679161 sameersbn/postgresql:latest "/sbin/entrypoint.sh" 8 minutes ago Up 8 minutes 5432/tcp dockerowncloud_postgresql_1
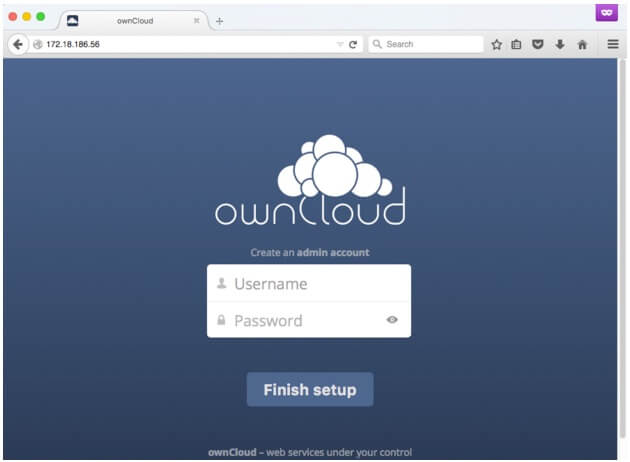
$ docker-machine ip u1Once you have the IP address, pull it up in the browser.
172.18.186.56
As you can see, it's working.
Next steps
So at this point you should understand how to set up a minimal infrastructure capable of hosting Docker containers on OpenStack by using the standard Docker ecosystem tools. You saw how to provision a Docker host, how to configure it, and finally how to deploy a sample 3-container application on it.In upcoming articles, we'll look at other methods of running containerized applications in OpenStack, such as OpenStack Magnum or OpenStack Murano and Kubernetes.

