
Persistent Data and Storage with Kubernetes

One of the biggest challenges for implementing cloud native technologies is learning the fundamentals—especially when you need to fit your learning into a busy schedule.
In this series, we’ll break down core cloud native concepts, challenges, and best practices into short, manageable exercises and explainers so you can learn five minutes at a time. These lessons assume a basic familiarity with the Linux command line and a Unix-like operating system—beyond that, you don’t need any special preparation to get started.
If you’re a developer whose organization is moving to Kubernetes, there’s a pretty good chance that you’re going to spend some time decomposing existing monolithic applications into microservices that take advantage of Kubernetes’ capabilities.
In the next few lessons, we’re going to work step-by-step to break down a monolith into dedicated Services running on Kubernetes. Specifically, we will decompose a simple To Do app with a web client and functionality for users to create accounts, log in, and save their own notes. This will give us a hands-on, project-based approach to learning major concepts in Kubernetes development such as Volumes, Secrets, and Ingress.
The monolithic To Do app is built on Node.js and MySQL, using a MySQL database to store user account data and tasks. We’ll start with one of the thornier challenges of decomposition: how to persist data in Kubernetes.
Table of Contents
Persistent Data and Storage with Kubernetes ← You are here
How to Use Kubernetes Secrets with Environment Variables and Volume Mounts
How to Use StatefulSets and Create a Scalable MySQL Server on Kubernetes

These lessons assume a basic understanding of containers. If you need to get up to speed on Docker and containerization, download our free ebook, Learn Containers 5 Minutes at a Time. This concise, hands-on primer explains:
- The key concepts underlying containers—and how to use core tools like image registries
- Fundamentals of container networking that are essential for understanding container orchestrators like Kubernetes
- How to deploy containerized apps in single-container and multi-container configurations
The pyramid of persistent data
In Kubernetes, containers are typically presumed to be ephemeral and immutable, which is to say that we expect any given container to be short-lived, replaceable, and unchanging in its contents. For stateless applications—apps that don’t store or modify changeable data—this is perfect.
But most apps are stateful: they change into different states as users or clients create, update, or delete data that may persist over time. This is a little out of step with the philosophy and assumptions of Kubernetes, but it’s a fundamental requirement that the system has to be able to handle.
And so it can! There are various ways in which Kubernetes can persist data, at varying degrees of data persistence and complexity. You can think of these approaches as steps on a pyramid, with the duration and reliability of data persistence running more or less inverse to the complexity of the solution.
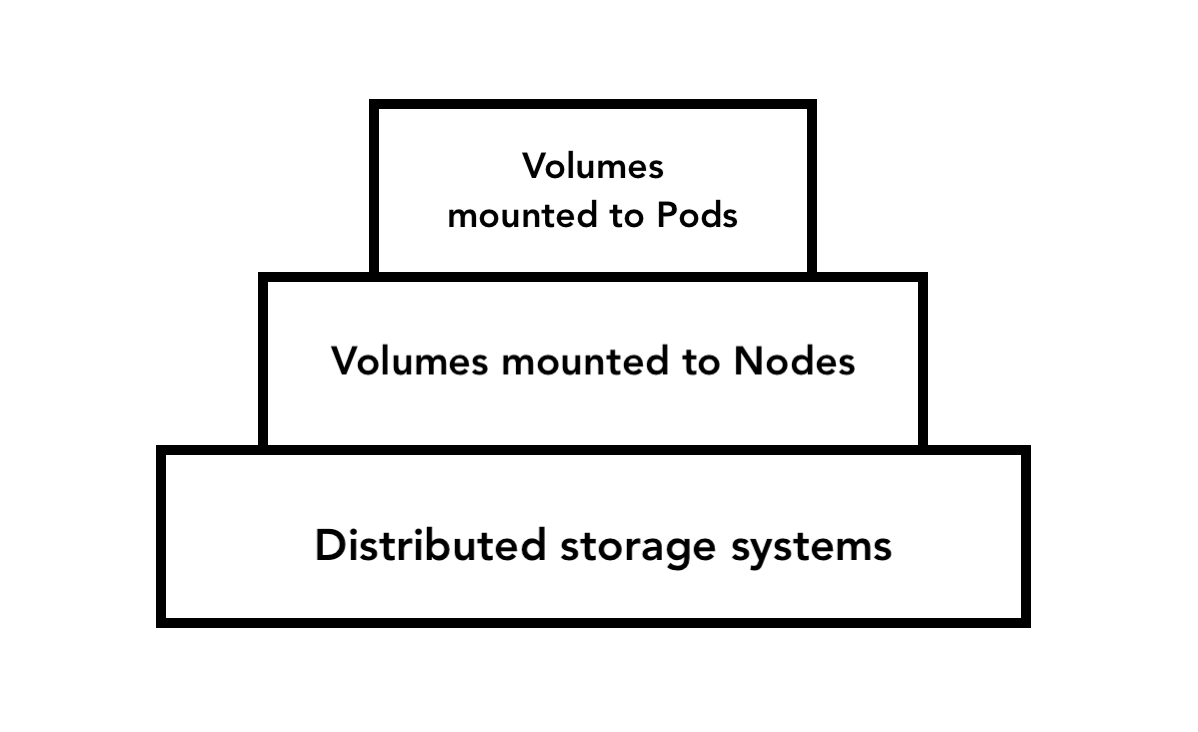
Let’s start at the top of the pyramid and decide which solution will be most suitable for our purposes.
Volumes mounted to Pods
Containers within a Pod can mount a writable volume at the Pod layer, similar to the way a Docker container might mount a volume on a host system. This approach is relatively simple—and has its uses—but your data won’t be very durable. If the container is replaced within the Pod—for example, if it has failed and been automatically replaced—the new container will still have access to the volume. But you’re never going to store, say, user account data this way, because as soon as the Pod is erased, any data the container has written will be gone. Pod-mounted volumes are most suited to temporary caches and other short-term uses that you don’t expect to last any longer than a given Pod—for example, this technique can be used to mount a Secret to a Pod (which we’ll discuss in depth in the next lesson).
Volumes mounted to Nodes
If you need data to persist beyond the lifespan of a particular Pod, you might consider using a volume mounted at the Node level. Now persistent data can be made available to any Pod running on that Node, but the limitation should be immediately clear: Only Pods on that Node can access the data.
In a single-node cluster, or with Pods that are limited to a dedicated Node, node-mounted volumes can be a great fit. But if you’re running the same Pods across multiple Nodes, that’s a problem—and for High Availability production apps, you really want to be able to run across a multi-node cluster.
Distributed storage systems
Distributed storage systems enable us to store data that can be made available clusterwide. Excellent! But dynamically apportioning storage across a multi-node cluster is a complex job that varies somewhat according to the underlying infrastructure. So this is another area where Kubernetes typically outsources the job to plugins, whether those are from cloud providers like Azure and AWS or they are components like NFS or Ceph configured on-prem.
External storage systems like these connect to Kubernetes by way of the Container Storage Interface (CSI). This provides a standard interface between different types of storage systems—including open and closed source solutions from various vendors—and the storage abstractions in the Kubernetes API. This design is similar to the Container Runtime Interface (CRI) model for runtimes, which we discussed in Lesson 3.
As a specification, the CSI is actually external—and not limited to—Kubernetes, managed as an independent project and used by other container orchestrators such as Mesos and Nomad.
But back to Kubernetes. What was that about those storage abstractions in the API? When we’re working with Kubernetes we need a standardized way to specify our requirements for persistent data storage. Kubernetes provides this with API resources called PersistentVolumes, PersistentVolumeClaims, and StorageClasses. We’ll break them down one by one.
Introducing PersistentVolumes and PersistentVolumeClaims
If we run kubectl explain persistentvolume, we get this description:
PersistentVolume (PV) is a storage resource provisioned
 by an administrator. It is analogous to a node.
What does it mean to be “analogous to a node”? Simply that the PersistentVolume (PV) is a system resource for storage in the same way that a node is a system resource for compute. PersistentVolumes are administrator-facing objects: system resources to be defined for others’ use.
As a developer, you wouldn’t typically create them, just as you probably wouldn’t add a node to the cluster. But you would consume storage, and to do so you would stake a PersistentVolumeClaim (PVC)—a request to provision available storage resources. This is essentially your app's voucher for storage utilization.
Depending on the specific requirements of your PVC and the resources available on your cluster, the provisioning of your storage may be static or dynamic.
With static provisioning, storage is a zero-sum resource, correlated directly with actually existing PersistentVolumes created manually by an administrator. It’s as though you walked up to a hotel and requested a room; there is a limited, defined set of rooms, and they are either occupied or available.
Administrators may also give you the option of dynamic provisioning. In this case, the system may automatically create PersistentVolumes based on your requirements and available resources, using a specified storage solution and predetermined parameters. If the hotel doesn’t have any vacancy, no problem; they’ve partnered with an RV company and your room will be here shortly.
To understand how dynamic provisioning works, we’ll need to dive into the third major storage API resource for Kubernetes: StorageClass.
Dynamic provisioning with Storage Classes
Much as Deployments provide an abstraction for managing Pods, the StorageClass API resource sits over, manages, and dynamically creates PersistentVolumes.
Using a StorageClass is necessary to dynamically provision storage, and in general it is the preferable target for storage requests via PersistentVolumeClaims. In the same way that you typically want to interact with a Deployment object rather than an individual Pod, you will typically prefer to interact with StorageClasses (SCs) rather than individual PVs.
Why use this higher level of abstraction? StorageClasses enable you to provision PVs for particular usages: storage with a triplicate backup policy, for example, or higher-latency cold storage. In other words, you’re defining a class of storage (just what it says on the tin!), instances of which can be spun up as needed and at scale.
With Minikube running, we can take a look at StorageClasses on our cluster:
$ kubectl get sc

NAME                 PROVISIONER                RECLAIMPOLICY   VOLUMEBINDINGMODE   ALLOWVOLUMEEXPANSION   AGE
standard (default)   k8s.io/minikube-hostpath   Delete          Immediate           false                  92s
Wait—we haven’t created any StorageClasses, have we?
Not yet! But this is typical. You would find a standard (default) StorageClass (and likely a couple more options) on a cloud-hosted Kubernetes cluster as well. If you were using AWS or Azure rather than local Minikube, you would find a different value in the PROVISIONER field. PROVISIONER refers to the CSI plugin through which Kubernetes will be connecting dynamically generated PVs to whatever external storage system you are using.
Another field we should note is the reclaimPolicy, which is set to Delete. This means that storage volumes and PVs provisioned by a PersistentVolumeClaim to this StorageClass will persist only as long as the PVC: once it’s deleted, the data will be deleted, too. This is the default for a StorageClass without a defined reclaimPolicy, and it makes sense from a data security and resource efficiency standpoint: it’s biased toward the deletion of unnecessary or unused artifacts. From a data persistence standpoint, it’s a risky policy, and if you want to avoid that risk, you’ll need to set the reclaimPolicy to Retain in your bespoke SCs. We’ll see how to do that in a moment. (We’ll discuss the other fields in the above output—volumeBindingMode and allowVolumeExpansion—as well.)
Take note: The standard SC is intended for quick experiments and debugging—in production, you would want a deliberately defined SC aligned with the specific requirements of your app. While we could use it for a learning exercise, we’ll act as our own operator and create a new StorageClass, which our app will access by means of a PersistentVolumeClaim.

Exercise: Running MySQL on Kubernetes
We said up top that our objective here is to decompose a To Do app built on Node.js and MySQL, using a MySQL database to store user account data and tasks. You can check out the code for our starting monolith on GitHub, but we won’t be using it much today. The MySQL server is already pretty separate from the rest of the app, so that makes a good candidate to migrate first.
I see your hand in the back of the room: “Wait, should we run MySQL on Kubernetes?” That’s a good question! We’ll address it at the end of the lesson. But for now we’ll focus on how to go about it.
First, we’ll create a container image that fits the requirements of our app. In this case, we want to deploy a MySQL server with a dedicated database and credentials ready to go. We’ll accomplish this by writing a Dockerfile that builds on top of the official MySQL base image. You can store your Dockerfile anywhere, but for organization’s sake I recommend writing it in your 5mins project directory, in a subdirectory called storage.
FROM mysql:8
ENV MYSQL_ROOT_PASSWORD=octoberfest
ENV MYSQL_DATABASE=todo_db
In this Dockerfile, we’re…
Building on top of the MySQL base image. It’s a good idea to specify a version number rather than defaulting to the latest image. Future versions of a container image may introduce breaking changes, so by specifying a specific version, you stay in control of the image your Pods are using (and can make upgrades more deliberately).
Establishing a root password and database through environment variables. Note: information in Docker images isn’t encrypted or particularly secure by default, and this means you would never want to store this Dockerfile or your image in a public repository! Indeed, in production, you wouldn’t want to set a sensitive password directly via environment variable at all. We’ll discuss why—and a more secure approach—next lesson, but for now, just remember that we’re cutting a corner here, and you would never want to upload an image like this to Docker Hub in the real world. Instead, you’d want to use a private image registry.
Now we’ll upload our image to Docker Hub. Remember, we wouldn’t want to use Docker Hub in practice! Imagine, instead, that we are pushing the image to a private registry that has been set up by our cluster administrator. The registry might be hosted externally by a cloud provider or it might be hosted within the cluster using tools like Mirantis Secure Registry or Harbor.
% docker build . -t <Your Docker Hub ID>/todo-mysql
 % docker push <Your Docker Hub ID>/todo-mysql
Start Minikube with minikube start. Now it’s time to create our StorageClass. In the same storage directory as your Dockerfile, create a YAML file called sc.yml and add the following:
apiVersion: storage.k8s.io/v1
kind: StorageClass
metadata:
 name: sc-local
provisioner: k8s.io/minikube-hostpath
parameters:
 {}
reclaimPolicy: Delete
volumeBindingMode: Immediate
allowVolumeExpansion: false
In our manifest for the StorageClass , we specify…
A name to help match the StorageClass with relevant claims—
A provisioner of k8s.io/minikube-hostpath. This points to the Minikube-specific driver that enables us to provision storage space from the Minikube instance’s host.
An empty parameters field, which I’ve included with a blank object value here because it’s an important field in real-world implementations. This is where an operator might set parameters specific to a given vendor’s storage solution. The vendor will provide documentation for using this field.
A reclaimPolicy of Delete : Alternatively, we could set this to RETAIN. If we did so, the system would preserve data created by a given PVC even once that PVC is deleted, but it wouldn’t be accessible by future PVCs, and we would have to manually clean up the data left behind.
A volumeBindingMode of Immediate. This controls the timing of the creation and binding of new PersistentVolumes with a PVC that makes a claim against the StorageClass. In this case, as soon as a PVC is submitted, the StorageClass will provision and bind storage to the claim. That’s nice and fast, but not without its complications! The Immediate binding process can all happen before the system has any knowledge of particular Pod requirements, so the SC could bind storage that isn’t actually suitable for the consuming app we have in mind—it might be on the wrong node, for example. If we want to avoid that kind of snafu, we can use a volumeBindingMode value of WaitForFirstConsumer—this will wait until an actual, real-life Pod tries to consume storage via a PVC to provision and bind the volume. Not all provisioners support that option, however, and our minikube-hostpath provisioner is one that does not.
An allowVolumeExpansion of False. This defines whether or not the size of the PersistentVolumes created by this SC may be changed (by editing the requesting PVC) after the initial provisioning. It accepts a Boolean value.
Now we’ll create our StorageClass:
% kubectl apply -f sc.yml Once the SC is created, we can check on its status:
% kubectl get sc
NAME                 PROVISIONER                RECLAIMPOLICY   VOLUMEBINDINGMODE   ALLOWVOLUMEEXPANSION   AGE
sc-local             k8s.io/minikube-hostpath   Delete          Immediate           false                  15s
standard (default)   k8s.io/minikube-hostpath   Delete          Immediate           false                  78m
Our SC is available, so now we’ll create a claim.
In a new YAML file called pvc.yml:
apiVersion: v1
kind: PersistentVolumeClaim
metadata:
 name: tododb-claim
spec:
 storageClassName: sc-local
 accessModes:
   - ReadWriteOnce
 resources:
   requests:
     storage: 1Gi
In the spec, we’re invoking our new StorageClass by name and then defining some requirements for the PV we’re requesting:
An accessMode of ReadWriteOnce. This means that one node can access a volume at a time (though multiple Pods on that node can access the volume simultaneously). This is the default access mode and the only one universally supported by different PV storage solutions. Other access modes include:
ReadOnlyMany: Multiple nodes can read from the same volume simultaneously.
ReadWriteMany: Multiple nodes can read and write to the same volume simultaneously.
ReadWriteOncePod: Only one Pod can access a volume at a time.
Storage capacity of 1 gibibyte.
Apply the claim, and then run kubectl get on the PV again:
% kubectl apply -f pvc.yml
% kubectl get pv
NAME         CAPACITY   ACCESS MODES   RECLAIM POLICY   STATUS   CLAIM                  STORAGECLASS   AGE
pvc-a8b...   1Gi        RWO            Delete           Bound    default/tododb-claim   sc-local       33s
Remember: We used the Immediate volumeBindingMode, so this PVC has provisioned and bound to a volume without being consumed by an actual Pod.
Now we’re ready to deploy our MySQL server. In the same storage directory, create a new file called todo-mysql.yml:
apiVersion: apps/v1
kind: Deployment
metadata:
 labels:
   app: todo-mysql
 name: todo-mysql
spec:
 replicas: 1
 selector:
   matchLabels:
     app: todo-mysql
 template:
   metadata:
     labels:
       app: todo-mysql
   spec:
     volumes:
       - name: todo-volume
         persistentVolumeClaim:
           claimName: tododb-claim
     containers:
     - image: ericgregory/todo-mysql
       name: todo-mysql
       ports:
       - containerPort: 80
       volumeMounts:
       - mountPath: "/var/lib/mysql"
         name: todo-volume
This Deployment manifest includes a volumes section in the spec, connecting a container-level volume mount named todo-volume with our tododb-claim PVC. In the container spec, we also specify a mountPath: the directory within the container to associate with the volume, where we wish to write data.
Now create the Deployment:
% kubectl apply -f todo-mysql.ymlIt will take a moment for the Deployment to be ready. You can run kubectl get pods to check the status of the Pod being generated.
Once the Pod is ready, we can hop into it using the kubectl exec command. This works much the same way as docker exec. In theory, we don’t want to be handling individual Pods manually, but this is a good way to check in on our container and storage. (Besides, practice is often messier than theory—while we’d prefer not to handle individual Pods manually, more than one developer has found themselves debugging by checking logs within a Pod.)
Copy the name of the individual Pod from the output of kubectl get pods, and then use that with kubectl exec. (Your Pod name will differ slightly from mine below.)
% kubectl exec --stdin --tty todo-mysql-5798c74978-dksct -- /bin/bashNow we’re inside the container—you can tell by the bash4.4# at the beginning of your terminal line, cluing you in to where you are. (Note that you shouldn’t type bash4.4# in the command below—that merely indicates the context for the action, like the % before terminal commands.) Go ahead and open MySQL:
bash4.4# mysql -u root -pOn the prompt, enter the password we set: octoberfest
Now we should be in MySQL, within the container; your terminal line should begin with mysql and an angle bracket. (As above, you shouldn’t type mysql> in the commands below.) From here, let’s access the database we created:
mysql> USE todo_db;Excellent, the database is there! We’ll create a test table in the database:
mysql> CREATE TABLE IF NOT EXISTS test123 ( \
    -> id INTEGER PRIMARY KEY);
Query OK, 0 rows affected (0.04 sec)

mysql> SHOW TABLES;
+-------------------+
| Tables_in_todo_db |
+-------------------+
| test123           |
+-------------------+
1 row in set (0.00 sec)
Now we’ll exit MySQL and the container by typing exit twice.
The final step of our exercise is to test our work: Will our test123 table persist if the Pod is deleted and replaced? Let’s see!
% kubectl delete pod todo-mysql-5798c74978-dksct
pod "todo-mysql-5798c74978-dksct" deleted
% kubectl get pods
NAME                          READY   STATUS    RESTARTS   AGE
todo-mysql-5798c74978-8b28k   1/1     Running   0          6s
All right, after we deleted the original Pod, it was immediately replaced by a new one. (Remember that your Pod names will differ slightly from mine.) Let’s take a peek inside the new Pod.
% kubectl exec --stdin --tty todo-mysql-5798c74978-8b28k -- /bin/bash
bash-4.4# mysql -u root -p
Enter password: octoberfest
mysql> USE todo_db;
Database changed
mysql> SHOW TABLES;
+-------------------+
| Tables_in_todo_db |
+-------------------+
| test123           |
+-------------------+
1 row in set (0.01 sec)
Excellent! Everything is working just the way we hoped.
Before we finish for the day, I bracketed an important question earlier, and now we should return to it: Should we run MySQL (or other databases) on Kubernetes?
It depends! There is no doubt that stateful applications introduce a significant amount of complexity to Kubernetes deployments, and distributed storage solutions backed by your Kubernetes nodes themselves run the risk of data loss in the event that a node goes down. Whether that risk is acceptable to you is down to your use case.
Some organizations use external, managed database services like MongoDB Atlas and simply keep the stateful elements of their services off the Kubernetes cluster entirely. Others use PersistentVolumes backed by external services. Still others run stateful apps entirely on the cluster using purpose-built cloud native database technologies like CockroachDB backed by local volumes.
Kubernetes provides an important abstraction that can help to simplify the management of stateful applications: an API resource called StatefulSets. We’ll make use of StatefulSets in the next lesson, when we start to bring all the pieces of our application together.
But that’s it for today. Stop Minikube as usual (this will delete everything on the cluster), but make sure to hold on to everything in your project directory, including the YAML files.
Need more instruction on Kubernetes persistent data and storage? Check out this short tutorial to get up-and-running in no time!
In the next lesson, we’ll focus on Kubernetes Secrets, and start to break out our To Do app’s API server with an eye toward security. See you then!

