
Kubernetes Ingress vs. Istio Gateway [webinar]
Nick Chase - January 01, 2011

Any application running at production scale should have an “Ingress” to expose itself to the outside world. While Kubernetes provides the “Ingress” resource for this purpose, its feature set is limited depending on the kind of Ingress Controller (usually NGINX) being used.
Alternatively, you can leverage Istio and take advantage of its more feature-rich Ingress Gateway resource, even if your application Pods themselves are not running purely Kubernetes. We can do so by incrementally adopting Istio’s feature: Ingress Gateway, which uses Envoy proxy as the gateway (as opposed to NGINX). We explore these two approaches in the following webinar, which include demos so you can see how Istio helps manage your ingress traffic.
Andrew Lee: Hello, everyone. Thank you for joining. My name is Andrew. I’m the technical instructor here at Mirantis. I’ve been in our training team for the past four years. And more recently we have been delivering Kubernetes courses. So we have our Istio course, our first Istio course coming up, and we wanted to give you some overview about some of the features of Istio, which is at today’s topic, Istio Ingress versus Kubernetes Ingress. So please enjoy the presentation.
We will look at these three types just in case you’re not familiar with them. Here’s what a NodePort entry point for your app might look like. From the Internet, I can access my Kubernetes node. And when I create a service type NodePort, it takes one of the ports from all of my Kubernetes nodes. It’s showing one in this diagram, but all your nodes will have this node port taken. Now when I talk to this node IP on this NodePort, by the power of IP tables, my request is forwarded to my application container.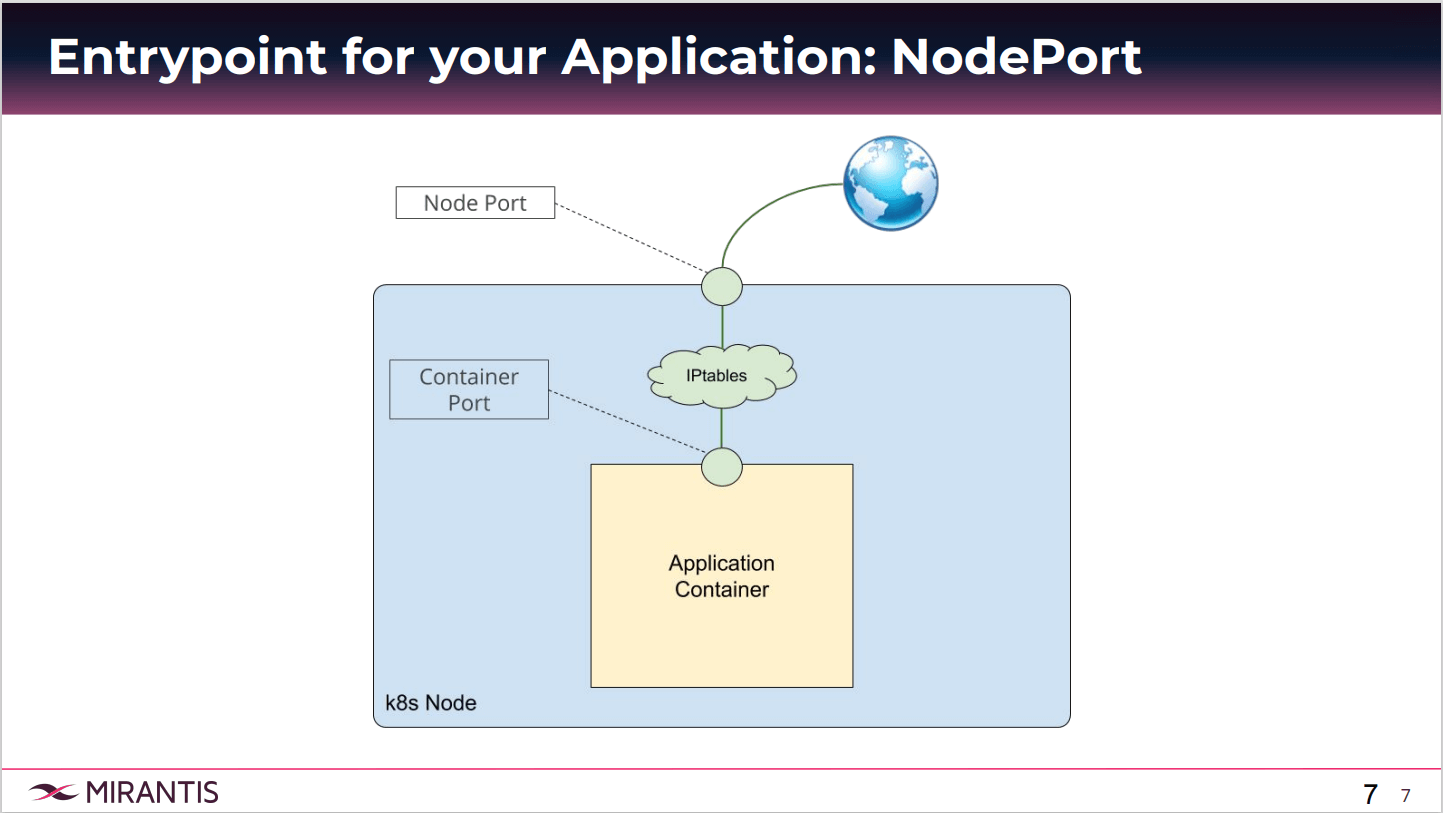
It’s a very simple and easy way to get up and running to expose your app. Now the problem comes when we start looking at what are my end users seeing? I have this really cool application. And then I tell my users, my app is available at 52.14.21.152:30126. Obviously that’s not an ideal scenario to give to your end users. One of the issues is that it’s not a standard port range. The default port range for this NodePort is 30000, so we will have about 32000.
The other one is we can give one NodePort per service. I just have one application exposed. If I had another one, I would have to create another NodePort service to expose that set of pods. Is this limitation is typically not for production use. Looking at Ingress, we still have our traffic coming into the node except now our Ingress Controller, which is a pod in this case, is going to be the one doing the proxy. And that proxy is choosing which service to forward the user traffic to.
In this case, I now have two applications, service A and B. And you specify some rules about how to forward traffic to its service, and that’s called Ingress. In fact there’s many components to Kubernetes Ingress that we’ll look at. One being the Ingress rule itself, and then the controller that is actually doing the forwarding. In a full-blown production environment, we just wanted to give you an idea about the architecture.

Typically you’ll have some load balancer, which is the single-point-of-entry for users. That load balancer will pick one of your Kubernetes worker nodes, and then your Ingress Controller will be exposed through that load balancer service. But what we’re going to do in the demo today will look more like this previous diagram where we exposed a host port. When I talk to the host port, I’m actually talking to the Ingress Controller. Keep that in mind.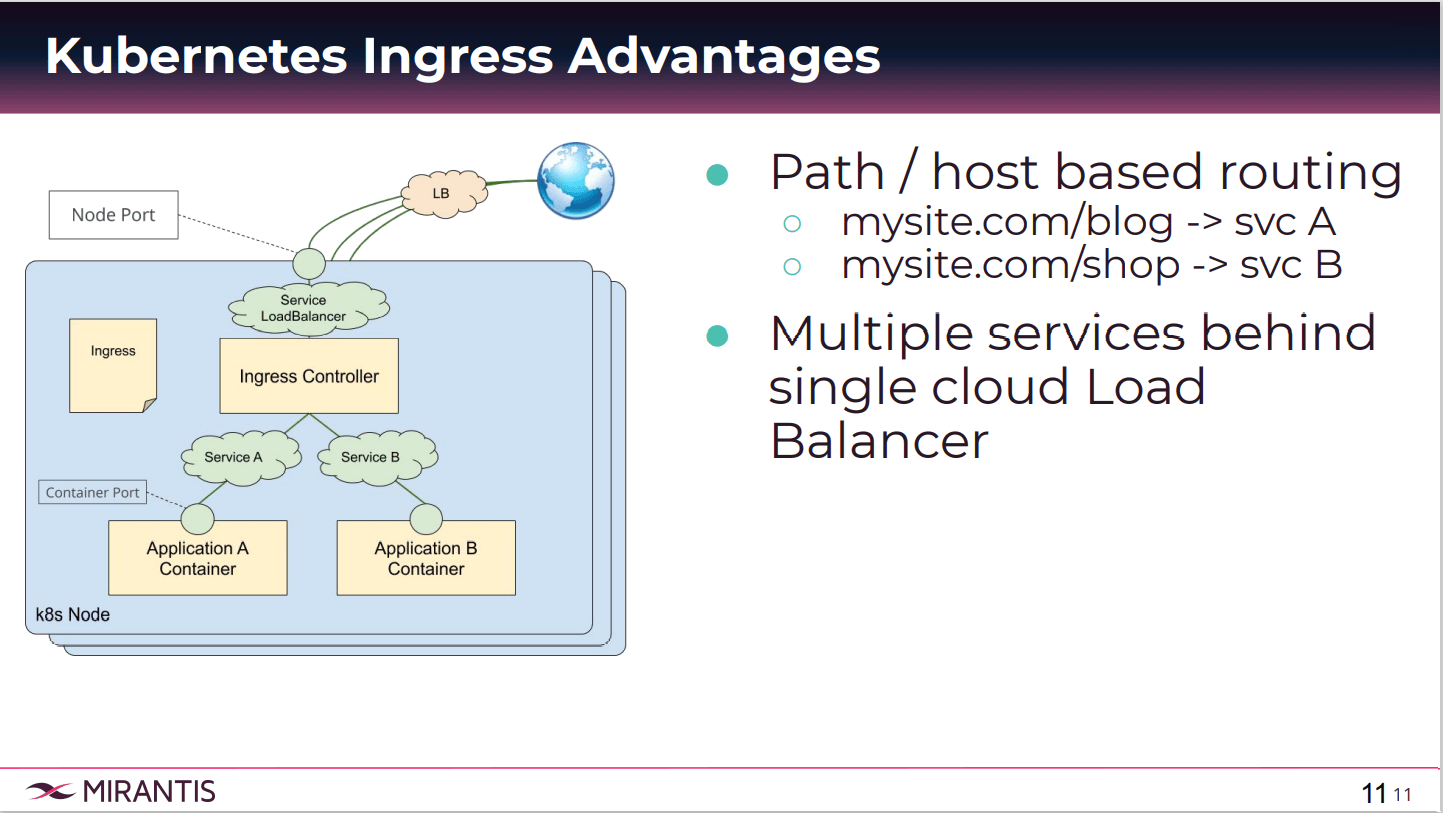
What’s great about Ingress is that we can do path and host-based routing. I mentioned earlier that we can define how our traffic can be routed to service A or B. Well, if service A is some blog application and service B is some shopping cart, I can say if a request comes in for my site.com/blog, let’s send it to service A.
That comes from the Ingress rule. If it comes in for my site.com/shop. Let’s send it to service B. That’s defined through the rules, and we can just expose one port, and depending on the user request, we can send it to the correct service. Multiple services behind a single cloud load balancer. And that’s the key. To do this, you need three components. We have our Ingress rule, which is the Kubernetes’s resource where we define that path-based routing.

We’ll see shortly in the lab with the Ingress Controller, which is the actual pod doing the proxy. The most common and recommended tool for that proxy is NGINX. Otherwise if you’re using cloud providers, they may actually implement this Ingress Controller in some different way in conjunction with a load balancer. This acts on the Ingress definitions provided. And then the default backend is where if none of the rules match, if the request doesn’t match any rules, it will be sent to this backend pod.

Kubernetes Ingress has some limitations. Out of the box, if I don’t get some NGINX Plus subscription, there are limited observability toolsets available to my Kubernetes cluster. There’s also no good way to do advanced traffic controls or release strategies. So if you think about, let’s send 10% of my traffic to version two, and 90% to version one, there’s no way to specify percent-based releases.
So you have some limited capabilities about traffic control. Also there’s no service resiliency features either. Keeping that in mind, let’s take a look at Istio and how it can solve some of those shortcomings. Primarily Istio is the control plane for Envoy, and that’s the way I like to think about Istio. And Envoy is going to be our proxy for the Ingress gateway.
Think about Envoy as sort of the direct replacement for NGINX, Envoy being more feature-rich. Let’s put Envoy at the edge and then Istio controls and programs Envoy. Rather than having an Ingress Controller here, we now have a resource called Istio Ingress Gateway, which is another pod with an Envoy container running. And this Gateway is program is by creating a Gateway Kubernetes resource, and VirtualService Kubernetes resource. Now these are each defined as a custom resource, and we'll also see that in the demo.
In similar fashion, we have service A and B where we define the rules about how to forward traffic to which service. We can also specify percent-based traffic routing as well. What I’ve done here is highlight or put an Envoy in application A as well. If you’re not familiar with Istio, you will have a sidecar container in every pod in your workload.
In fact, all of my application pods will have this Envoy container inside. That’s going to be your data plane. We’ll see why in just a little bit later. To utilize the Istio and Ingress Gateway, you need three resources. You need the gateway resource. This is a custom resource definition where you configure ports, the protocol certificates, if any, as well as a VirtualService. This is where you define your routes.
The VirtualService is very similar to the Ingress Kubernetes resource we saw earlier, so it will be a replacement to that resource. And then lastly is your Ingress Gateway, which is the pod with Envoy. That does the routing. Ingress Gateway is a replacement for a Ingress Controller in the native Kubernetes.
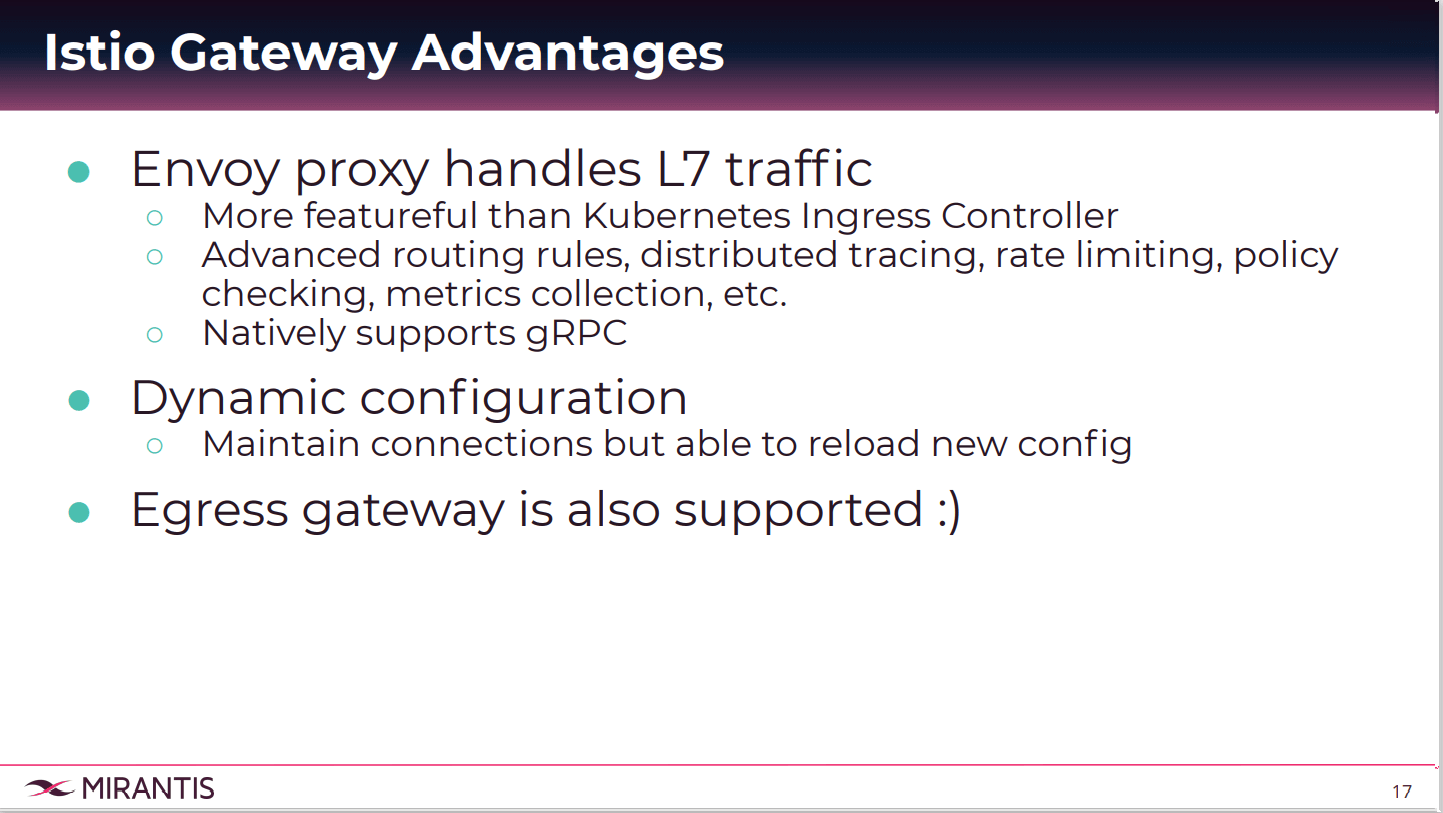
The advantages are that Envoy can handle layer seven traffic. So can Ingress, but Envoy has additional advanced features as listed here.
Things like more advanced routing rules, percent-based routing distributed tracing, limiting the rate of traffic, checking policies. One of the very important feature sets of Istio is that we’re able to observe our microservices better, more holistically. Metrics collection is also very simple when you have Envoy. It also natively supports gRPC. If your applications use gRPC to communicate, then Envoy and Istio is a good choice.
Secondly, there is dynamic configuration. No longer do you update a config map and then restart your pod. Envoy has a feature called hot reload where you don’t have to drop any traffic before loading a new config. Lastly, Ingress rules are also supported.
One disadvantages you may think of is that it requires yet another control plane component.
Envoy by itself, you can use it as a data plane component. But it’s easier to do so with a control plane like Istio. It requires you to learn this new tool and new commands, and how it works. Another thing is that if you talk to a company or product like Ambassador, they’ll say, “Well, Istio is primarily for internal traffic management. It’s for your service mesh. It’s not specialized or exposing traffic to the outside. It’s not for north to south, rather it’s more specialized for east-to-west communication.” So that may be a disadvantage.
Some alternatives. There are toolsets called API Gateways, which do specialize in this north to south edged traffic chart. Ambassador, and you may have heard of Traefik or Kong. Now these are mainly commercial products, whereas Istio and Envoy specifically is a completely open source product under the CNCF.
We’re going to have an application which gives us some cat gif. We’re going to progressively expose it by better and better methods. We’ll start with NodePort, and then we’ll move on to Kubernetes Ingress, and we’ll take a look at what domain name is configured. And we will live install and configure Istio into our Kubernetes node. Lastly, we’ll look at the Istio Ingress Gateway. As a bonus, we’ll take a look at what observability features are available using Istio.
Here I have my environment. This is just a single node Kubernetes deployment. Right now, there’s nothing deployed on here except the Kubernetes control plane. If we do get the pods the kube system, we have our Kubernetes components running. What I’m going to do is navigate to the manifest directory. And here I have an application called Flask that’s ready to be deployed.
The basics of this app, it’s very simple. We have a frontend Flask service, which serves the Flask app pod. It’s a Python code which retrieves cat gif URLS from Redis. We’ll go ahead and deploy this and see what it looks like. The first thing we’re going to deploy is the backend to make the cat gifs available. We’ll apply the Redis app first. While it’s deploying, let’s take a look at the deployment spec. There you can see a service type cluster IP.
This Redis service does not need to be exposed outside, so cluster IP type is fine. Now we have a deployment of the Redis app. We’re going to have a mounted volume, which then is going to serve a Redis configuration that we passed in a config map earlier. This is not part of the recording, but I have created this config map with the Redis com inside. Let’s take a look at that pod. It’s up and running.
The Flask app deployment yaml contains the NodePort type service, which we will use to access this application, as well as the Flask app container. Let’s look at our pods now. Now we have our Flask deployment and the Redis deployment running. What that means is we can now go to get services, and we’ll notice that our Flask service has a node port associated to it. That means if I go to my IP address, which I have assigned a domain name for.
It’s andrew.megarantis.com, and I go to the port 32015, which matches the NodePort, then I should get my application. This is my cat application, later we’ll deploy the dog. For now we just have a cat application. Later, we’ll deploy a dog gif. But for now, we just have the cat gif of the day. That’s a very simple way to get up and running with Kubernetes to expose my application.
But as we discussed, one of the issues is this is not a standard port. We must have different ports for different applications. Now what we’ll do is create an Ingress resource. That’ll allow us to do path-based routing. Let’s take a look at the Ingress manifest, Ingress cat/dog. This is saying anything destined for the /cats path, let’s send it to the Flask service. Anything for /dogs, let’s send it to the Flask dogs service.
But that doesn’t mean we’re going to go to two different hosts. We’re going to still be able to go to andrew.megarantis.com. But depending on the path that we request, we’ll be forwarded to a different service. What we’ll do now is deploy our dog application. Flask app dog. We’ll make sure that’s running. Been created, and the last one is running. Let’s go ahead and apply the Ingress rule. This one. Ingress cat/dog. And now Ingress is created.
Because we already have the Ingress controller, this is the name of the Ingress controller, we have this pod up and running. It’s ready to enforce this rule. If we do describe Ingress called cat/dog Ingress, we should see that this is being served by the controller. This Ingress resource also has an address. Now it’s ready to be used. Let’s go back to here. Go to port A. Standard port. My browser doesn’t quite like the fact that it’s a standard port, but it doesn’t really recognize it. But we will proceed and ignore that error for now. Since I didn’t specify any path right now, we’re getting the default back here. That’s the desired behavior.
But if I specify cats, okay, I get my cat gif of the day. That’s our cat service. If I go to dogs, right, and I get our dog gif of the day. That’s the power of Ingress, having the single entry point on a standard port, but being able to do path-based as well as host-based routing. It’s very simple to do. And all it took was the deployment of the Ingress controller, as well as the Ingress rules that we created.
That’ll take a second just to delete all the resources. Afterwards, we’ll take a look at the installation of Istio using Helm charts. Just a few more seconds and our Ingress namespace should be deleted. There we go. The next step then is to download this repository. Now if you are following along from home, this is just a standard Istio version 119 that we’ve just downloaded from the Internet. It comes with these Helm charts. The first one we’re going to run is called Istio Init, and that’s going to initialize my custom resources.
And by custom resources, I mean if we do kubectl get CRV, Istio System…let’s see. That’s not the list I was looking for. If we do get CRD, you see that there’s a lot of these custom resources with the Istio suffix, and these are all related to Istio. This will allow us to then later on install Istio and have Istio manage these resources. The next Helm chart to run is the actual control plane components themselves.
This one will spawn all of the Istio control plane components with the following options: gateway type NodePort, Kiali-enabled, Prometheus-enabled, tracing, Grafana, and so on. Pretty much everything enabled. We’re going to run that. And that’ll take us a few moments to install as well. Eventually what we want to get at is Istio control plane and take a look at the Istio Ingress Gateway, and be able to forward traffic to our existing dog and cat apps. Instead of using NGINX, we want to us Envoy. It looks like it’s been deployed. Let’s look at the Istio system namespace.
A couple of my pods are still coming up. Some are still being created so let’s give it a moment. Hit the pods. Now the Ingress gateway is running. The sidecar injector is still being created, so is Prometheus. Prometheus is running, and Ingress gateway. We should have all pods now fairly quickly. The first thing I’ll do right now is if you take a look at my existing workload, they each have one container. But in an Istio-enabled environment, all of my workload pods should have two containers because each of them will run on Envoy’s sidecars.
And Istio makes it really easy to automatically enable injection, and that is the following. We’re going to label whatever namespace my workload is running at. In this case, it’s default. We’re going to put a label on it called Istio-injection is enabled. That’s not going to change anything just yet. What we need to do is actually delete the pods if they already exist, and we’ll just let the replica set controllers recreate the pods. And there are some dependencies between these applications.
The Redis should be up and running first. A couple minutes to wait for these pods to come back up.
Let’s take a look right now. We now have all the pods with two containers. If you describe them, you’ll be able to see what I’m talking about. Describe pod. You see that in the containers field. There is a new container called Istio proxy. That’s the one that is the side car which is handling your traffic or this pod. That is the Envoy container that’s running within the pod.
Our workload is ready to go with Istio. And so we’re going to go ahead and start working on the Ingress gateway of Istio. Now the Ingress gateway has already been deployed for you. If we go to Istio system namespace. You can see that we have an Istio Ingress gateway pod. Let me show you one thing. We’re going to edit the deployment spec of Istio and Redis gateway.
We’ll actually map the host port 80 to this pod directly, to the Ingress gateway directly. That way any traffic coming to the host will be forwarded to this gateway pod. Otherwise we would probably create something like a load balancer service, and then ensure that the load balancer forwards it to this gateway. But this is just one way of doing it, and this is for demo purposes. But we will put a host port here and save that, save that spec.
My virtual service will look like the following. It’ll utilize that gateway, but also we have a couple rules. The first part of the rule says if the user request header, user agent header, matches Chrome, then let’s send it to the dog service. Otherwise for any other request, let’s send it to the regular cat service. Let’s go ahead and apply those two resources on Kubernetes. kubectl apply. Cat/dog gateway. And apply dog Chrome virtual service.
We now have our gateway resource and the virtual service resource. If I go back to my website, just the root directory. I navigated to enter mirantis.com. My browser is actually forcing me into an HTTPS. What I’ll do is open the new incognito window and go to the site directly again. Because this is Chrome, I am getting dog gif of the day. If I open a new browser that is not Chrome, here’s Safari. Safari will get a cat gif of the day. This is all thanks to our VirtualService, which is routing our traffic to respective services. That is the power of VirtualService.
Let’s go ahead and do that. Edit service. Kiali. Change the type. The NodePort like so. And that service is live. Let me make sure that I have my secret. It’s called Kiali. Okay. I have my Kiali secret with the admin dashboard credentials. The location of Kiali is then a service, a service IP and then NodePort. So that NodePort/Kiali. Here’s that console. Login with admin. That’s from the secret that we created earlier.
What’s great about Kiali is we have various views we can select. Today’s focus will be on the graph view. We want to select the namespace, and a workload is that default namespace, so we’ll select that one. When no traffic is flowing, it doesn’t look particularly flashy. What we can do is actually run some commands to simulate traffic. We’ll do a while loop of curling the domain. And we will also curl as Chrome, on andrew.megarantis.com.
Let’s curl another resource. This time, we will pass on an invalid URL just to see what happens. While that’s going, it’s running some curl commands against my service, and shortly I will see some response from Kiali. What’s great about Kiali is I can see exactly where the failures are occurring. For example, my 400 errors, which is the path not found errors, are happening at the Flask service going to the Flask app.
We can see that our dog app is returning fine, so we know that we can pinpoint our efforts to debug into our Flask service and the Flask app. In fact, we want to cancel that for a sec. What we can do then is get the logs of one of our flask app deployments to see what is going on with this deployment. You could kubectl logs, not get logs. And we will select the flask app container.
Because we’ve been able to easily pinpoint where it is, we can see that a couple users have been pointing to this location called /invalid, otherwise our requests have been returned with 200. You can start to imagine as you have bigger applications, bigger microservices, more dependencies, this graph here will come in very handy. Even if you are an operator who is new to the team, new to the application, you can get a very good overview of what the architecture looks like.
For example, we can see here that our cat application actually retrieves from Redis, whereas our dog application does not. The dog gif URLs are embedded in this HTML, whereas the Flask app is not. So that’s all I wanted to show for today. Thank you for watching.
Nick Chase: All right. Thank you.
Andrew Lee: I found that in the demo environment, specifically, it was pretty intensive for me. Let’s take a look. We can do describe node. Right now, it’s using about two virtual CPUs and about 70 percent of my provision memory. I found it to be pretty intensive to run additional control plane component, but of course it will help to have your additional Kubernetes nodes. But your master nodes may become quite a bit larger because of the additional control plane components you’re deploying.
Andrew Lee: No. We talked about some of the alternatives, like Ambassador is a product where it’s still using Envoy, but it’s just a different control plane component. Istio is not the only way. There are definitely alternatives on the market.
Andrew Lee: “Envoy is more feature-rich than NGINX. It’s not as blocked behind the paywall, it’s more community-driven. Many big companies like Google and Lyft are adopting Envoy and contributing back to its code. This is a great ecosystem to get into. When we talked about advanced routing rules, the tracing, the metrics view that we saw in Kiali, these are all available because of Envoy’s features
Nick Chase: You said that Envoy is more feature-rich. Could you give us some examples of that?
Andrew Lee: Some of these metrics that we’re gathering about how much traffic is being sent, for example, the request percentage, these are all kept track by Envoy. Because Envoy is right at the data plane and it is the medium in which your microservices communicate with each other, it can see all the communication channels between all of your services.
Whereas with just pure Kubernetes, maybe that you want to, you’ll have to install some additional metrics toolsets in order to see this kind of info. And the same thing applies to the edge. If you just had NGINX, well, maybe you don’t have as much visibility and features as Envoy.
Andrew Lee: That’s a similar question as one before. There’s alternatives to Istio. Another one that I found is called Contour. So without having other custom resource definitions from Istio, Contour is a good project. We’re still using Envoy proxy, but it’s going to be implemented in a different way than Istio. So it’s a little bit more lighter weight. If that’s what you’re looking for, then maybe that’s a good option for you to look at.
Alternatively, you can leverage Istio and take advantage of its more feature-rich Ingress Gateway resource, even if your application Pods themselves are not running purely Kubernetes. We can do so by incrementally adopting Istio’s feature: Ingress Gateway, which uses Envoy proxy as the gateway (as opposed to NGINX). We explore these two approaches in the following webinar, which include demos so you can see how Istio helps manage your ingress traffic.
Webinar Transcript
Andrew Lee: Hello, everyone. Thank you for joining. My name is Andrew. I’m the technical instructor here at Mirantis. I’ve been in our training team for the past four years. And more recently we have been delivering Kubernetes courses. So we have our Istio course, our first Istio course coming up, and we wanted to give you some overview about some of the features of Istio, which is at today’s topic, Istio Ingress versus Kubernetes Ingress. So please enjoy the presentation.
What is Kubernetes Ingress and the Ingress Controller
Andrew Lee: Today we’re going to have a short presentation, about 10 to 15 minutes, about what is Ingress, specifically the Kubernetes Ingress and the Ingress Controller. And then we’ll discuss Istio’s version of Ingress, which is called Gateway. After we have this discussion, I’m going to spend the rest of the time doing a demo of these two topics.Entry point for your application
First we have to understand what is Kubernetes Ingress. There are many ways to expose your app in Kubernetes. If you have just started using Kubernetes, maybe you’re familiar with a NodePort type of service. So you get your node up and running, and you expose a port on that node, which maps your service, which then maps to your pod. In a more advanced scenario, you may have deployed a load balancer type service using your call provider, or even a Ingress with the Ingress Controller.We will look at these three types just in case you’re not familiar with them. Here’s what a NodePort entry point for your app might look like. From the Internet, I can access my Kubernetes node. And when I create a service type NodePort, it takes one of the ports from all of my Kubernetes nodes. It’s showing one in this diagram, but all your nodes will have this node port taken. Now when I talk to this node IP on this NodePort, by the power of IP tables, my request is forwarded to my application container.
Entry point for your Application: NodePort
It’s a very simple and easy way to get up and running to expose your app. Now the problem comes when we start looking at what are my end users seeing? I have this really cool application. And then I tell my users, my app is available at 52.14.21.152:30126. Obviously that’s not an ideal scenario to give to your end users. One of the issues is that it’s not a standard port range. The default port range for this NodePort is 30000, so we will have about 32000.
NodePort Limitations
The other one is we can give one NodePort per service. I just have one application exposed. If I had another one, I would have to create another NodePort service to expose that set of pods. Is this limitation is typically not for production use. Looking at Ingress, we still have our traffic coming into the node except now our Ingress Controller, which is a pod in this case, is going to be the one doing the proxy. And that proxy is choosing which service to forward the user traffic to.
Entrypoint for your Application: Ingress
In this case, I now have two applications, service A and B. And you specify some rules about how to forward traffic to its service, and that’s called Ingress. In fact there’s many components to Kubernetes Ingress that we’ll look at. One being the Ingress rule itself, and then the controller that is actually doing the forwarding. In a full-blown production environment, we just wanted to give you an idea about the architecture.
Typically you’ll have some load balancer, which is the single-point-of-entry for users. That load balancer will pick one of your Kubernetes worker nodes, and then your Ingress Controller will be exposed through that load balancer service. But what we’re going to do in the demo today will look more like this previous diagram where we exposed a host port. When I talk to the host port, I’m actually talking to the Ingress Controller. Keep that in mind.
Kubernetes Ingress Advantages
What’s great about Ingress is that we can do path and host-based routing. I mentioned earlier that we can define how our traffic can be routed to service A or B. Well, if service A is some blog application and service B is some shopping cart, I can say if a request comes in for my site.com/blog, let’s send it to service A.
That comes from the Ingress rule. If it comes in for my site.com/shop. Let’s send it to service B. That’s defined through the rules, and we can just expose one port, and depending on the user request, we can send it to the correct service. Multiple services behind a single cloud load balancer. And that’s the key. To do this, you need three components. We have our Ingress rule, which is the Kubernetes’s resource where we define that path-based routing.
We’ll see shortly in the lab with the Ingress Controller, which is the actual pod doing the proxy. The most common and recommended tool for that proxy is NGINX. Otherwise if you’re using cloud providers, they may actually implement this Ingress Controller in some different way in conjunction with a load balancer. This acts on the Ingress definitions provided. And then the default backend is where if none of the rules match, if the request doesn’t match any rules, it will be sent to this backend pod.
Kubernetes Ingress has some limitations. Out of the box, if I don’t get some NGINX Plus subscription, there are limited observability toolsets available to my Kubernetes cluster. There’s also no good way to do advanced traffic controls or release strategies. So if you think about, let’s send 10% of my traffic to version two, and 90% to version one, there’s no way to specify percent-based releases.
Istio Ingress Gateway
So you have some limited capabilities about traffic control. Also there’s no service resiliency features either. Keeping that in mind, let’s take a look at Istio and how it can solve some of those shortcomings. Primarily Istio is the control plane for Envoy, and that’s the way I like to think about Istio. And Envoy is going to be our proxy for the Ingress gateway.
Think about Envoy as sort of the direct replacement for NGINX, Envoy being more feature-rich. Let’s put Envoy at the edge and then Istio controls and programs Envoy. Rather than having an Ingress Controller here, we now have a resource called Istio Ingress Gateway, which is another pod with an Envoy container running. And this Gateway is program is by creating a Gateway Kubernetes resource, and VirtualService Kubernetes resource. Now these are each defined as a custom resource, and we'll also see that in the demo.
In similar fashion, we have service A and B where we define the rules about how to forward traffic to which service. We can also specify percent-based traffic routing as well. What I’ve done here is highlight or put an Envoy in application A as well. If you’re not familiar with Istio, you will have a sidecar container in every pod in your workload.
In fact, all of my application pods will have this Envoy container inside. That’s going to be your data plane. We’ll see why in just a little bit later. To utilize the Istio and Ingress Gateway, you need three resources. You need the gateway resource. This is a custom resource definition where you configure ports, the protocol certificates, if any, as well as a VirtualService. This is where you define your routes.
The VirtualService is very similar to the Ingress Kubernetes resource we saw earlier, so it will be a replacement to that resource. And then lastly is your Ingress Gateway, which is the pod with Envoy. That does the routing. Ingress Gateway is a replacement for a Ingress Controller in the native Kubernetes.

Istio Gateway Advantages
The advantages are that Envoy can handle layer seven traffic. So can Ingress, but Envoy has additional advanced features as listed here.
Things like more advanced routing rules, percent-based routing distributed tracing, limiting the rate of traffic, checking policies. One of the very important feature sets of Istio is that we’re able to observe our microservices better, more holistically. Metrics collection is also very simple when you have Envoy. It also natively supports gRPC. If your applications use gRPC to communicate, then Envoy and Istio is a good choice.
Secondly, there is dynamic configuration. No longer do you update a config map and then restart your pod. Envoy has a feature called hot reload where you don’t have to drop any traffic before loading a new config. Lastly, Ingress rules are also supported.
Istio Gateway Disadvantages and Alternatives
One disadvantages you may think of is that it requires yet another control plane component.
Envoy by itself, you can use it as a data plane component. But it’s easier to do so with a control plane like Istio. It requires you to learn this new tool and new commands, and how it works. Another thing is that if you talk to a company or product like Ambassador, they’ll say, “Well, Istio is primarily for internal traffic management. It’s for your service mesh. It’s not specialized or exposing traffic to the outside. It’s not for north to south, rather it’s more specialized for east-to-west communication.” So that may be a disadvantage.
Some alternatives. There are toolsets called API Gateways, which do specialize in this north to south edged traffic chart. Ambassador, and you may have heard of Traefik or Kong. Now these are mainly commercial products, whereas Istio and Envoy specifically is a completely open source product under the CNCF.
Installation and Configuration of Kubernetes Ingress Demo
Let’s take a look at the demo overview.We’re going to have an application which gives us some cat gif. We’re going to progressively expose it by better and better methods. We’ll start with NodePort, and then we’ll move on to Kubernetes Ingress, and we’ll take a look at what domain name is configured. And we will live install and configure Istio into our Kubernetes node. Lastly, we’ll look at the Istio Ingress Gateway. As a bonus, we’ll take a look at what observability features are available using Istio.
Here I have my environment. This is just a single node Kubernetes deployment. Right now, there’s nothing deployed on here except the Kubernetes control plane. If we do get the pods the kube system, we have our Kubernetes components running. What I’m going to do is navigate to the manifest directory. And here I have an application called Flask that’s ready to be deployed.
The basics of this app, it’s very simple. We have a frontend Flask service, which serves the Flask app pod. It’s a Python code which retrieves cat gif URLS from Redis. We’ll go ahead and deploy this and see what it looks like. The first thing we’re going to deploy is the backend to make the cat gifs available. We’ll apply the Redis app first. While it’s deploying, let’s take a look at the deployment spec. There you can see a service type cluster IP.
This Redis service does not need to be exposed outside, so cluster IP type is fine. Now we have a deployment of the Redis app. We’re going to have a mounted volume, which then is going to serve a Redis configuration that we passed in a config map earlier. This is not part of the recording, but I have created this config map with the Redis com inside. Let’s take a look at that pod. It’s up and running.
Deploying Our Flask App Deployment
Let’s go ahead and deploy our Flask app deployment.The Flask app deployment yaml contains the NodePort type service, which we will use to access this application, as well as the Flask app container. Let’s look at our pods now. Now we have our Flask deployment and the Redis deployment running. What that means is we can now go to get services, and we’ll notice that our Flask service has a node port associated to it. That means if I go to my IP address, which I have assigned a domain name for.
It’s andrew.megarantis.com, and I go to the port 32015, which matches the NodePort, then I should get my application. This is my cat application, later we’ll deploy the dog. For now we just have a cat application. Later, we’ll deploy a dog gif. But for now, we just have the cat gif of the day. That’s a very simple way to get up and running with Kubernetes to expose my application.
But as we discussed, one of the issues is this is not a standard port. We must have different ports for different applications. Now what we’ll do is create an Ingress resource. That’ll allow us to do path-based routing. Let’s take a look at the Ingress manifest, Ingress cat/dog. This is saying anything destined for the /cats path, let’s send it to the Flask service. Anything for /dogs, let’s send it to the Flask dogs service.
But that doesn’t mean we’re going to go to two different hosts. We’re going to still be able to go to andrew.megarantis.com. But depending on the path that we request, we’ll be forwarded to a different service. What we’ll do now is deploy our dog application. Flask app dog. We’ll make sure that’s running. Been created, and the last one is running. Let’s go ahead and apply the Ingress rule. This one. Ingress cat/dog. And now Ingress is created.
Because we already have the Ingress controller, this is the name of the Ingress controller, we have this pod up and running. It’s ready to enforce this rule. If we do describe Ingress called cat/dog Ingress, we should see that this is being served by the controller. This Ingress resource also has an address. Now it’s ready to be used. Let’s go back to here. Go to port A. Standard port. My browser doesn’t quite like the fact that it’s a standard port, but it doesn’t really recognize it. But we will proceed and ignore that error for now. Since I didn’t specify any path right now, we’re getting the default back here. That’s the desired behavior.
But if I specify cats, okay, I get my cat gif of the day. That’s our cat service. If I go to dogs, right, and I get our dog gif of the day. That’s the power of Ingress, having the single entry point on a standard port, but being able to do path-based as well as host-based routing. It’s very simple to do. And all it took was the deployment of the Ingress controller, as well as the Ingress rules that we created.
Deploying and Creating Ingress Rules for Istio
So how do we go about deploying and creating Ingress rules for Istio? What we’re going to do is first take a look at the Ingress and NGINX namespace. This Ingress, default Ingress and NGINX will actually interfere with Istio Ingress Gateway. It’s going to try to take the same port 80 from the host. We’re going to just get rid of this namespace entirely as well to meet the Ingress resource. Do some housekeeping clean-up with Ingress. We’ll delete the cat/dog Ingress, and then we’ll delete the Ingress namespace as well. Ingress and NGINX.That’ll take a second just to delete all the resources. Afterwards, we’ll take a look at the installation of Istio using Helm charts. Just a few more seconds and our Ingress namespace should be deleted. There we go. The next step then is to download this repository. Now if you are following along from home, this is just a standard Istio version 119 that we’ve just downloaded from the Internet. It comes with these Helm charts. The first one we’re going to run is called Istio Init, and that’s going to initialize my custom resources.
And by custom resources, I mean if we do kubectl get CRV, Istio System…let’s see. That’s not the list I was looking for. If we do get CRD, you see that there’s a lot of these custom resources with the Istio suffix, and these are all related to Istio. This will allow us to then later on install Istio and have Istio manage these resources. The next Helm chart to run is the actual control plane components themselves.
This one will spawn all of the Istio control plane components with the following options: gateway type NodePort, Kiali-enabled, Prometheus-enabled, tracing, Grafana, and so on. Pretty much everything enabled. We’re going to run that. And that’ll take us a few moments to install as well. Eventually what we want to get at is Istio control plane and take a look at the Istio Ingress Gateway, and be able to forward traffic to our existing dog and cat apps. Instead of using NGINX, we want to us Envoy. It looks like it’s been deployed. Let’s look at the Istio system namespace.
A couple of my pods are still coming up. Some are still being created so let’s give it a moment. Hit the pods. Now the Ingress gateway is running. The sidecar injector is still being created, so is Prometheus. Prometheus is running, and Ingress gateway. We should have all pods now fairly quickly. The first thing I’ll do right now is if you take a look at my existing workload, they each have one container. But in an Istio-enabled environment, all of my workload pods should have two containers because each of them will run on Envoy’s sidecars.
And Istio makes it really easy to automatically enable injection, and that is the following. We’re going to label whatever namespace my workload is running at. In this case, it’s default. We’re going to put a label on it called Istio-injection is enabled. That’s not going to change anything just yet. What we need to do is actually delete the pods if they already exist, and we’ll just let the replica set controllers recreate the pods. And there are some dependencies between these applications.
The Redis should be up and running first. A couple minutes to wait for these pods to come back up.
Let’s take a look right now. We now have all the pods with two containers. If you describe them, you’ll be able to see what I’m talking about. Describe pod. You see that in the containers field. There is a new container called Istio proxy. That’s the one that is the side car which is handling your traffic or this pod. That is the Envoy container that’s running within the pod.
Our workload is ready to go with Istio. And so we’re going to go ahead and start working on the Ingress gateway of Istio. Now the Ingress gateway has already been deployed for you. If we go to Istio system namespace. You can see that we have an Istio Ingress gateway pod. Let me show you one thing. We’re going to edit the deployment spec of Istio and Redis gateway.
We’ll actually map the host port 80 to this pod directly, to the Ingress gateway directly. That way any traffic coming to the host will be forwarded to this gateway pod. Otherwise we would probably create something like a load balancer service, and then ensure that the load balancer forwards it to this gateway. But this is just one way of doing it, and this is for demo purposes. But we will put a host port here and save that, save that spec.
Configuring the Istio Gateway
All right. Our Ingress gateway pod is set up. What we’ll do next is start configuring the gateway. So let’s go back to our Manifest directory. In order to use Istio gateway, you need to create both a Gateway spec and a VirtualService spec. Gateway will configure my host and port for this pod, and then VirtualService will configure the rules. I have both of those here. My cat/dog gateway will expose port 80 protocol HTTP, and my host name will be andrew.megarantis.com.My virtual service will look like the following. It’ll utilize that gateway, but also we have a couple rules. The first part of the rule says if the user request header, user agent header, matches Chrome, then let’s send it to the dog service. Otherwise for any other request, let’s send it to the regular cat service. Let’s go ahead and apply those two resources on Kubernetes. kubectl apply. Cat/dog gateway. And apply dog Chrome virtual service.
We now have our gateway resource and the virtual service resource. If I go back to my website, just the root directory. I navigated to enter mirantis.com. My browser is actually forcing me into an HTTPS. What I’ll do is open the new incognito window and go to the site directly again. Because this is Chrome, I am getting dog gif of the day. If I open a new browser that is not Chrome, here’s Safari. Safari will get a cat gif of the day. This is all thanks to our VirtualService, which is routing our traffic to respective services. That is the power of VirtualService.
How to Retrieve the Kiali Dashboard
The last thing that we kind of looked at in the live demo, what I want to show you again just in case is to retrieve the Kiali dashboard. Kiali will allow us to visualize our microservices. As a bonus, let’s take a look at the Kiali observability tool. I would just expose it as a NodePort.Let’s go ahead and do that. Edit service. Kiali. Change the type. The NodePort like so. And that service is live. Let me make sure that I have my secret. It’s called Kiali. Okay. I have my Kiali secret with the admin dashboard credentials. The location of Kiali is then a service, a service IP and then NodePort. So that NodePort/Kiali. Here’s that console. Login with admin. That’s from the secret that we created earlier.
What’s great about Kiali is we have various views we can select. Today’s focus will be on the graph view. We want to select the namespace, and a workload is that default namespace, so we’ll select that one. When no traffic is flowing, it doesn’t look particularly flashy. What we can do is actually run some commands to simulate traffic. We’ll do a while loop of curling the domain. And we will also curl as Chrome, on andrew.megarantis.com.
Let’s curl another resource. This time, we will pass on an invalid URL just to see what happens. While that’s going, it’s running some curl commands against my service, and shortly I will see some response from Kiali. What’s great about Kiali is I can see exactly where the failures are occurring. For example, my 400 errors, which is the path not found errors, are happening at the Flask service going to the Flask app.
We can see that our dog app is returning fine, so we know that we can pinpoint our efforts to debug into our Flask service and the Flask app. In fact, we want to cancel that for a sec. What we can do then is get the logs of one of our flask app deployments to see what is going on with this deployment. You could kubectl logs, not get logs. And we will select the flask app container.
Because we’ve been able to easily pinpoint where it is, we can see that a couple users have been pointing to this location called /invalid, otherwise our requests have been returned with 200. You can start to imagine as you have bigger applications, bigger microservices, more dependencies, this graph here will come in very handy. Even if you are an operator who is new to the team, new to the application, you can get a very good overview of what the architecture looks like.
For example, we can see here that our cat application actually retrieves from Redis, whereas our dog application does not. The dog gif URLs are embedded in this HTML, whereas the Flask app is not. So that’s all I wanted to show for today. Thank you for watching.
Nick Chase: All right. Thank you.
Questions and Answers for Istio Ingress Gateway vs. Kubernetes Ingress
I see we’ve got a bunch of questions.Question: “How resource-intensive is it to run Istio in your Kubernetes cluster?”
Andrew Lee: I found that in the demo environment, specifically, it was pretty intensive for me. Let’s take a look. We can do describe node. Right now, it’s using about two virtual CPUs and about 70 percent of my provision memory. I found it to be pretty intensive to run additional control plane component, but of course it will help to have your additional Kubernetes nodes. But your master nodes may become quite a bit larger because of the additional control plane components you’re deploying.
Question: “Is the only way to have Envoy proxy at the edge?”
Andrew Lee: No. We talked about some of the alternatives, like Ambassador is a product where it’s still using Envoy, but it’s just a different control plane component. Istio is not the only way. There are definitely alternatives on the market.
Question: “If the main difference between Kubernetes, Ingress, and Istio Ingress is NGINX versus Envoy, why is Envoy better?”
Andrew Lee: “Envoy is more feature-rich than NGINX. It’s not as blocked behind the paywall, it’s more community-driven. Many big companies like Google and Lyft are adopting Envoy and contributing back to its code. This is a great ecosystem to get into. When we talked about advanced routing rules, the tracing, the metrics view that we saw in Kiali, these are all available because of Envoy’s features
Nick Chase: You said that Envoy is more feature-rich. Could you give us some examples of that?
Andrew Lee: Some of these metrics that we’re gathering about how much traffic is being sent, for example, the request percentage, these are all kept track by Envoy. Because Envoy is right at the data plane and it is the medium in which your microservices communicate with each other, it can see all the communication channels between all of your services.
Whereas with just pure Kubernetes, maybe that you want to, you’ll have to install some additional metrics toolsets in order to see this kind of info. And the same thing applies to the edge. If you just had NGINX, well, maybe you don’t have as much visibility and features as Envoy.
Question: “Could you just use Envoy as the Ingress Controller without Istio?”
Andrew Lee: That’s a similar question as one before. There’s alternatives to Istio. Another one that I found is called Contour. So without having other custom resource definitions from Istio, Contour is a good project. We’re still using Envoy proxy, but it’s going to be implemented in a different way than Istio. So it’s a little bit more lighter weight. If that’s what you’re looking for, then maybe that’s a good option for you to look at.
