
Docker Run: How to create a Docker image for an application
Nick Chase - January 01, 2011
Whether you’re just getting started containerizing applications or you’re diving deeper into Kubernetes development, knowing how to create your first Docker images for applications is an essential skill. In this guide, you'll learn how to create Docker images so you can deploy your own applications and make them available to other people.
The key to a Docker image is that it's a layered file system. In other words, if you start out with an image that's just the operating system (say Windows) and then add an application (say Nginx), you'll wind up with something like this:
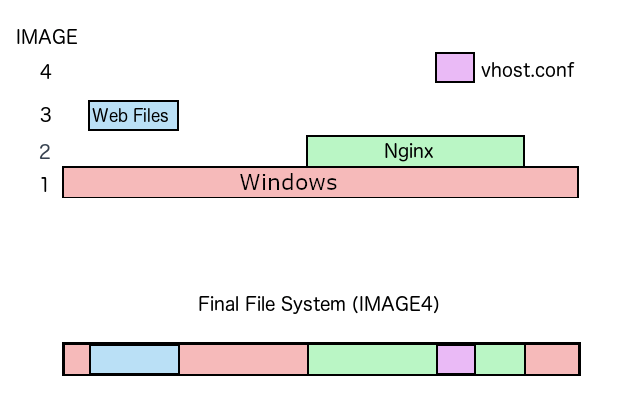
As you can see, the difference between IMAGE1 and IMAGE2 is just the application itself, and then IMAGE4 has the changes made on layers 3 and 4. So in order to create an image, you are basically starting with a base image and defining the changes to it.
I hear you asking, "But what if I want to start from scratch?" Well, let's define "from scratch." Chances are, you mean that you want to start with a clean operating system and go from there. Well, in most cases there's a base image already available to do exactly that.
But maybe you want to spin up a bare-bones foundation for your new container...using Docker’s scratch image. In that case, skip forward to the Using a Dockerfile section. (For further information on creating a Docker base image, including instructions on using tar to package a parent image, check out the Docker docs.)
Go to the command line where you have Docker installed and log in to the Docker Hub:
A couple of notes here. First off, because we didn't specify a particular name for the container, Docker assigned one. In this example, it's small_bassi. Second, notice that there are 3 open ports: 80, 443, and 9000, and that they've been mapped to other ports (in this case 32822, 32821, and 32820, respectively -- on your machine these ports will be different). This makes it possible for multiple containers to be "listening" on the same port on the same host machine. So if we were to try and access a web page hosted by this container, we'd do it by accessing:
http://localhost:32822
So far, though, there aren't any pages to access. Let's fix that.
For example, suppose I wanted a container that always takes the latest version of a Linux operating system, such as the Ubuntu operating system, and builds on that. The previous method doesn't give us that advantage.
Instead, we can use a method called the Dockerfile, which enables us to specify a particular version of a base image, or specify that we want to always use the latest version.
You can also use Dockerfiles to specify other attributes of containers and images. For example, let's say we want to create a version of the rss-php-nginx container that starts with v1 but serves on port 88 (rather than the traditional 80). To do that, we basically want to perform three steps:
Let's get that set up.
In previous guides, we looked at how to deploy Kubernetes and create a cluster. We also looked at how to deploy an application on the cluster environment and configure OpenStack instances (including security) to help you access them.
In our next tutorial, we’ll look at using YAML to manage containers with Kubernetes.
Table of Contents
- How Docker images work
- How do I create a Docker image?
- Creating a new Docker image from an existing container
- Using a Dockerfile
- Additional Mirantis Docker image resources
- Moving forward
How Docker images work
Before learning to create Docker images, the first thing that we need to understand is how Docker images themselves work.The key to a Docker image is that it's a layered file system. In other words, if you start out with an image that's just the operating system (say Windows) and then add an application (say Nginx), you'll wind up with something like this:

As you can see, the difference between IMAGE1 and IMAGE2 is just the application itself, and then IMAGE4 has the changes made on layers 3 and 4. So in order to create an image, you are basically starting with a base image and defining the changes to it.
I hear you asking, "But what if I want to start from scratch?" Well, let's define "from scratch." Chances are, you mean that you want to start with a clean operating system and go from there. Well, in most cases there's a base image already available to do exactly that.
But maybe you want to spin up a bare-bones foundation for your new container...using Docker’s scratch image. In that case, skip forward to the Using a Dockerfile section. (For further information on creating a Docker base image, including instructions on using tar to package a parent image, check out the Docker docs.)
How do I create a Docker image?
In this guide, we’re going to look at two methods for creating a new Docker image:- Create a Docker image from an existing container: In this case, you start with an existing image, customize it with the changes you want, then build a new image from it.
- Use a Dockerfile: In this case, you use a file of instructions -- the Dockerfile -- to specify the base image and the changes you want to make to it.
Creating a new Docker image from an existing container
When it comes to Docker, getting started can be pretty straightforward. In this example, we're going to start with an image that includes the nginx web application server and PHP. To that, we're going to add support for reading RSS data using an open-source package called SimplePie (available for download at GitHub). We'll then make a new image out of the altered container.Set up Docker and Docker Hub
The very first step is to make sure that your system has Docker Engine installed. For Windows and Mac users, the process has changed with the introduction of Docker Desktop. You can follow the instructions here to install Docker.Next, you’ll need to get the base image. For this tutorial, that’s webdevops/php-nginx, which you can find in the Docker Hub repository — in order to “pull” it, you’ll need a Docker Hub ID. If you don’t have one already, go to https://hub.docker.com and create a free account.Create the original Docker container
The first thing we need to do is instantiate the original base image, or have Docker create a container from an image.Go to the command line where you have Docker installed and log in to the Docker Hub:
# docker login
Login with your Docker ID to push and pull images from Docker Hub. If you don't have a Docker ID, head over to https://hub.docker.com to create one.
Username: nickchase
Password:
Login Succeeded
We're going to start with the base image and have Docker start a container. Instantiate webdevops/php-nginx:
# docker run -dP webdevops/php-nginxThe -dP flag makes sure that the container runs in the background, and that the ports on which it listens are made available.Make sure the container is running:# docker ps CONTAINER ID IMAGE COMMAND CREATED STATUS PORTS NAMES 1311034ca7dc webdevops/php-nginx "/opt/docker/bin/entr" 35 seconds ago Up 34 seconds 0.0.0.0:32822->80/tcp, 0.0.0.0:32821->443/tcp, 0.0.0.0:32820->9000/tcp small_bassi
A couple of notes here. First off, because we didn't specify a particular name for the container, Docker assigned one. In this example, it's small_bassi. Second, notice that there are 3 open ports: 80, 443, and 9000, and that they've been mapped to other ports (in this case 32822, 32821, and 32820, respectively -- on your machine these ports will be different). This makes it possible for multiple containers to be "listening" on the same port on the same host machine. So if we were to try and access a web page hosted by this container, we'd do it by accessing:
http://localhost:32822
So far, though, there aren't any pages to access. Let's fix that.
Create a file on the container
In order for us to test this container, we need to create a sample PHP file. We'll do that by logging into the container and creating a file.- Login to the container
# docker exec -it small_bassi /bin/bash
root@1311034ca7dc:/#
Using exec with the -it switch creates an interactive session for you to execute commands directly within the container. In this case, we're executing /bin/bash, so we can do whatever else we need to. - The document root for the nginx server in this container is at /app, so go ahead and create the /app/index.php file:
vi /app/index.php - Add a simple PHP routine to the file and save it:
<?php
for ($i; $i < 10; $i++){
     echo "Item number ".$i."\n";
}
?>
- Now exit the container to go back to the main command line:
root@1311034ca7dc:/# exit - Now let's test the page. To do that, execute a simple curl command:
# curl http://localhost:32822/index.php
Item number
Item number 1
Item number 2
Item number 3
Item number 4
Item number 5
Item number 6
Item number 7
Item number 8
Item number 9
Make changes to the container
Now that we know PHP is working we can go ahead and add RSS support using the SimplePie package. To do that, we'll simply download it to the container and install it.- The first step is to log back into the container:
# docker exec -it small_bassi /bin/bash
root@1311034ca7dc:/#
- Next go ahead and use curl to download the package, saving it as a zip file:
root@1311034ca7dc:/# curl https://codeload.github.com/simplepie/simplepie/zip/1.4.3 > simplepie1.4.3.zip - Now you need to install it. To do that, unzip the package, create the appropriate directories, and copy the necessary files into them as follows:
root@1311034ca7dc:/# unzip simplepie1.4.3.zip
root@1311034ca7dc:/# mkdir /app/php
root@1311034ca7dc:/# mkdir /app/cache
root@1311034ca7dc:/# mkdir /app/php/library
root@1311034ca7dc:/# cp -r s*/library/* /app/php/library/.
root@1311034ca7dc:/# cp s*/autoloader.php /app/php/.
root@1311034ca7dc:/# chmod 777 /app/cache
- Now we just need a test page to make sure that it's working. Create a new file in the /app directory:
root@1311034ca7dc:/# vi /app/rss.php - Now add the content for the sample file. (This file is excerpted from the SimplePie website, but I've cut it down for brevity's sake, since it's not really the focus of what we're doing. Please see the original version for explanatory line comments.)
<?php
require_once('php/autoloader.php');
$feed = new SimplePie();
$feed->set_feed_url("http://rss.cnn.com/rss/edition.rss");
$feed->init();
$feed->handle_content_type();
?>
<html>
<head><title>Sample SimplePie Page</title></head>
<body>
 <div class="header">
 <h1><a href="<?php echo $feed->get_permalink(); ?>"><?php echo $feed->get_title(); ?></a></h1>
 <p><?php echo $feed->get_description(); ?></p>
 </div>
 <?php foreach ($feed->get_items() as $item): ?>
 <div class="item">
 <h2><a href="<?php echo $item->get_permalink(); ?>"><?php echo $item->get_title(); ?></a></h2>
 <p><?php echo $item->get_description(); ?></p>
 <p><small>Posted on <?php echo $item->get_date('j F Y | g:i a'); ?></small></p>
 </div>
 <?php endforeach; ?>
</body>
</html>
- Exit the container:
root@1311034ca7dc:/# exit - Let's make sure it's working. Remember, we need to access the container on the alternate port (check docker ps to see what ports you need to use):
# curl http://localhost:32822/rss.php
<html>
<head><title>Sample SimplePie Page</title></head>
<body>
        <div class="header">
                <h1><a href="http://www.cnn.com/intl_index.html">CNN.com - RSS Channel - Intl Homepage - News</a></h1>
                <p>CNN.com delivers up-to-the-minute news and information on the latest top stories, weather, entertainment, politics and more.</p>
        </div>
...
Create the new image
Let's look at how to create a Docker image from the container. We have a working container and we want to turn it into an image and push it to Docker Hub so community users can access it. The name you'll use for your container typically will have three parts:[username]/[imagename]:[tags]For example, my Docker Hub username is nickchase, so I am going to name version 1 of my new RSS-ified containernickchase/rss-php-nginx:v1- If you started to think about version control systems when we first discussed the differences between layers, you were right on target. The first step in creating a new image is to commit the changes that we've already made, adding a message about the changes and specifying the author, as in:
docker commit -m "Message" -a "Author Name" [containername] [imagename]So in my case, that will be:# docker commit -m "Added RSS" -a "Nick Chase" small_bassi nickchase/rss-php-nginx:v1 sha256:148f1dbceb292b38b40ae6cb7f12f096acf95d85bb3ead40e07d6b1621ad529e
- Next we want to go ahead and push the new image to the Docker Hub so we can use it:
# docker push nickchase/rss-php-nginx:v1
The push refers to a repository [docker.io/nickchase/rss-php-nginx]
69671563c949: Pushed
3e78222b8621: Pushed
5b33e5939134: Pushed
54798bfbf935: Pushed
b8c21f8faea9: Pushed
...
v1: digest: sha256:48da56a77fe4ecff4917121365d8e0ce615ebbdfe31f48a996255f5592894e2b size: 3667
- Now if you list the images that are available, you should see it in the list:
# docker images
REPOSITORY                TAG                 IMAGE ID            CREATED             SIZE
nickchase/rss-php-nginx   v1                  148f1dbceb29        11 minutes ago      677 MB
nginx                     latest              abf312888d13        3 days ago          181.5 MB
webdevops/php-nginx       latest              93037e4c8998        3 days ago          675.4 MB
ubuntu                    latest              e4415b714b62        2 weeks ago         128.1 MB
hello-world               latest              c54a2cc56cbb        5 months ago        1.848 kB
- Now let's go ahead and test it. We'll start by stopping the original container so we can remove the local copy of the image:
# docker stop small_bassi
# docker rm small_bassi
- Now we can remove the image itself:
# docker rmi nickchase/rss-php-nginx:v1
Untagged: nickchase/rss-php-nginx:v1
Untagged: nickchase/rss-php-nginx@sha256:0a33c7a25a6d2db4b82517b039e9e21a77e5e2262206fdcac8b96f5afa64d96c
Deleted: sha256:208c4fc237bb6b2d3ef8fa16a78e105d80d00d75fe0792e1dcc77aa0835455e3
Deleted: sha256:d7de4d9c00136e2852c65e228944a3dea3712a4e7bcb477eb7393cd309be179b
- If you run docker images again, you'll see that it's gone:
# docker images
REPOSITORY                TAG                 IMAGE ID            CREATED             SIZE
nginx                     latest              abf312888d13        3 days ago          181.5 MB
webdevops/php-nginx       latest              93037e4c8998        3 days ago          675.4 MB
ubuntu                    latest              e4415b714b62        2 weeks ago         128.1 MB
hello-world               latest              c54a2cc56cbb        5 months ago        1.848 kB
- Now if you create a new container based on this image, you will see Docker download it from the Docker Hub:
# docker run -dP nickchase/rss-php-nginx:v1 - Finally, test the new container by getting the new port...
# docker ps
CONTAINER ID        IMAGE                        COMMAND                  CREATED             STATUS              PORTS                                                                    NAMES
13a423324d80        nickchase/rss-php-nginx:v1   "/opt/docker/bin/entr"   6 seconds ago       Up 5 seconds        0.0.0.0:32825->80/tcp, 0.0.0.0:32824->443/tcp, 0.0.0.0:32823->9000/tcp   goofy_brahmagupta
- ... and accessing the rss.php file.
curl http://localhost:32825/rss.php

Using a Dockerfile
Manually creating a new image from an existing container gives you a lot of control, but it does have one downside. If the base container gets updated, you're not necessarily going to have the benefits of those changes.For example, suppose I wanted a container that always takes the latest version of a Linux operating system, such as the Ubuntu operating system, and builds on that. The previous method doesn't give us that advantage.
Instead, we can use a method called the Dockerfile, which enables us to specify a particular version of a base image, or specify that we want to always use the latest version.
You can also use Dockerfiles to specify other attributes of containers and images. For example, let's say we want to create a version of the rss-php-nginx container that starts with v1 but serves on port 88 (rather than the traditional 80). To do that, we basically want to perform three steps:
- Start with the desired base container.
- Tell Nginx to listen on port 88 rather than 80.
- Let Docker know that the container listens on port 88.
Let's get that set up.
- Create a working directory in which to build your new container. What you call it is completely up to you. I called mine k8stutorial.
- From the command line, in the local context, start by instantiating the image so we have something to work from:
# docker run -dP nickchase/rss-php-nginx:v1 - Now get a copy of the existing vhost.conf file. In this particular container, you can find it at /opt/docker/etc/nginx/vhost.conf.
# docker cp amazing_minksy:/opt/docker/etc/nginx/vhost.conf .Note that I have a new container named amazing_minsky to replace small_bassi. At this point you should have a copy of vhost.conf in your local directory -- so in my case, it would be ~/k8stutorial/vhost.conf. - You now have a local copy of the vhost.conf file. Using a text editor, open the file and specify that nginx should be listening on port 88 rather than port 80:
server {
    listen   88 default_server;
    listen 8000 default_server;
    server_name  _ *.vm docker;
...
- Next, we want to go ahead and create the Dockerfile. You can do this in any text editor. The file, which should be called Dockerfile, should start by specifying the base image:
FROM nickchase/rss-php-nginx:v1
- Any container that is instantiated from this image is going to be listening on port 80, so we want to go ahead and overwrite that Nginx config file with the one we've edited:
FROM nickchase/rss-php-nginx:v1 COPY vhost.conf /opt/docker/etc/nginx/vhost.conf - Finally, we need to tell Docker that the container listens on port 88:
FROM nickchase/rss-php-nginx:v1
COPY vhost.conf /opt/docker/etc/nginx/vhost.conf
EXPOSE 88
- Now we need to build the actual image. To do that, we'll use the docker build command:
# docker build -t nickchase/rss-php-nginx:v2 .
Sending build context to Docker daemon 2.048 kB
Step 1 : FROM nickchase/rss-php-nginx:v1
 ---> 208c4fc237bb
Step 2 : EXPOSE 88
 ---> Running in 23408def6214
 ---> 93a43c3df834
Removing intermediate container 23408def6214
Successfully built 93a43c3df834
Notice that we've specified the image name, along with a new tag (you can also create a completely new image) and the directory in which to find the Dockerfile and any supporting files. - Finally, push the new image to the hub:
# docker push nickchase/rss-php-nginx:v2 - Test out your new image by instantiating it and pulling up the test page. You can use a command such as docker run <image>. For example:
# docker run -dP nickchase/rss-php-nginx:v2
root@kubeclient:/home/ubuntu/tutorial# docker ps
CONTAINER ID        IMAGE                        COMMAND                  CREATED             STATUS              PORTS                                                                                           NAMES
04f4b384e8e2        nickchase/rss-php-nginx:v2   "/opt/docker/bin/entr"   8 seconds ago       Up 7 seconds        0.0.0.0:32829->80/tcp, 0.0.0.0:32828->88/tcp, 0.0.0.0:32827->443/tcp, 0.0.0.0:32826->9000/tcp   goofy_brahmagupta
13a423324d80        nickchase/rss-php-nginx:v1   "/opt/docker/bin/entr"   12 minutes ago      Up 12 minutes       0.0.0.0:32825->80/tcp, 0.0.0.0:32824->443/tcp, 0.0.0.0:32823->9000/tcp                          amazing_minsky
curl http://localhost:32828/rss.php
Create a Docker base image
Remember when we said we could use a Dockerfile to create our own base image “from scratch”? In this case, that means building from a special, just-the-essentials image provided by Docker called scratch. In order to do this, we simply begin our Dockerfile with the following specification:# syntax=docker/dockerfile:1 FROM scratch
When Docker goes to build your image, the system will treat the next line after FROM scratch as the image’s first filesystem layer.
Additional Mirantis Docker image resources
- Learn how to create a docker image, install Docker compose, create project files, and more in our Docker Images training.
- Manage and deploy private images with Mirantis Secure Registry and Mirantis Kubernetes Engine.
- Building Docker Images with a shell script/PowerShell script: Docker Enterprise Solution Guides.
- With Mirantis Kubernetes Engine you can ensure applications only use Docker images signed by users you trust.
Moving forward
Creating new Docker images that can be used by you or other developers is pretty straightforward. You have the option to manually create and commit changes, or to script them using a Dockerfile. Once your images are created, you can orchestrate your containers in large-scale, dynamic deployments using Kubernetes.In previous guides, we looked at how to deploy Kubernetes and create a cluster. We also looked at how to deploy an application on the cluster environment and configure OpenStack instances (including security) to help you access them.
In our next tutorial, we’ll look at using YAML to manage containers with Kubernetes.


