
Mirantis OpenStack Express VPN-as-a-Service (VPNaaS) - Step by Step
Hybrid Essentials: Linking Tenants on Separate OpenStack Clouds
In this video, we’ll show how quickly and easily Mirantis OpenStack Express VPNaaS lets you link tenants in separate OpenStack clouds -- for example, premise and hosted clouds in a hybrid application.
Step by Step
To demo this capability, I’ve set up two, completely-separate OpenStack environments in MOX -- one representing the premise datacenter, the other a hosted cloud. In a future demo, I’ll show how it’s now also possible to link an actual on-premise OpenStack cloud to a Mirantis OpenStack Express cloud, though this currently requires use of neutron command-line or REST functions, and is ideally done with the help of scripts to simplify the process.
Mirantis OpenStack Express, meanwhile, has made it simple. Within each environment, I’ve set up a Project -- also called a Tenant. That’s an OpenStack construct for isolating tenant resources and activities inside a cluster. You can use a Project to give your users access to designated resources, to give them roles that define their powers and to prevent them from seeing parts of the Project and cloud they’re not permissioned for. Under most OpenStack networking regimes (other than the simplified, “flat” model -- these environments use Neutron VLAN-based networking), a project can have its own private networks, subnets, and router gateways.
That’s what I’ve built here, in each cluster. First, I created a Project -- we have DemoProject 1 on Environment 1, and DemoProject 2 on Environment 2. Then I made the Admin user of each environment a member of the respective Project and gave each of them the admin role within that Project. This is important for setting up VPNaaS, since router gateway IP addresses and other info you’ll need to set up your VPN connection are visible only to the admin user.

Then, switching to each project as the admin user, I built a simple local network for it. You can see these networks from each project’s Network Topology view. Each project’s network has a defined subnet, letting it serve a range of local IP addresses. And each network has a router connecting it to the cloud’s public external network.
This is a plain-vanilla network setup that lets machines talk to each other and the internet. And what VPNaaS will do is make an encrypted connection between the public IP addresses of each tenant’s gateway router, so that machines in DemoProject 1 can see machines in DemoProject 2, and vice-versa, while securing the traffic between the two projects from prying eyes.

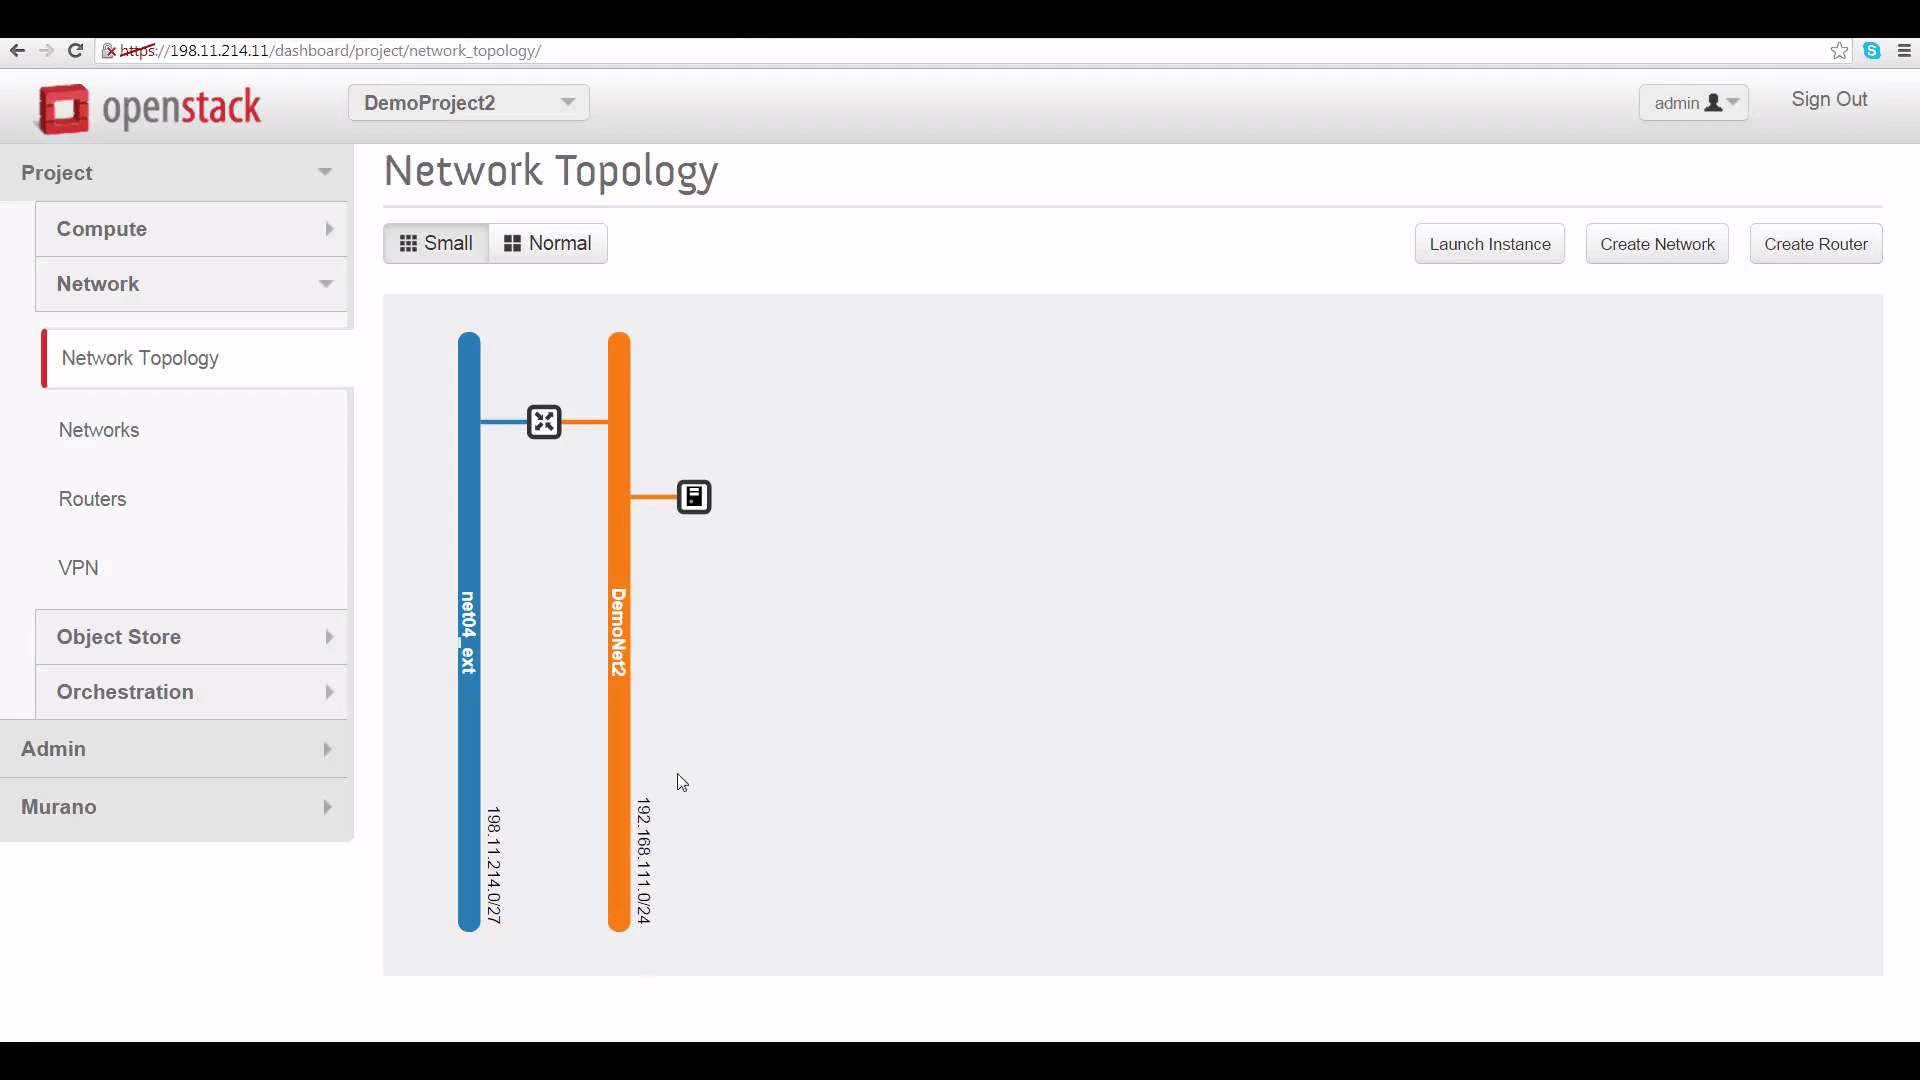
For VPNaaS to work in connecting these subnets, the subnets need to have non-overlapping IP address ranges. As you can see here, I’ve given each subnet an arbitrary CIDR range assignment that doesn’t overlap with that of the tenant in the other cloud. Each range contains 256 IPv4 addresses.
Once your VPN is connected, you’ll probably want to use a range of apps and methods to communicate across it. So you need to be aware that when you first set up a Project in Mirantis OpenStack Express, it gets assigned the default security group for the cluster in its default form, which is usually restrictive. So you’ll probably need to create a few additional rules in each Project’s default security group: like a general ICMP rule, enabling pings, and a port 22 TCP rule, enabling SSH.

Set up VPNaaS on Cloud A
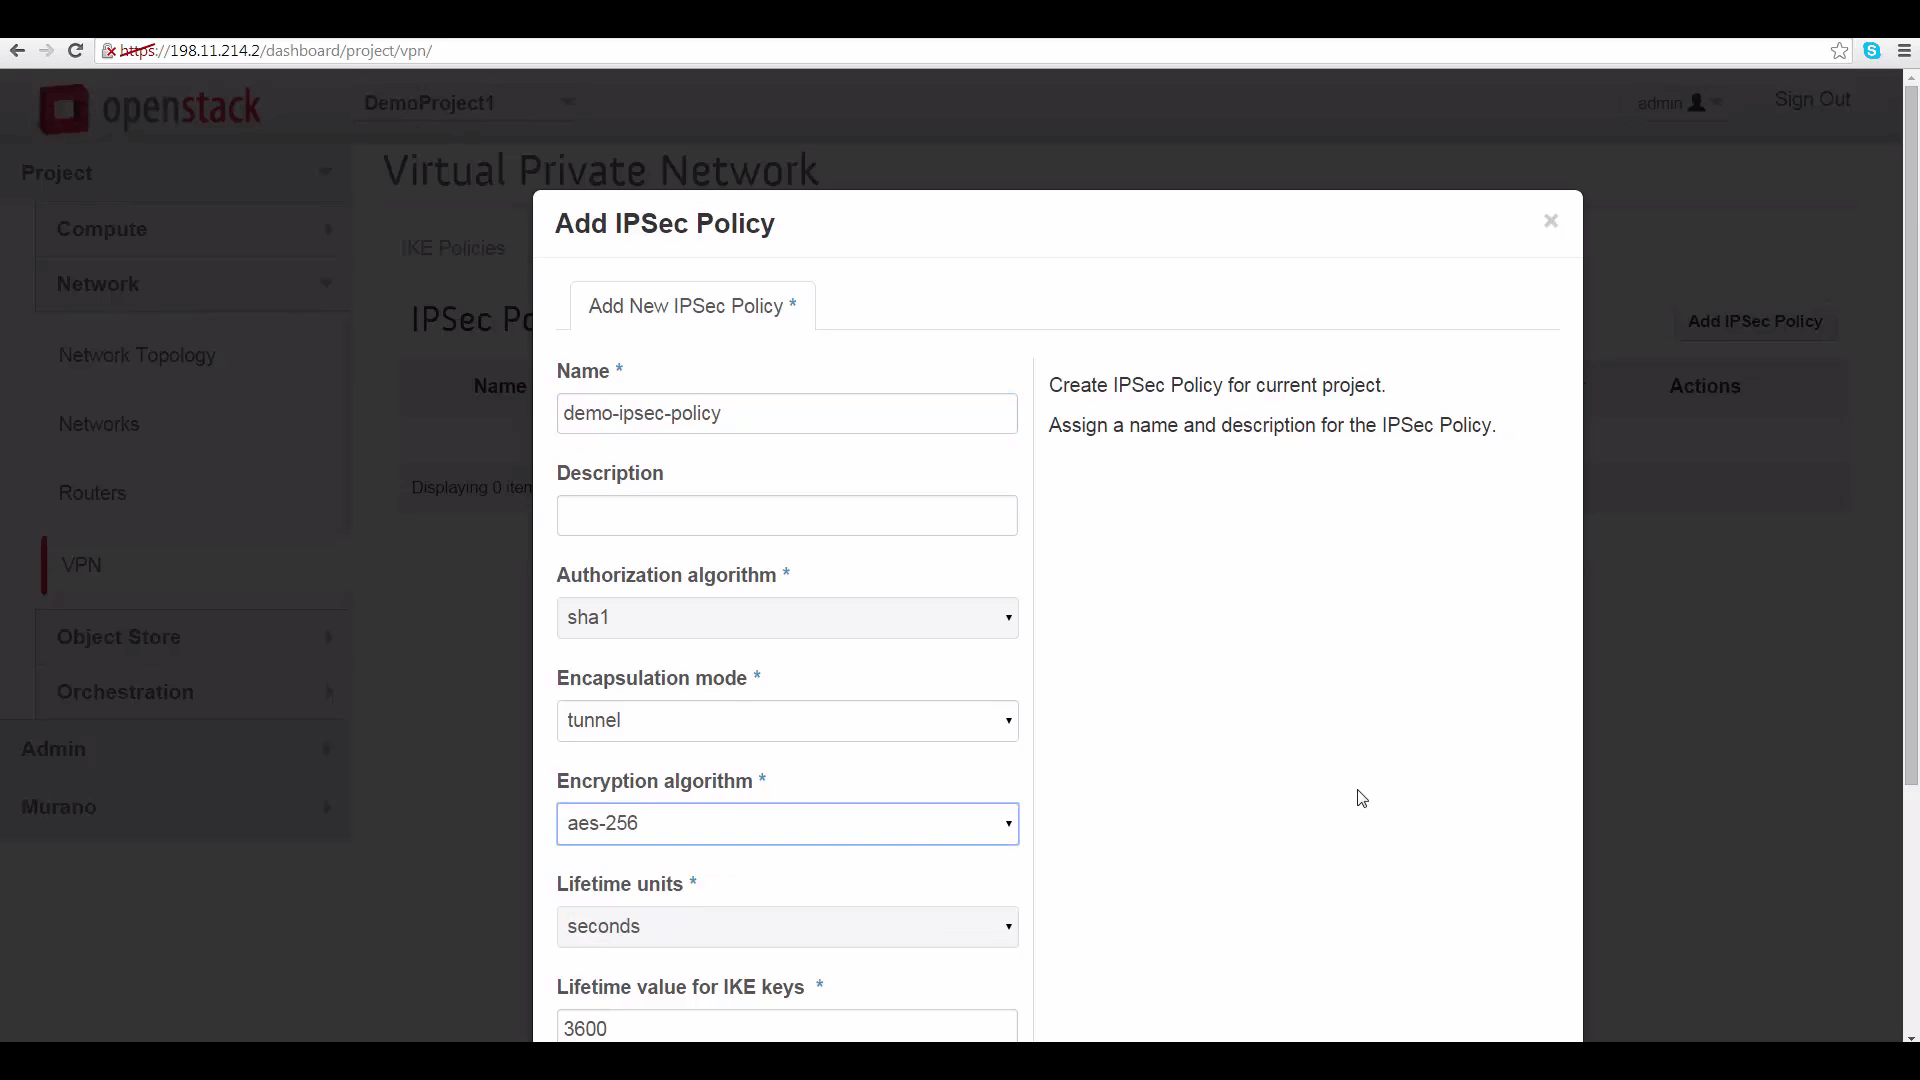
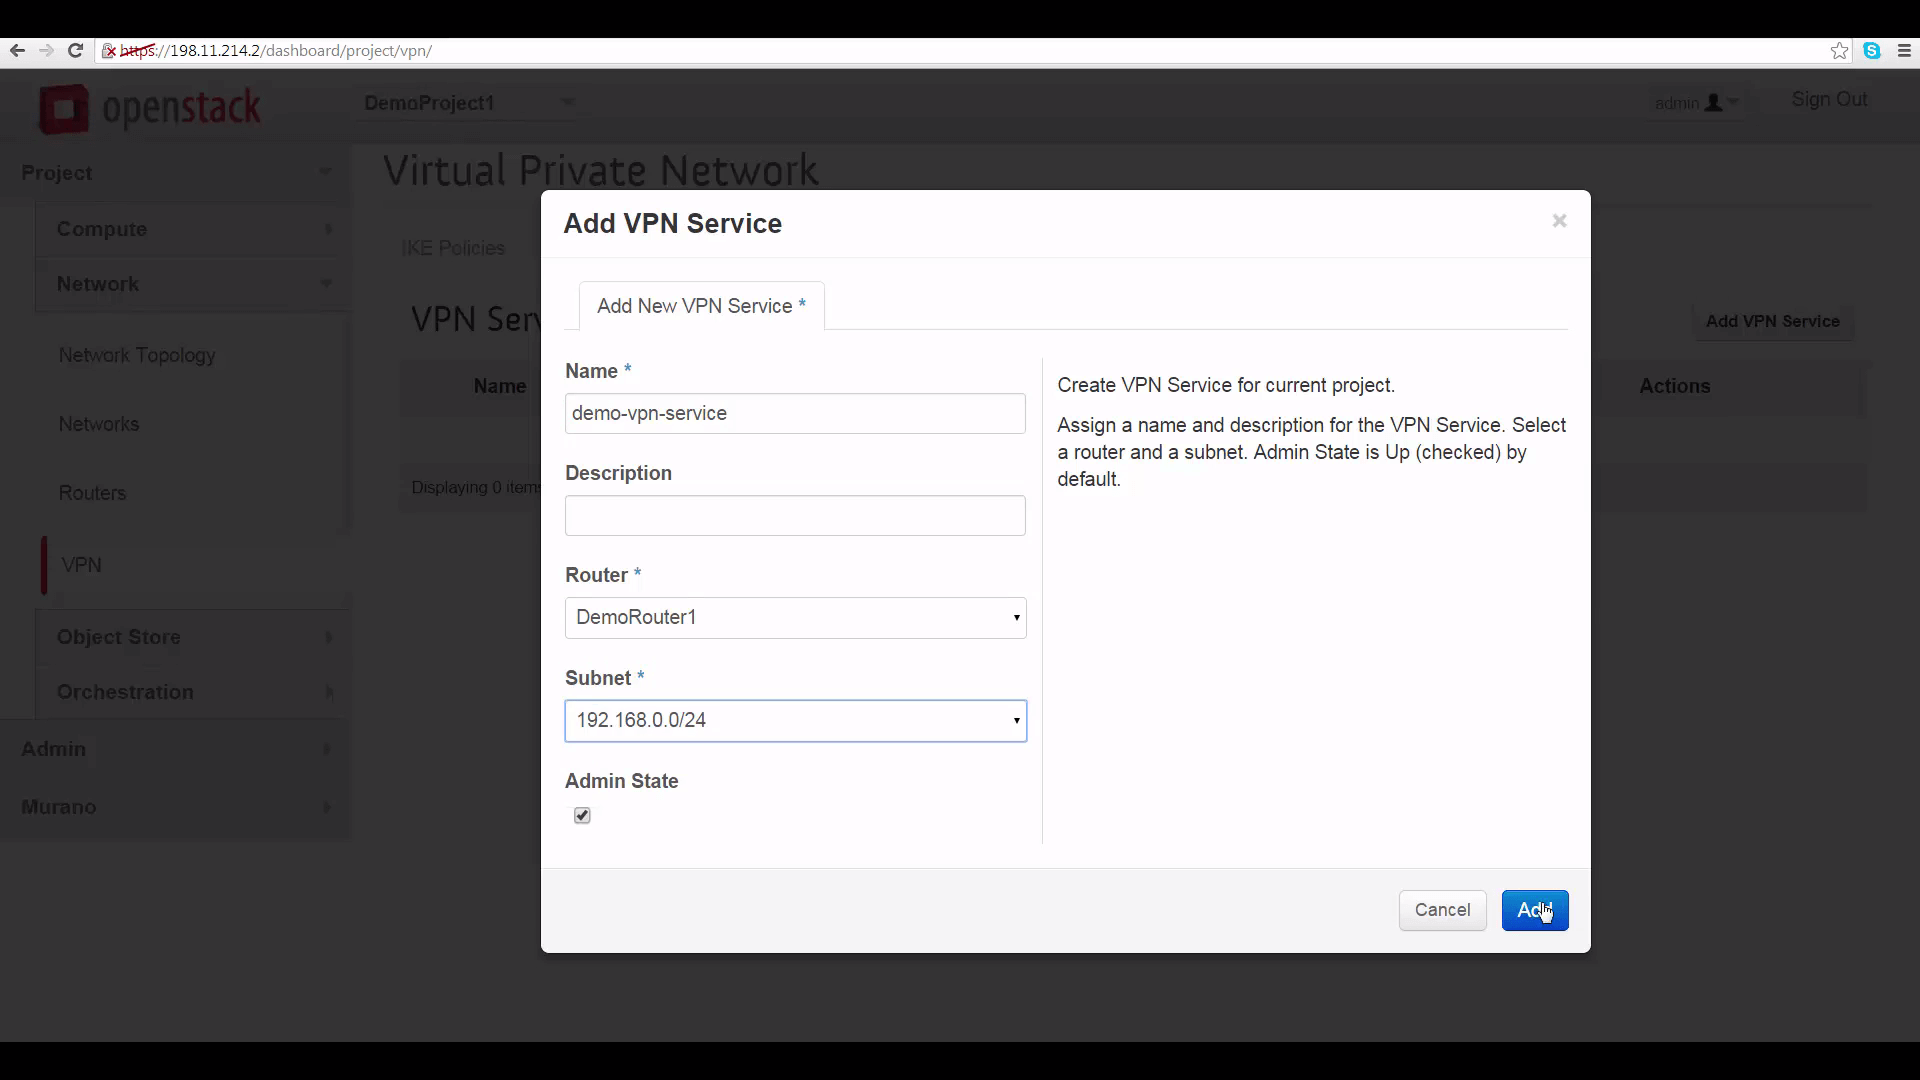
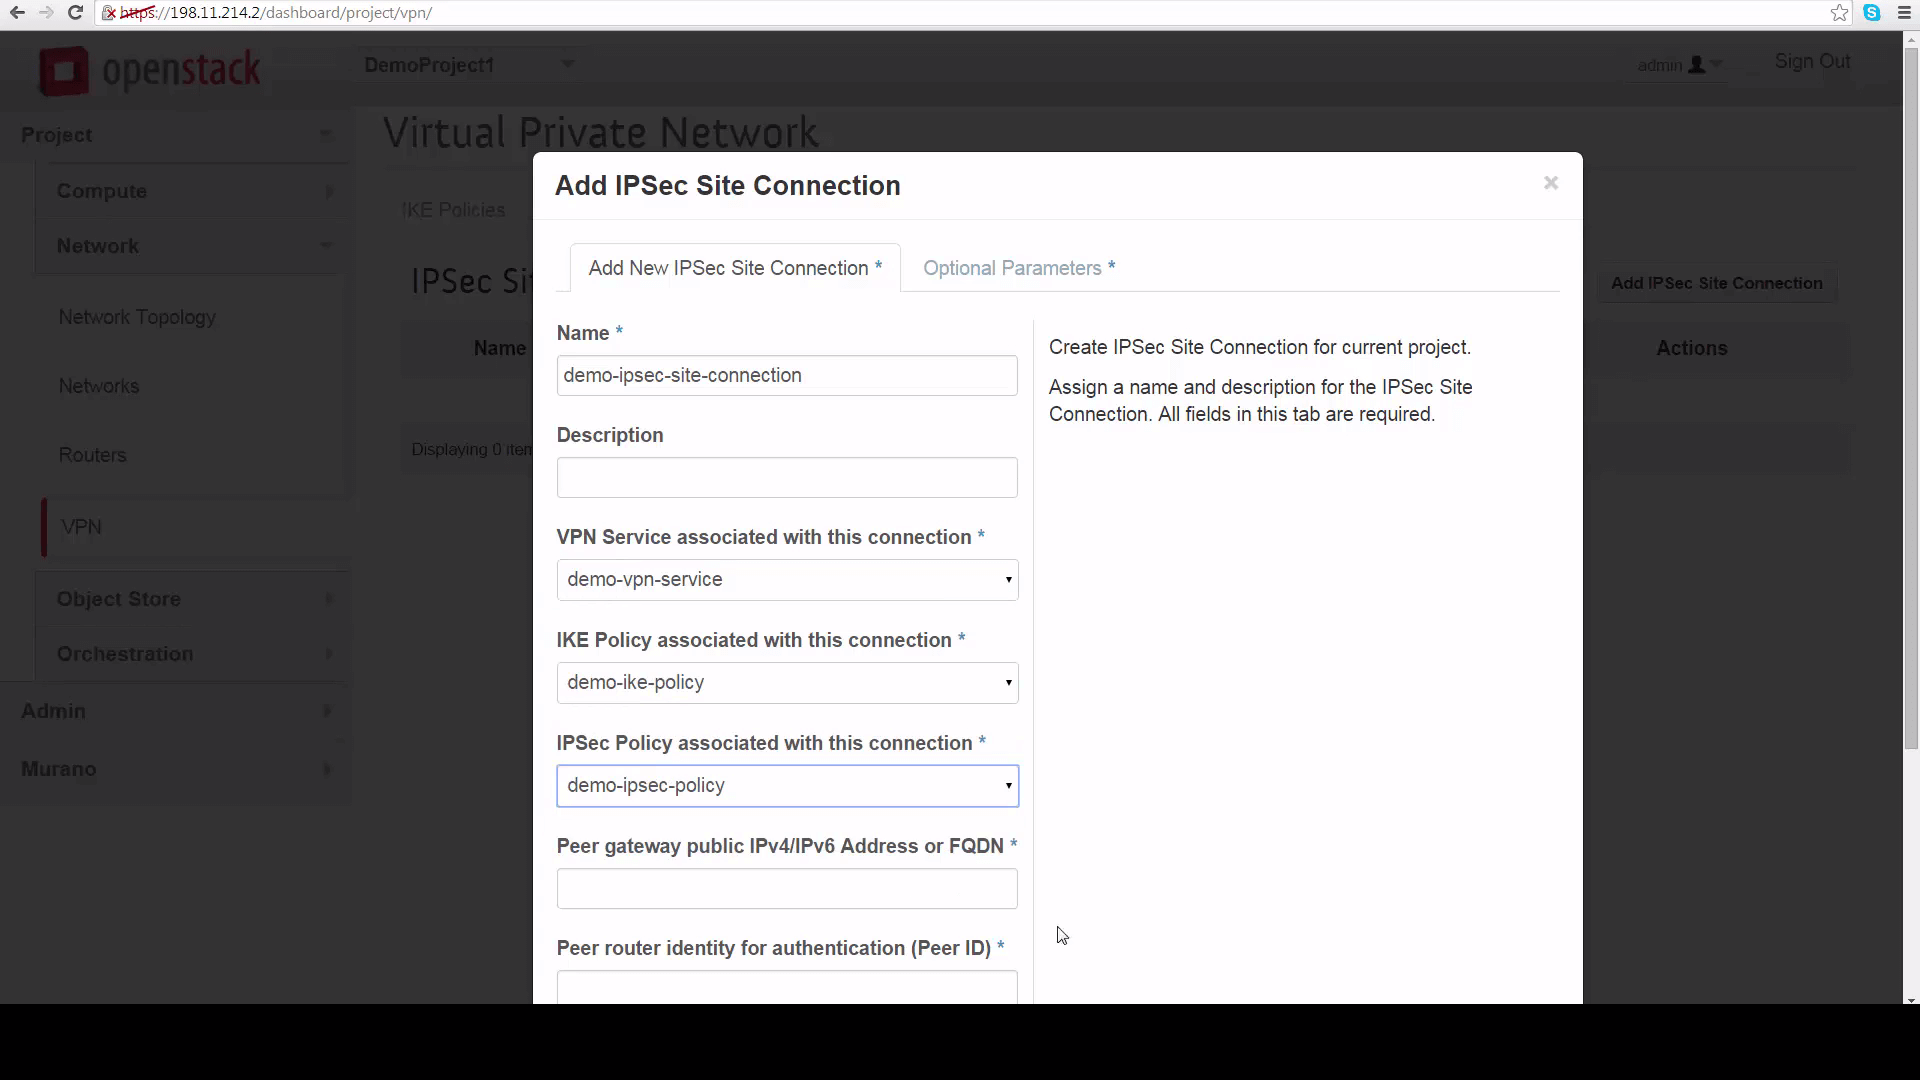
Now let’s start building our VPN hookup by clicking on VPN under Compute->Network. We get four tabs that let us set up the four elements of a VPN link: an Internet Key Exchange (IKE) policy, an IPSec policy, a VPN Service, and an IPSec Site Connection. We need to fill out these tabs under each Project to make the VPN work. Protocol and policy details need to match -- the defaults offered are mostly optimal. And to fill out the IPSec Site Connection tab, we’ll need to provide each side of the VPN with info on the other side’s public gateway IP address, and its subnet IP address range.
We’ll do all of this first for DemoProject 1 on Cluster A:
Create the Internet Key Exchange Policy: The only thing recommended to change, here, is the Encryption algorithm, which should be set to aes-256.

Create the IPSec Policy: Same thing. The defaults are fine, though it’s recommended to use aes-256 encryption.
Create the VPN Service: Here’s where we select a router that will work as our VPN gateway -- that’s the local router; and picking a subnet to make visible at the other end: that’s our local subnet. As noted, the main thing to remember is that VPN will not work if the subnets at both ends overlap.
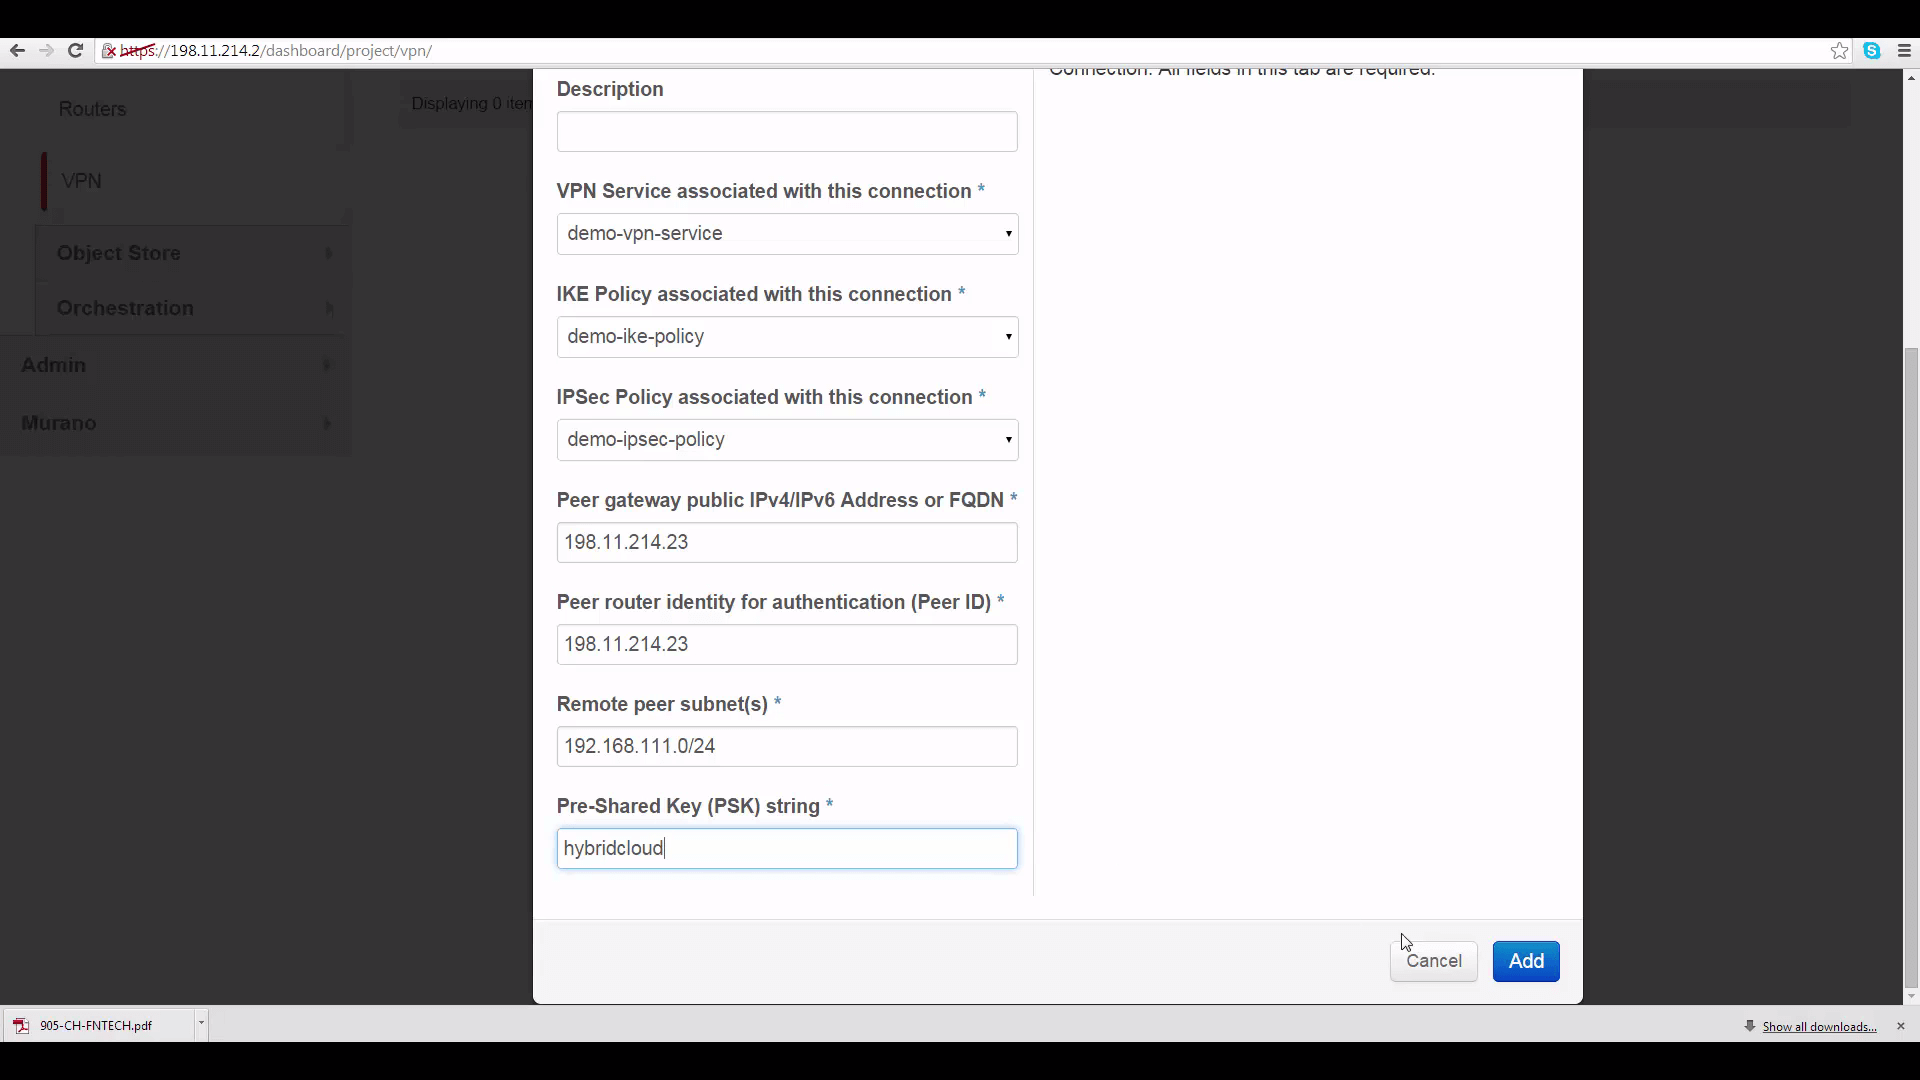
Create IPSec Site Connection: This is the only mildly-tricky thing about setting up a VPN using VPNaaS. We start by identifying our VPN Service, our IKE Policy and our IPSec Policy, defined just a moment before -- that’s easy. To finish, however, we’ll need to get some information about the network in DemoProject 2. So let’s flip to DemoProject 2’s Horizon, making sure we’re logged in as the admin, so we can see the info we need to know.
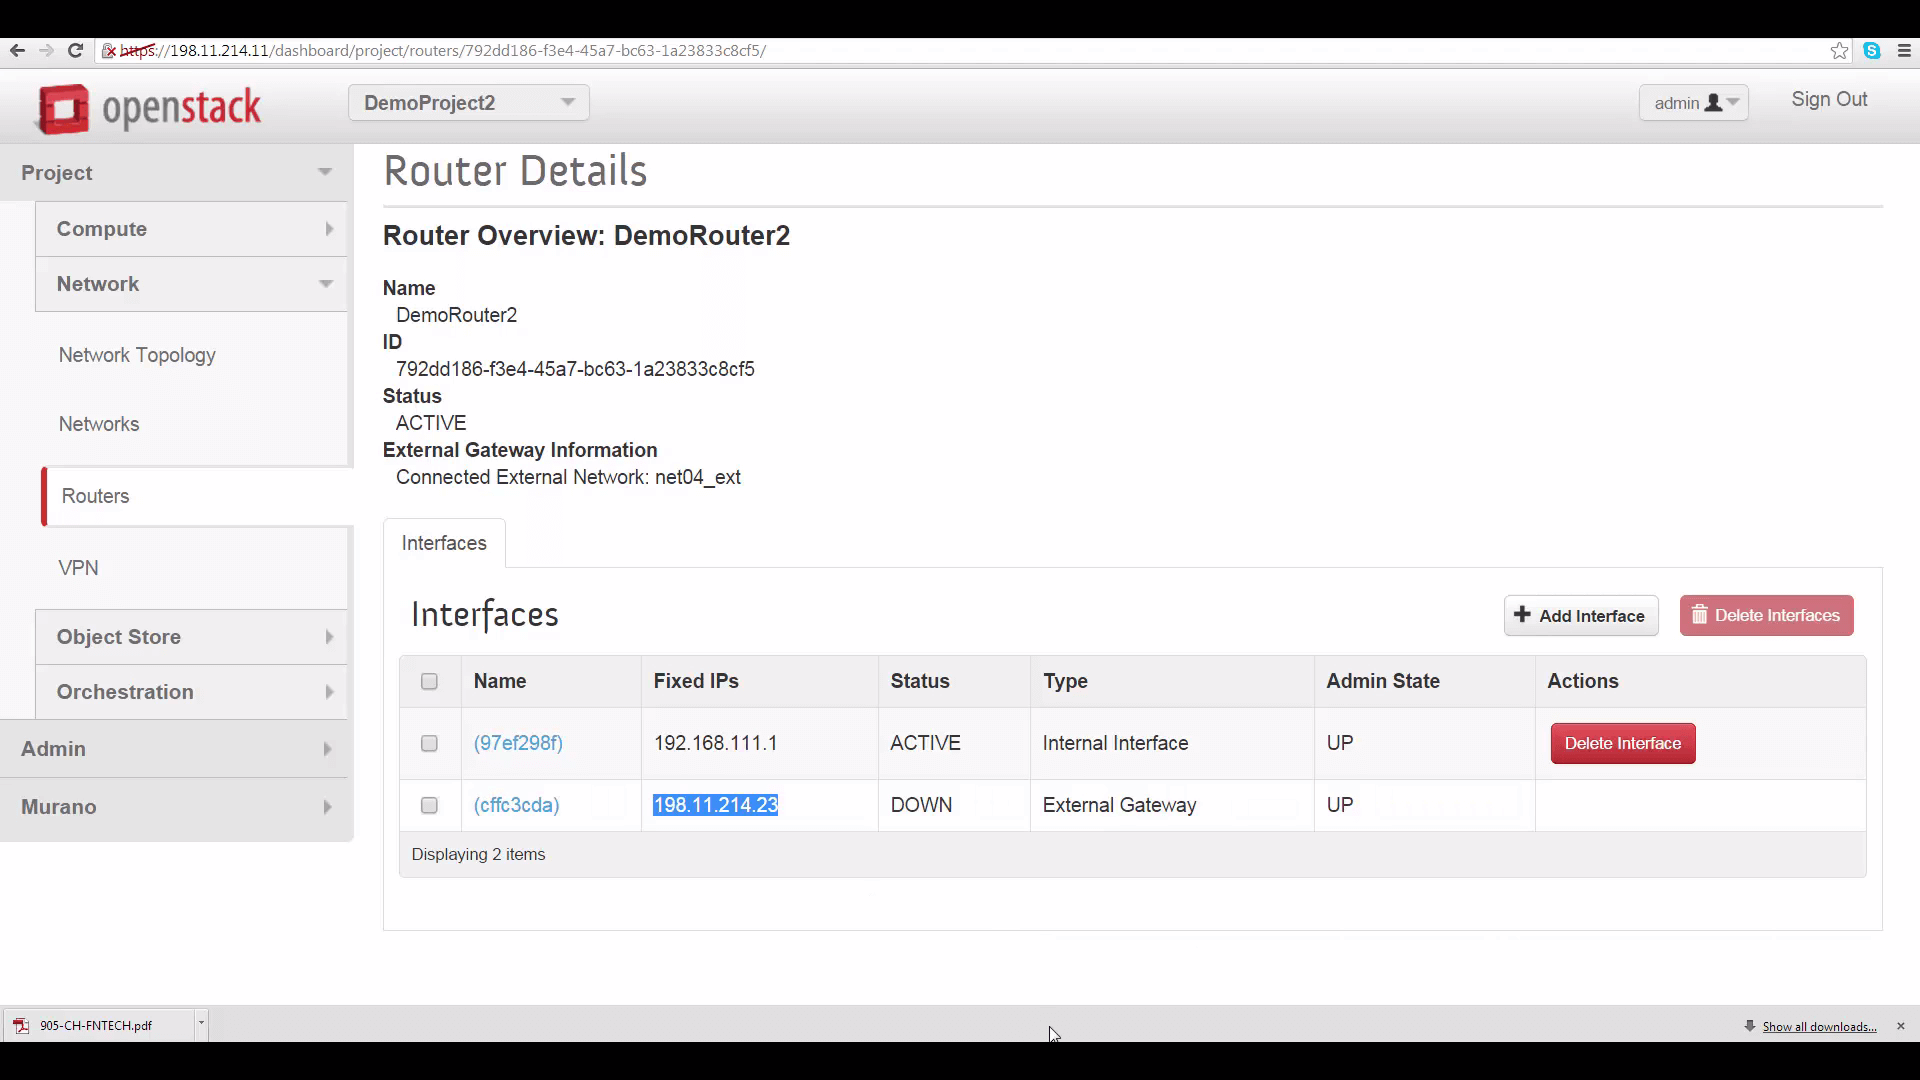
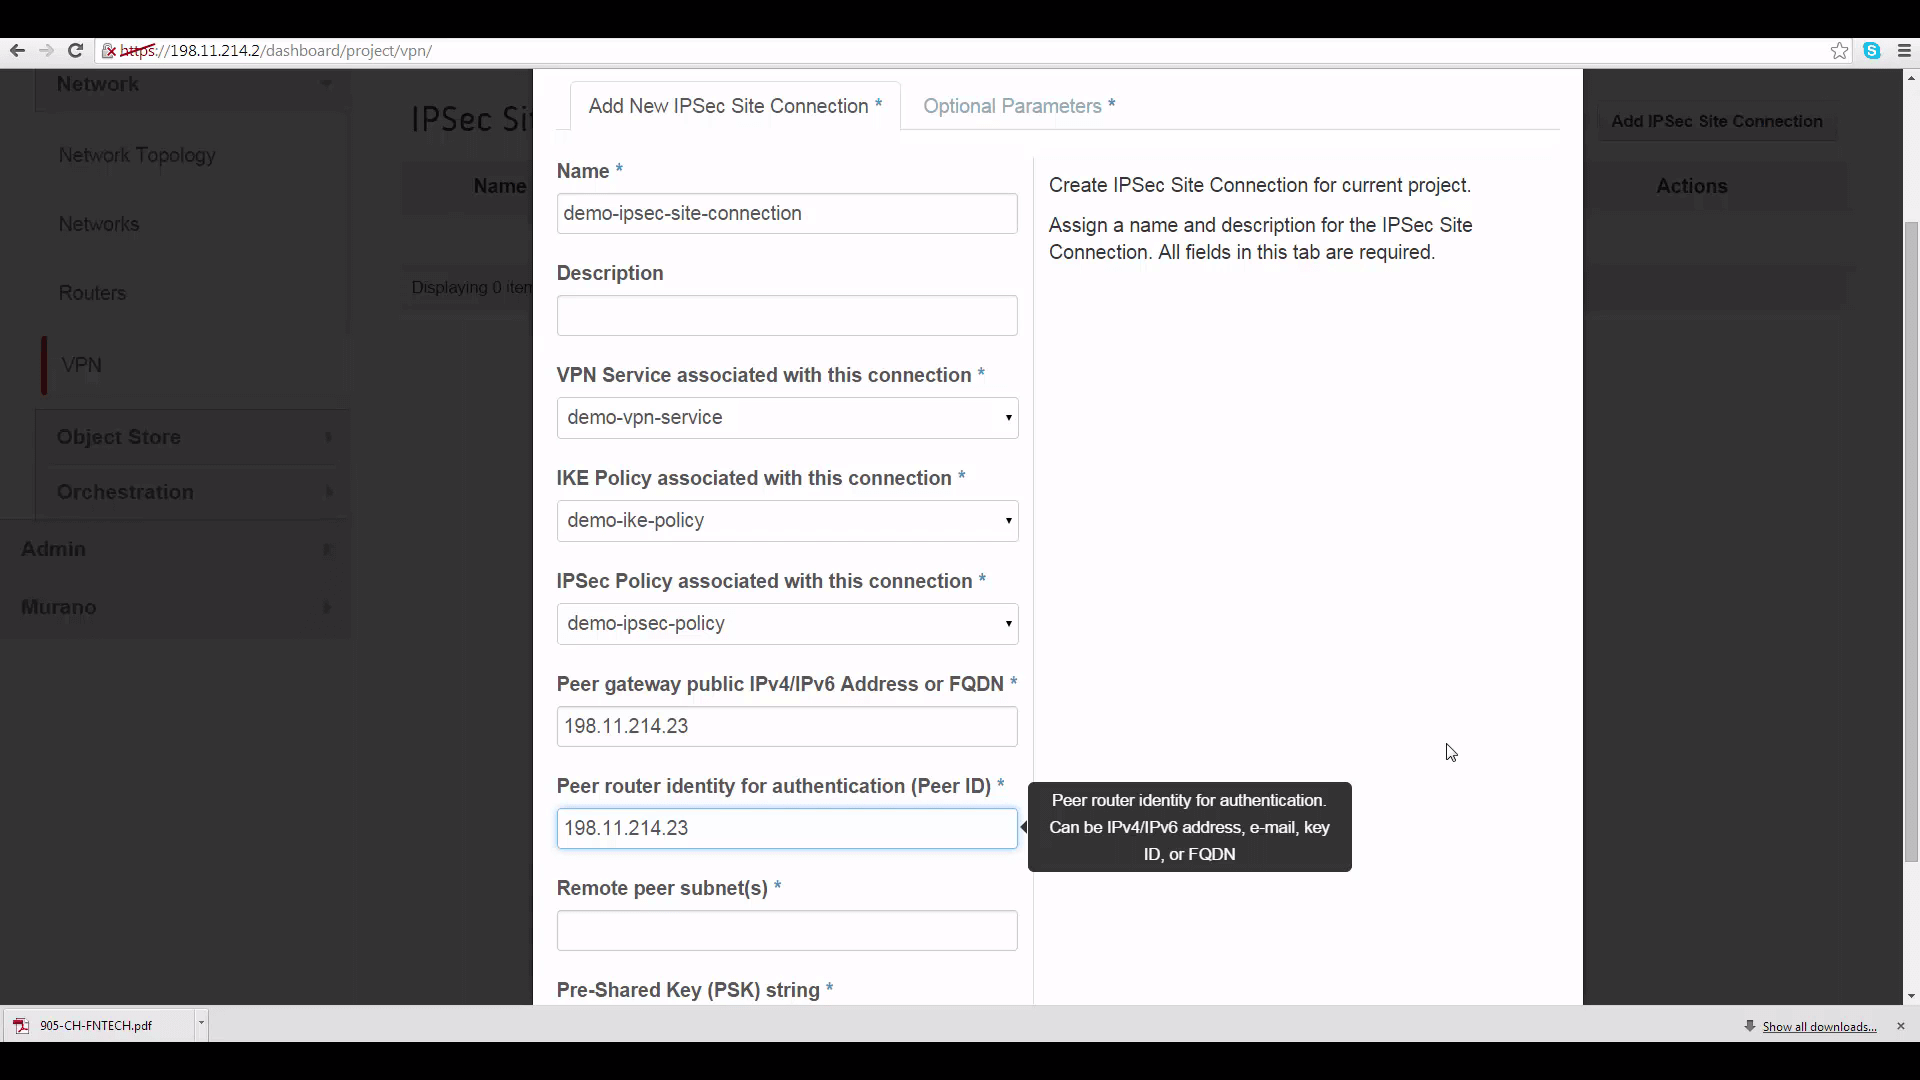
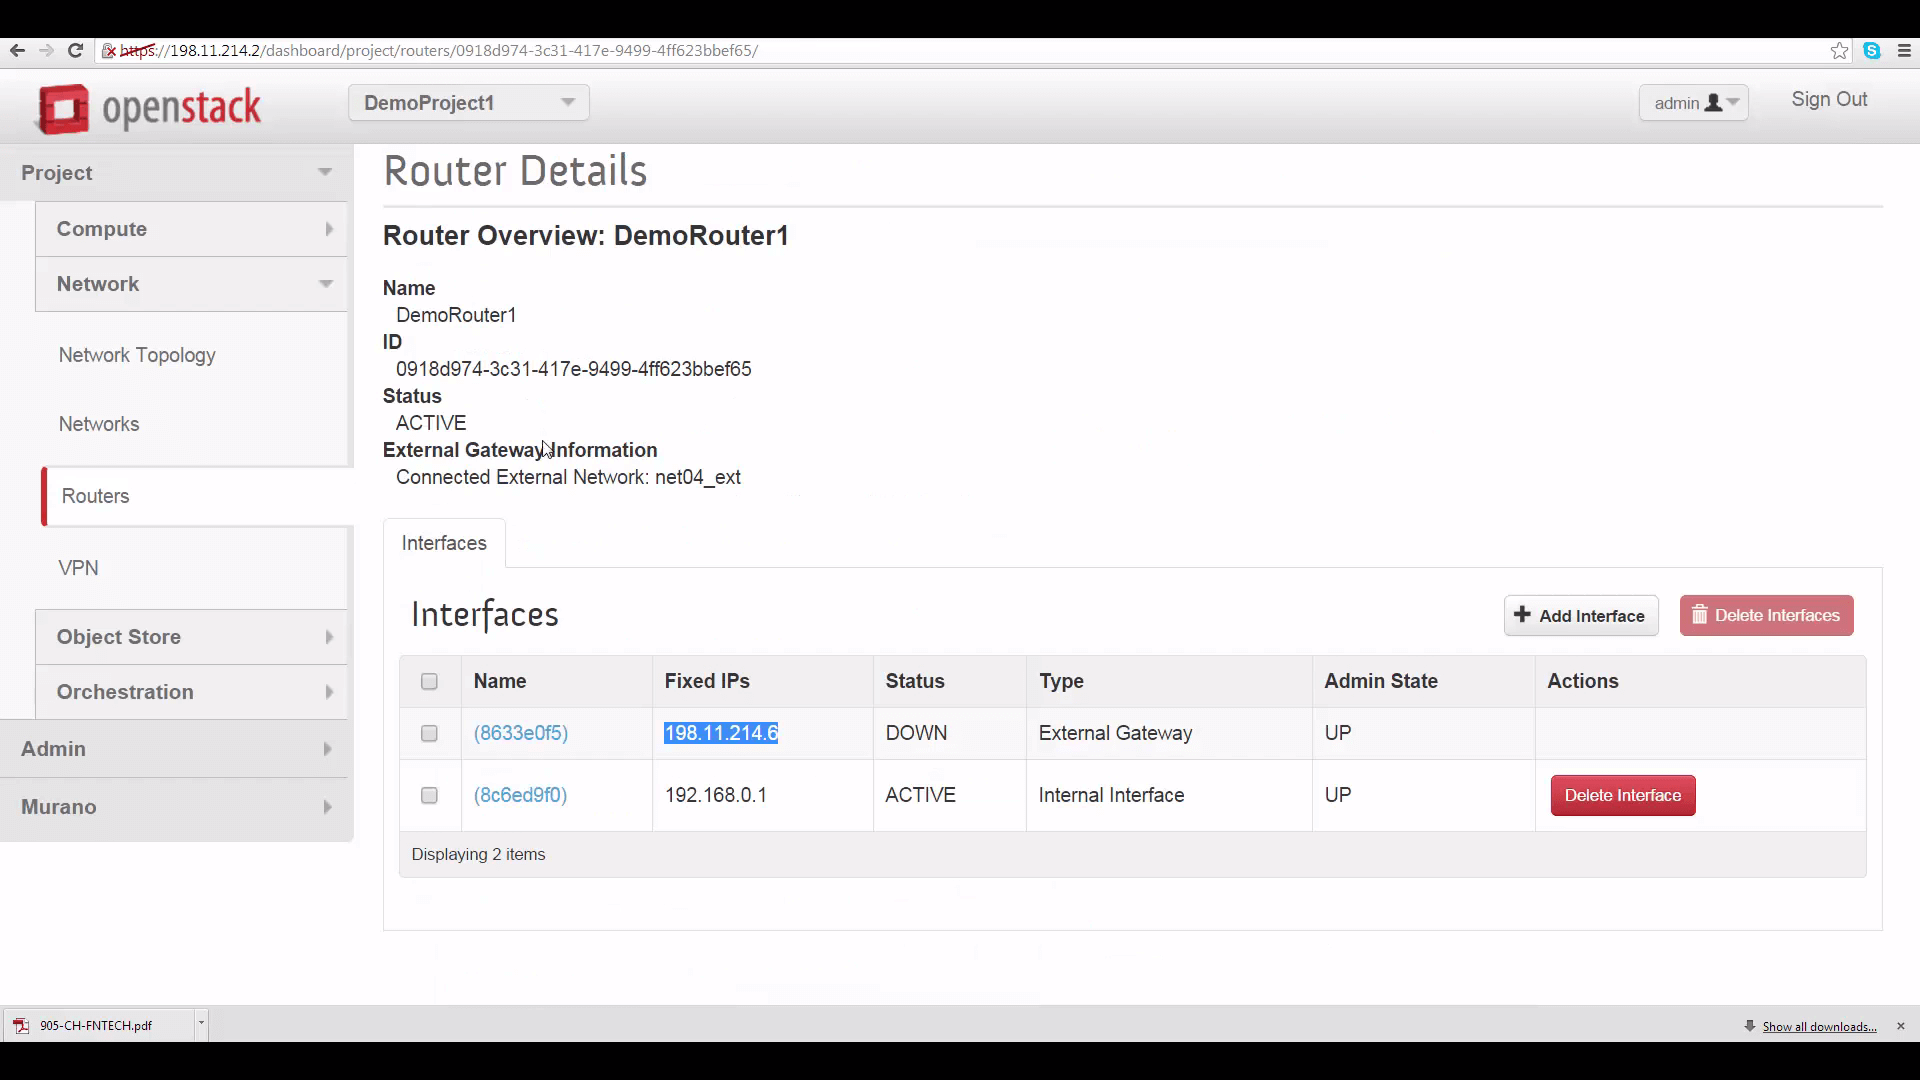
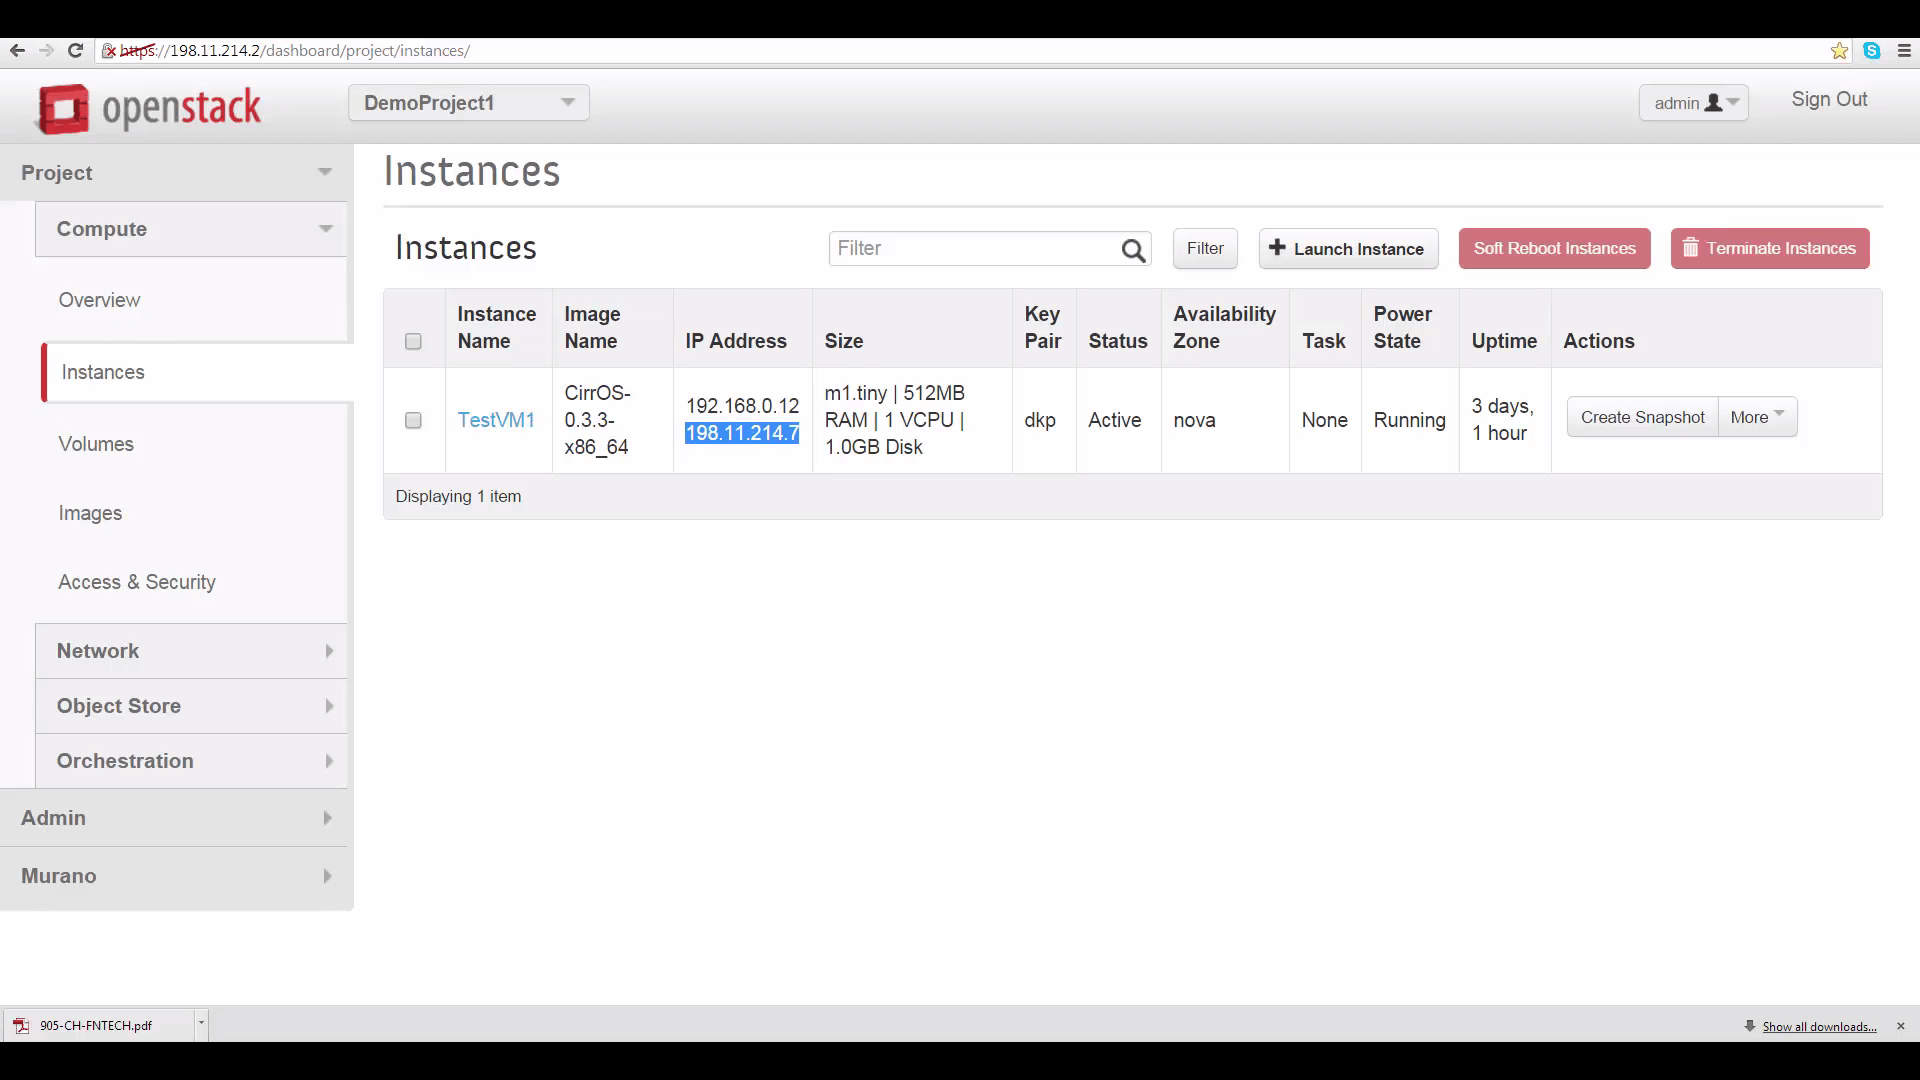
The first thing we need is the Peer gateway public IPV4 address or fully-qualified domain name for DemoProject2’s router. This can be found by going to DemoProject2’s Network tab, clicking on router, the router name, and copying the IP address shown for the external gateway interface: it’s 198.11.214.23. This is the thing you won’t be able to see if you’re not in the admin role for this project.
This IP address goes into two slots in the IPSec Site Connection edit dialog for DemoProject1: the first marked “Peer gateway public IPv4/IPv6 Address or FQDN”, and the second marked “Peer router identity for authentication (Peer ID)”.
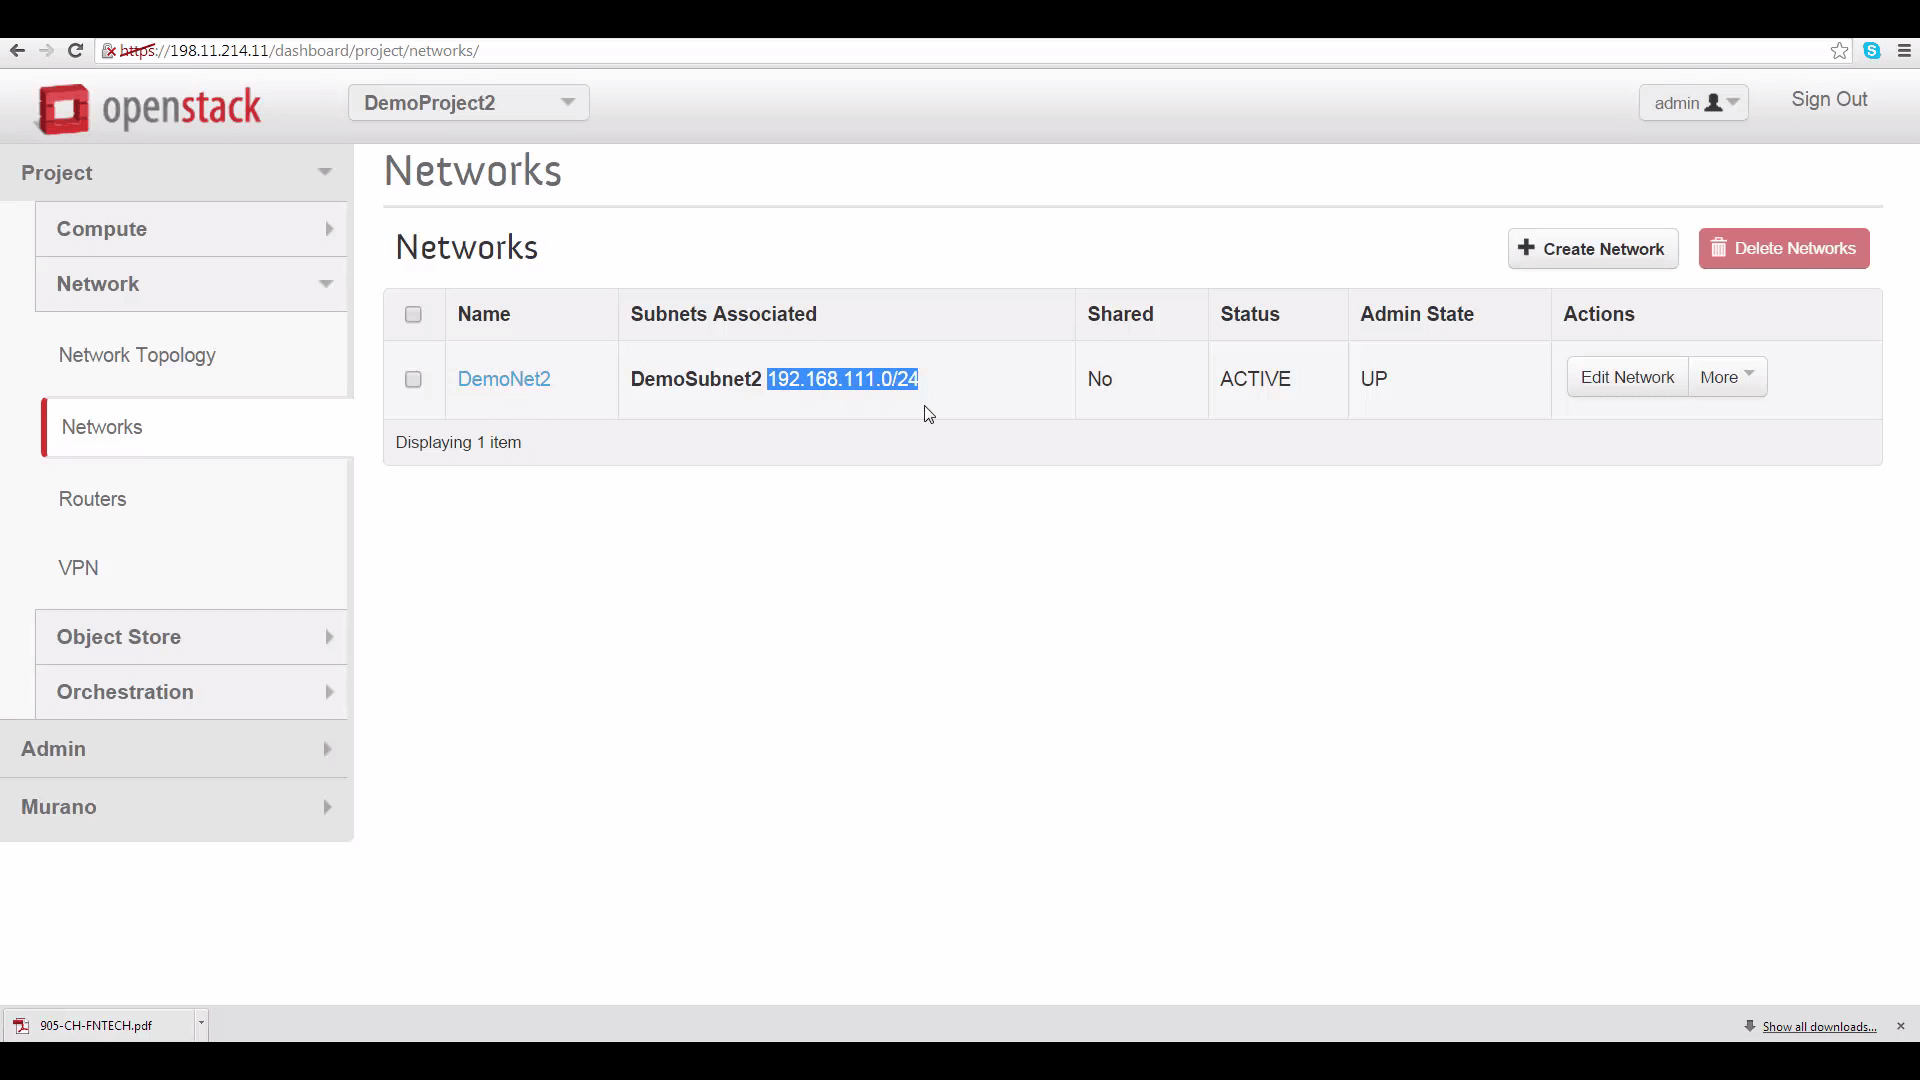
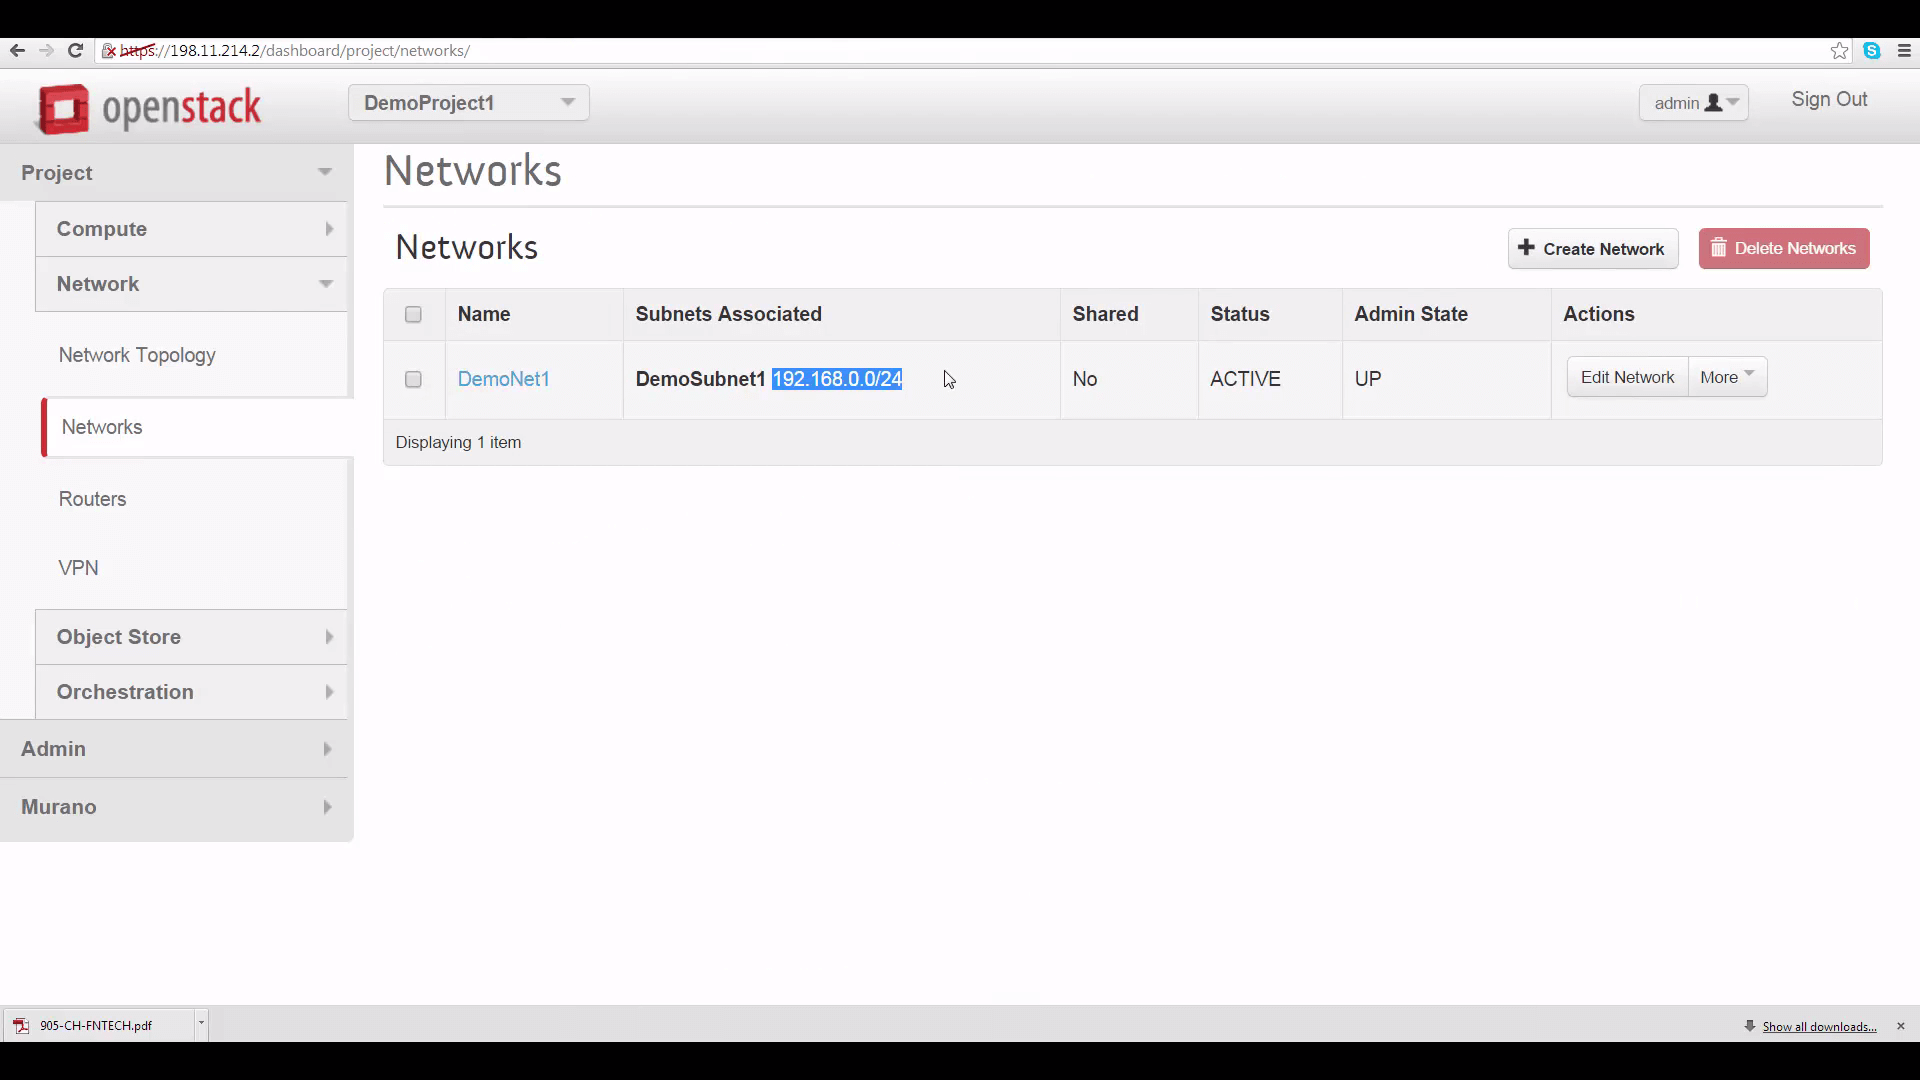
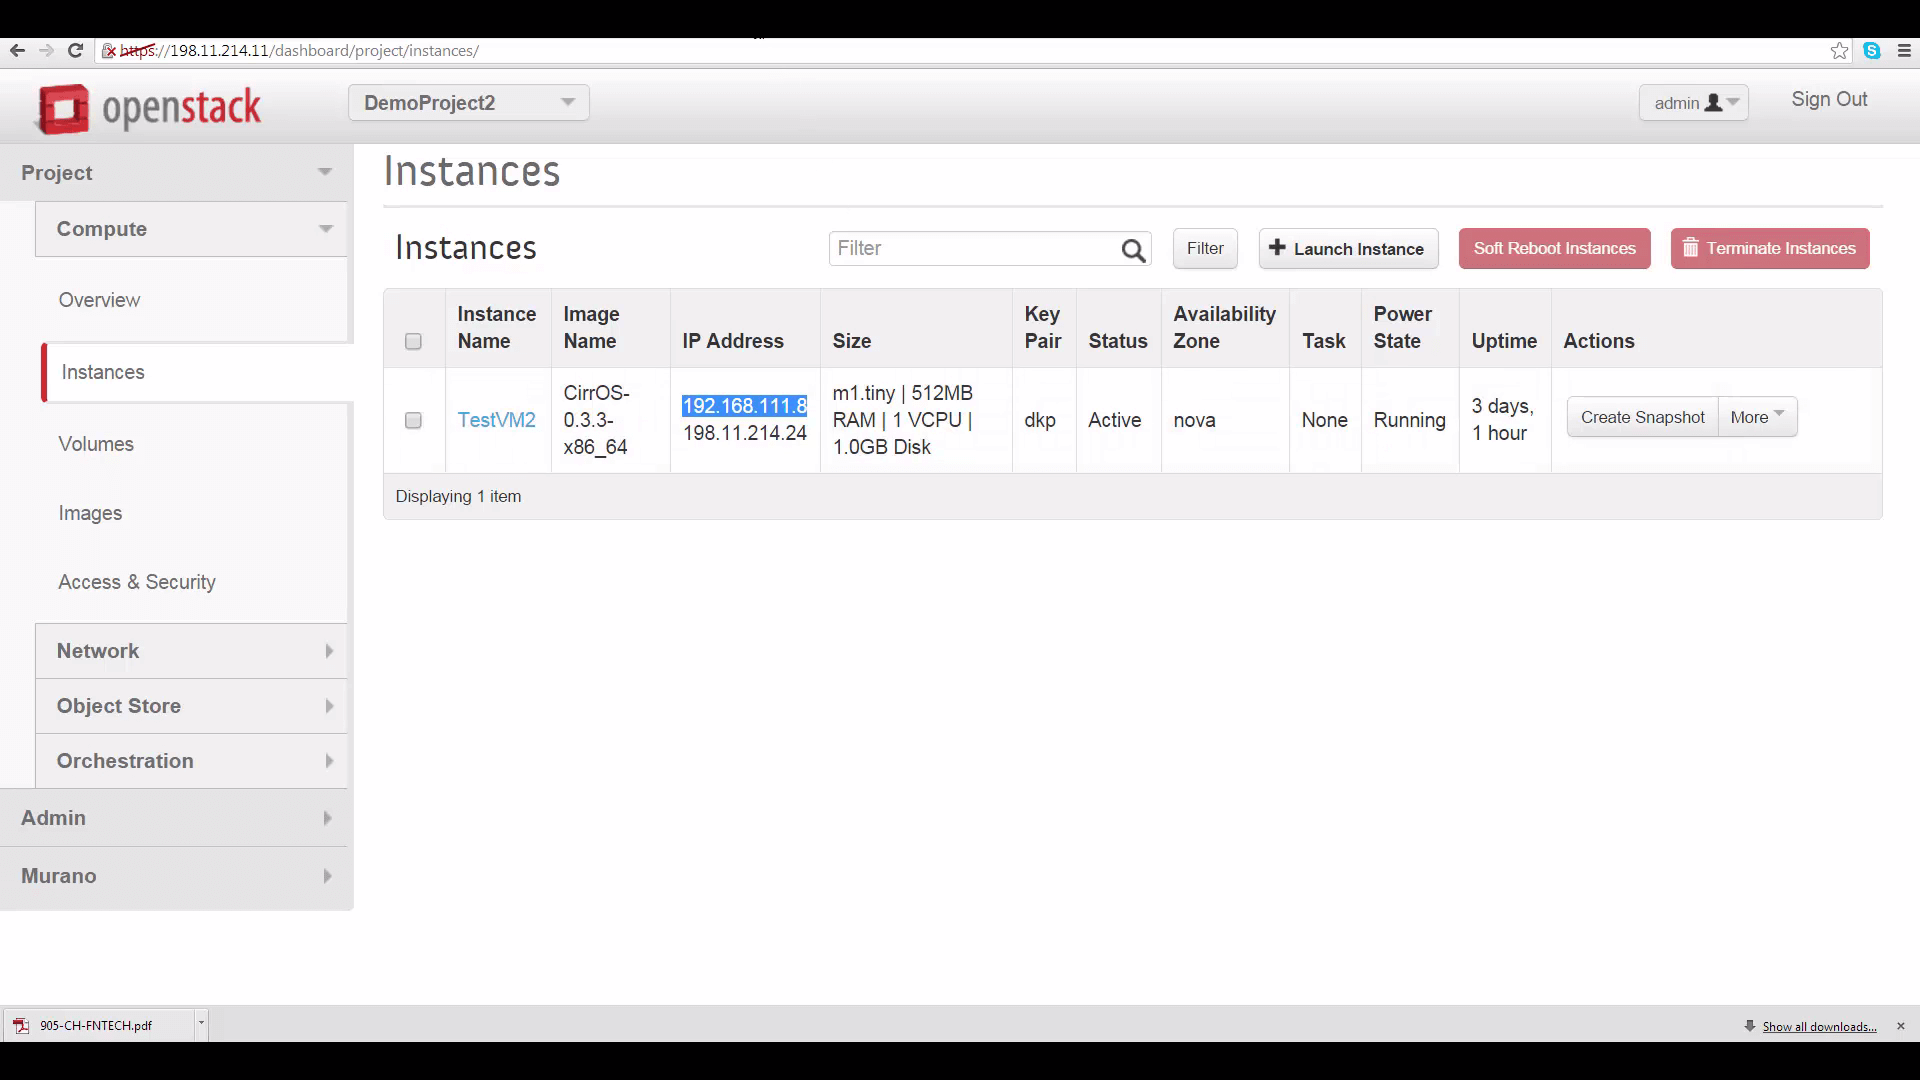
The second piece of info is the CIDR range for DemoProject2’s subnet. Again, go to DemoProject2’s Horizon, click the Network tab, click on network, and copy the subnet CIDR range, which is 192.168.111.0/24.
We’ll put that into the Remote Peer Subnet slot on DemoProject1’s IPSec Site Connection dialog. Then to finish setting up DemoProject1’s IPSec Site Connection, we’ll provide a pre-shared key password -- same on both sides -- for authentication. The rest of the parameters can be left as defaults -- if you change them, they should match on both sides of the connection.
Set up VPNaaS on Cloud B
Now let’s quickly set up the other end of the VPNaaS connection, over on DemoProject 2. We’ll make sure protocol details and policies match.
On DemoProject2’s IPSec Site Connection tab, we’ll provide -- in two places -- the peer gateway public IP address for DemoProject 1’s router, and DemoProject 1’s subnet IP address range.

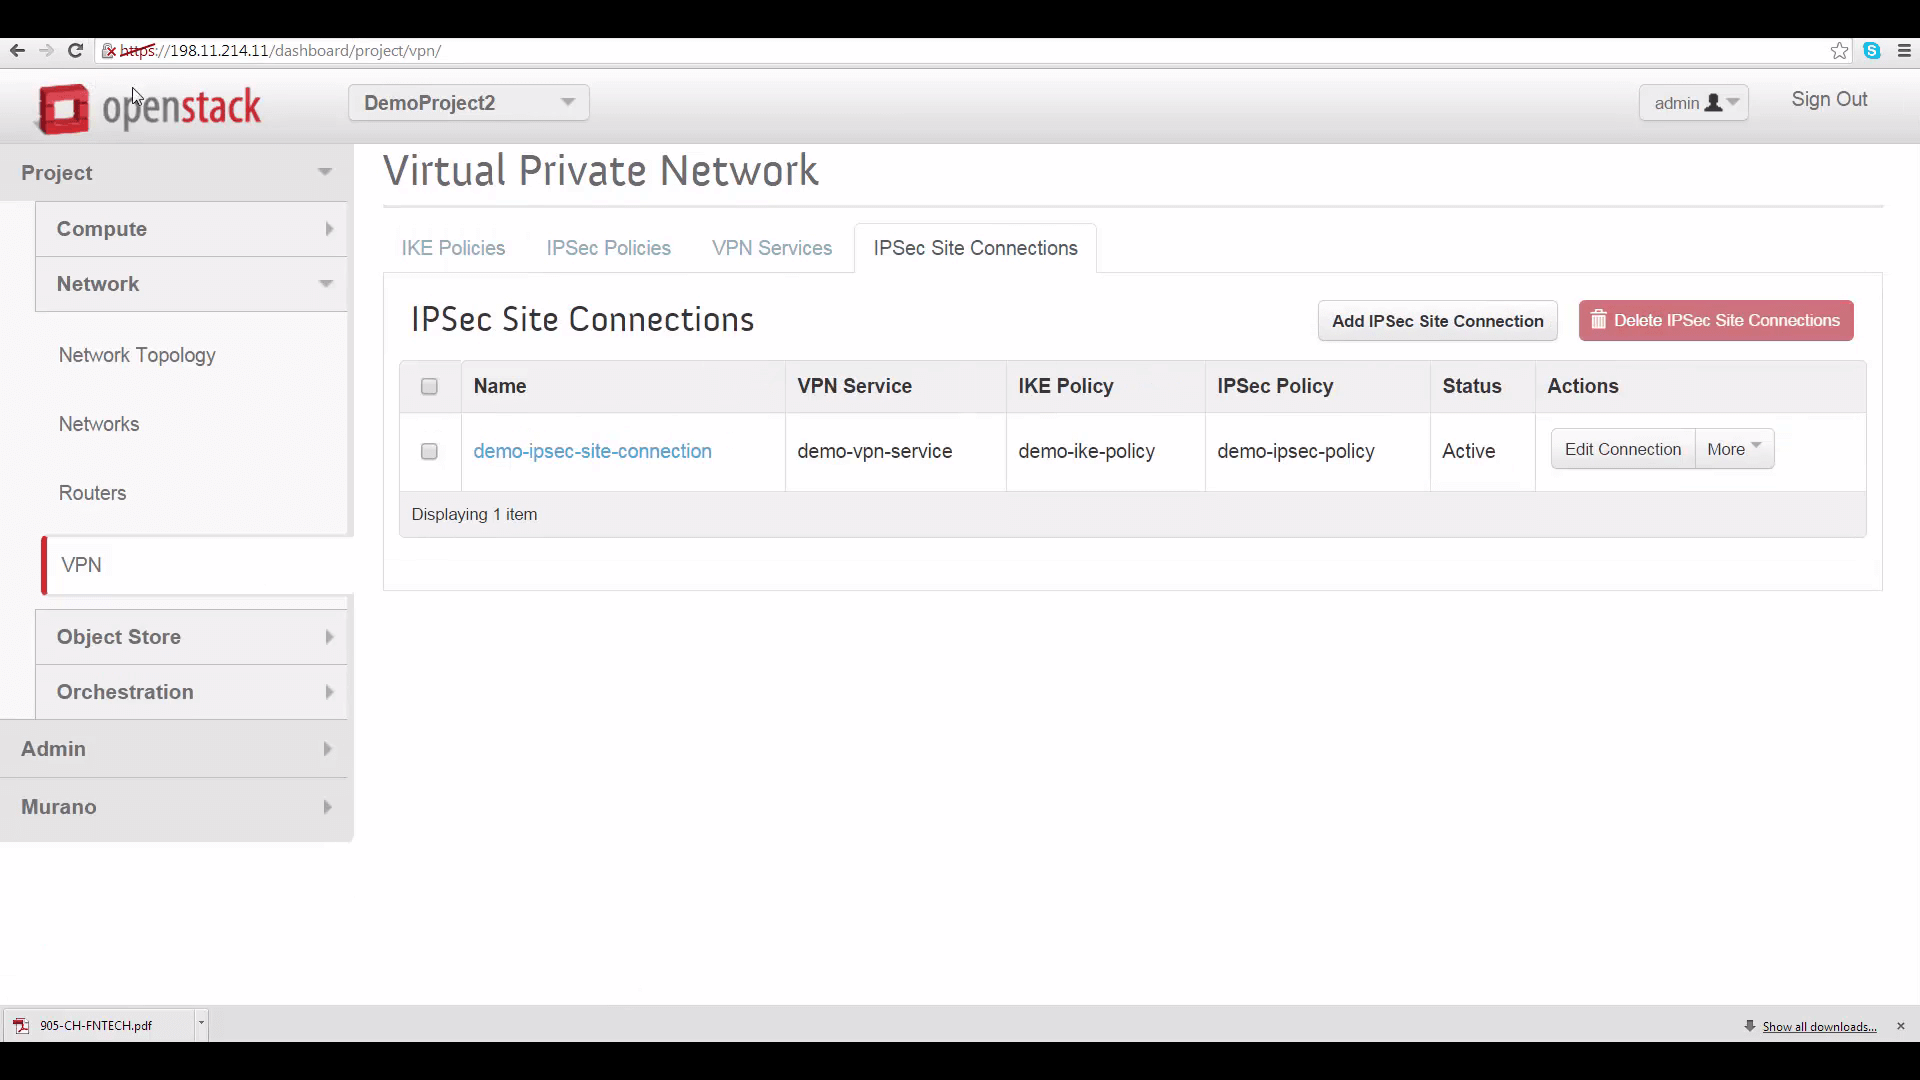
Once you click Add on the IPSec Site Connection tab, you’ll have to wait a little bit for your VPN to go to Active status. If that doesn’t happen within a few minutes, there’s probably something wrong with your settings.
If this happens, check to make sure that protocol details on both sides match, that correct router gateway and subnet address range info for each side has been provided in the other side’s IPSec Site Connection tab, that PSK passwords match, and that subnet IP address ranges don’t overlap.
Testing VPNaaS
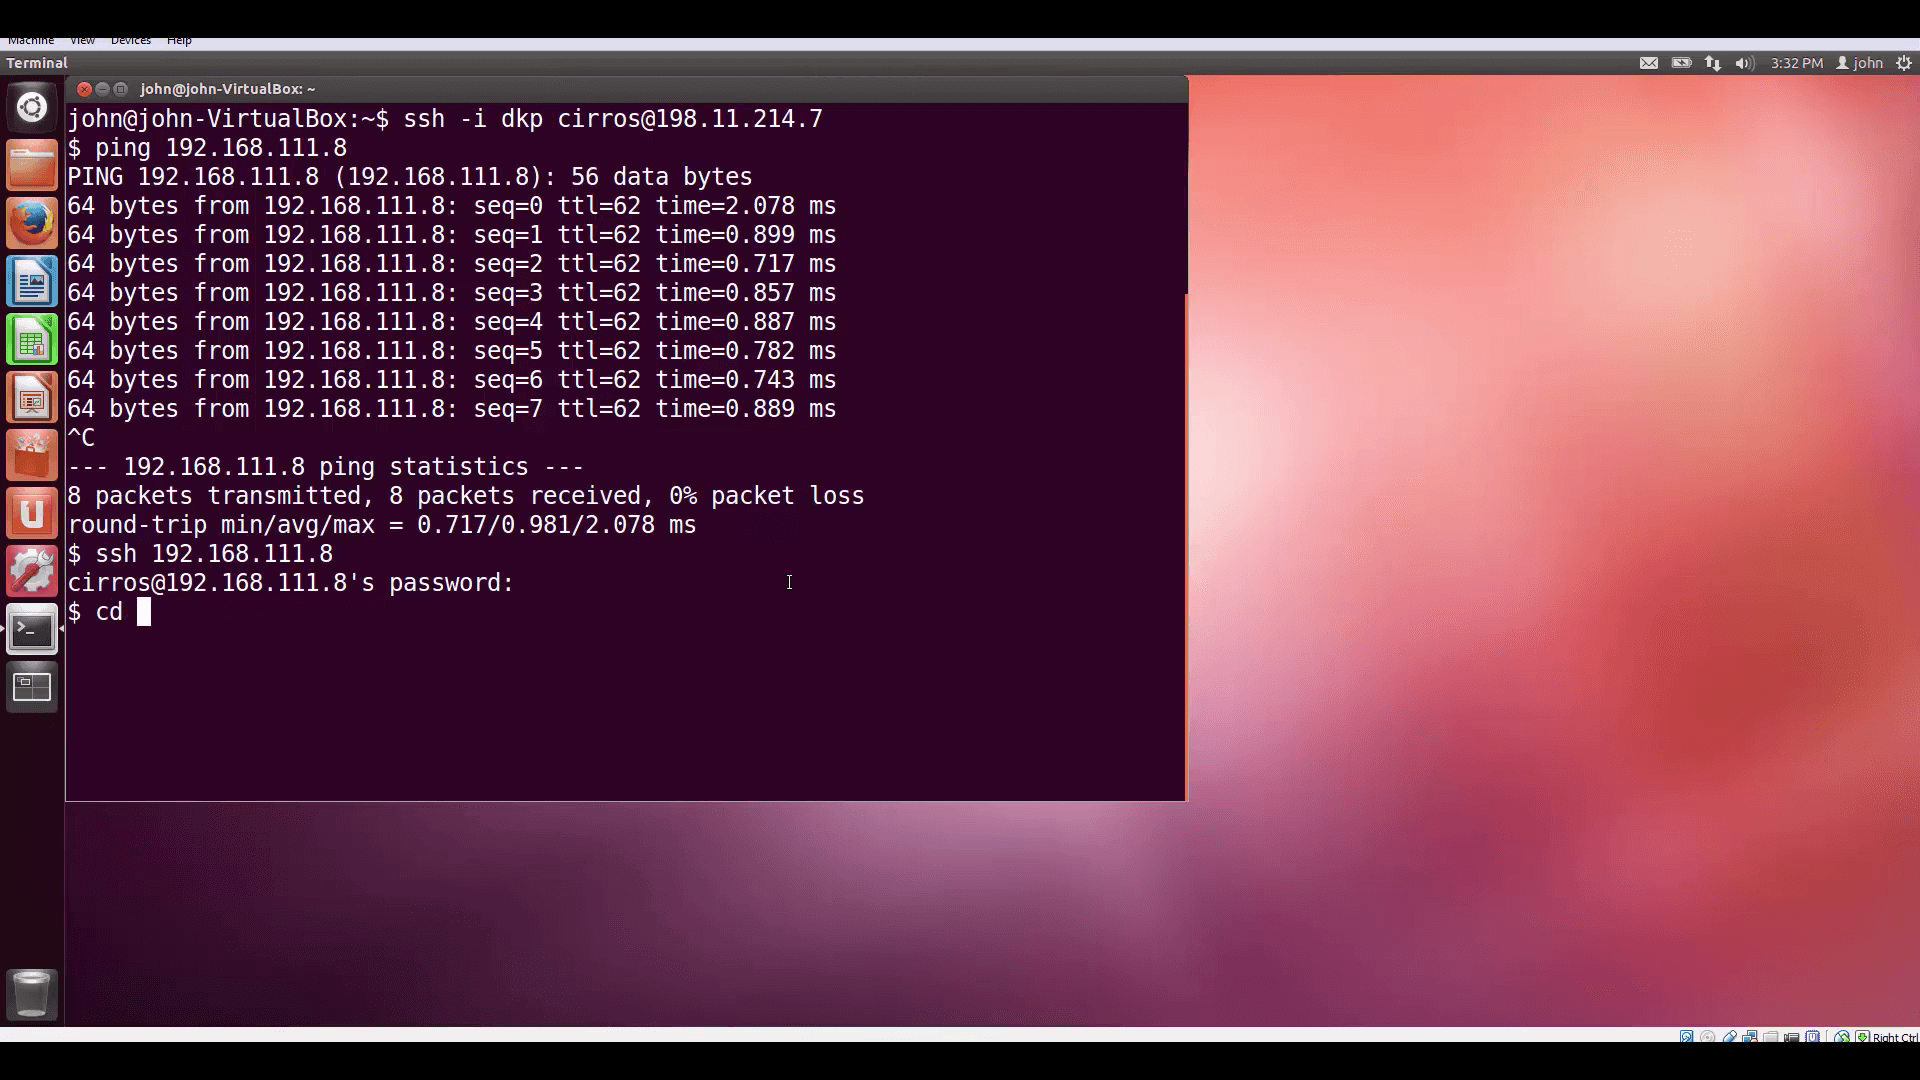
Now, let’s test. I’ve created two VMs, one in each Project, and associated them with floating IPs so I can SSH into them from my desktop. Let’s look at the internal IP of the VM on DemoProject2 (Cloud B) ... And then let’s log into the VM on DemoProject1 (Cloud A) and ping our new VPN friend on that internal IP address. Remember, we set each Project’s security group rules to admit ICMP traffic.
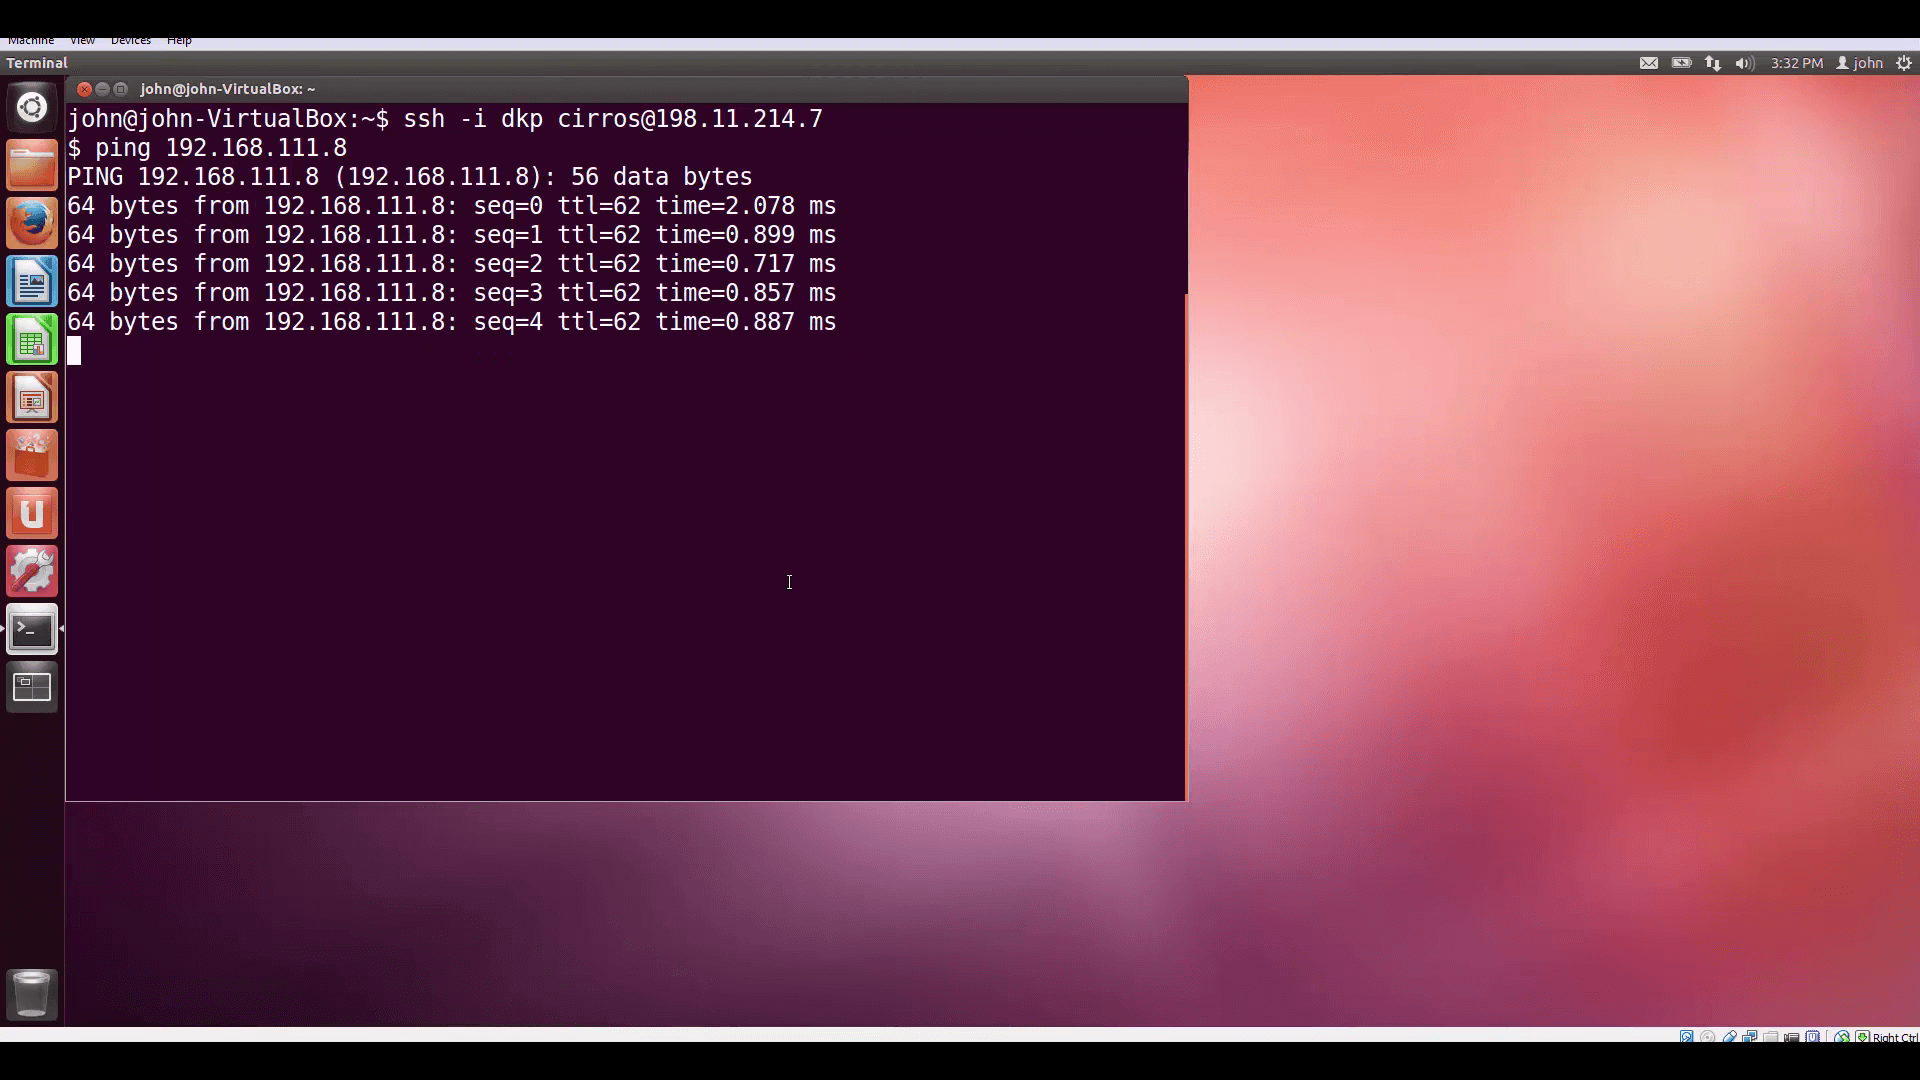
Success! Finally, lets log into our friend using SSH with user/pass authentication and pass some TCP traffic.
Simple and quick. In upcoming videos, we’ll be exploring some more-interesting use-cases for Mirantis OpenStack Express VPNaaS. Thanks for watching!
Mirantis OpenStack Express Basic Ops Tutorials
Mirantis OpenStack Express 2.0 — Mirantis' "Private Cloud as a Service" — is the fastest way to get your hands on a fully-functional, optimally-configured, private OpenStack cloud, running on hosted bare metal and able to scale on demand. This series of short tutorials shows how to perform common cloud operations tasks in MOX 2.0, and offers links to documentation and learning resources. Pro tip: though aimed at Mirantis OpenStack Express, many of the techniques discussed here will also work on a private OpenStack cloud deployed using Mirantis OpenStack.
Tutorials:
- Adding New Custom Boot Images
- Launching a VM from a Boot Image
- Creating a Block Storage Volume
- Attaching and Using Volumes
- Creating new VM Flavors
- Setting Up a project
- Murano in a Minute

