
Heat Application Stack in OpenContrail
In this blog we would like to show how to orchestrate with OpenStack using Heat and OpenContrail. We show how to create complex application stack with using existing implementation HAProxy Neutron LbaaS in OpenContrail.
Heat is the main project of the OpenStack orchestration program. It allows users to describe deployments of complex cloud applications in text files called templates. These templates are then parsed and executed by the Heat engine.
Heat is not officially supported by Juniper in Contrail release 1.2, but with OpenStack release IceHouse it works smoothly for standard OpenStack resources. Contrail specific Heat resources can be implemented through contrail-heat repo at following link https://github.com/Juniper/contrail-heat
The contrail heat extensions adds resources for managing:
- Network IPAMs - IP Address Management resources, which are available only in OpenContrail.
- Network Policies
- Service Instance - orchestration for service channing in OpenContrail
- etc.
Heat OpenContrail Installation
Deploy latest stable OpenContrail release 1.2 with OpenStack IceHouse on Ubuntu 12.04 or 14.04 (e.g. http://www.opencontrail.org/deploy-opencontrail/ ).
Add Cloud Archive IceHouse repository or download heat packages manually.
# apt-get install python-software-properties
# add-apt-repository cloud-archive:icehouse
Install heat packages
# apt-get install heat-api heat-api-cfn heat-api-cloudwatch heat-engine heat-common python-heatclient
Output should look like
# dpkg -l | grep heat
ii  heat-api                            2014.1.3-0ubuntu1                     all          OpenStack orchestration service - ReST API
ii  heat-api-cfn                        2014.1.3-0ubuntu1                     all          OpenStack orchestration service - CFN API
ii  heat-api-cloudwatch                 2014.1.3-0ubuntu1                     all          OpenStack orchestration service - CloudWatch API
ii  heat-common                         2014.1.3-0ubuntu1                     all          OpenStack orchestration service - common files
ii  heat-engine                         2014.1.3-0ubuntu1                     all          OpenStack orchestration service - engine
ii  python-heat                         2014.1.3-0ubuntu1                     all          OpenStack orchestration service - Python files
ii  python-heatclient                   0.2.8-0ubuntu1                        all          client library and CLI for OpenStack Heat
- Install contrail heat resources from github
# pip install git+https://github.com/Juniper/contrail-heat.git@R1.30
In the configuration file, specify the location of the database where the Orchestration service stores data. Use same MySQL database as Contrail with a heat user on the controller node. Replace HEAT_DBPASS with the password for the database user. Edit /etc/heat/heat.conf and modify the [database] section:
[database]
# The SQLAlchemy connection string used to connect to the database
connection = mysql://heat:HEAT_DBPASS@controller/heat
Use the password that you set previously to log in as root and create a heat database user:
# mysql -u root -p
mysql> CREATE DATABASE heat;
mysql> GRANT ALL PRIVILEGES ON heat.* TO 'heat'@'localhost' \
IDENTIFIED BY 'HEAT_DBPASS';
mysql> GRANT ALL PRIVILEGES ON heat.* TO 'heat'@'%' \
IDENTIFIED BY 'HEAT_DBPASS';
Create the heat service tables:
# su -s /bin/sh -c "heat-manage db_sync" heat
Create a heat user and endpoints that the Orchestration service can use to authenticate with the Identity Service.
# source /etc/contrail/openrc
# keystone user-create --name=heat --pass=HEAT_PASS  --email=heat@example.com
# keystone user-role-add --user=heat --tenant=service --role=admin
# keystone role-create --name heat_stack_user
# keystone service-create --name=heat --type=orchestration --description="Orchestration"
# keystone endpoint-create \
  --service-id=$(keystone service-list | awk '/ orchestration / {print $2}') \
  --publicurl=http://controller:8004/v1/%\(tenant_id\)s \
  --internalurl=http://controller:8004/v1/%\(tenant_id\)s \
  --adminurl=http://controller:8004/v1/%\(tenant_id\)s
# keystone service-create --name=heat-cfn --type=cloudformation --description="Orchestration CloudFormation"
# keystone endpoint-create \
  --service-id=$(keystone service-list | awk '/ cloudformation / {print $2}') \
  --publicurl=http://controller:8000/v1 \
  --internalurl=http://controller:8000/v1 \
  --adminurl=http://controller:8000/v1
Edit following parameters in /etc/heat.conf
 [DEFAULT]
...
# URL of the Heat metadata server. (string value)
heat_metadata_server_url = http://CONTROLLER_IP:8000
# URL of the Heat waitcondition server. (string value)
heat_waitcondition_server_url = http://CONTROLLER_IP:8000/v1/waitcondition
...
rabbit_host = CONTROLLER_IP
rabbit_user = RABBIT_USER
rabbit_password = RABBIT_PASS
...

[keystone_authtoken]
auth_host = controller
auth_port = 35357
auth_protocol = http
auth_uri = http://controller:5000/v2.0
admin_tenant_name = service
admin_user = heat
admin_password = HEAT_PASS

[ec2authtoken]
auth_uri = http://controller:5000/v2.0
Restart heat services
# service heat-api restart
# service heat-api-cfn restart
# service heat-engine restart
Verify heat
# heat list
If there is nothing, it is OK. Otherwise something is wrong. Now we can start with our application stack deployment.
Heat Stack Deployment Process
This part will cover how did we implement the automated deployment process with heat and salt. It actually consist of only 2 phases. In the 1st the heat orchestration client creates the necessary resources. After all resources have been successfully created the 2nd phase is stated. It orchestrates services across the application stack in the right order, ie. the database services are installed before the application services that require them.
Create infrastructure resources
Orchestrate compute services
The following schema illustrates how this deployment process works with the OpenStack IaaS platform. Heat orchestration
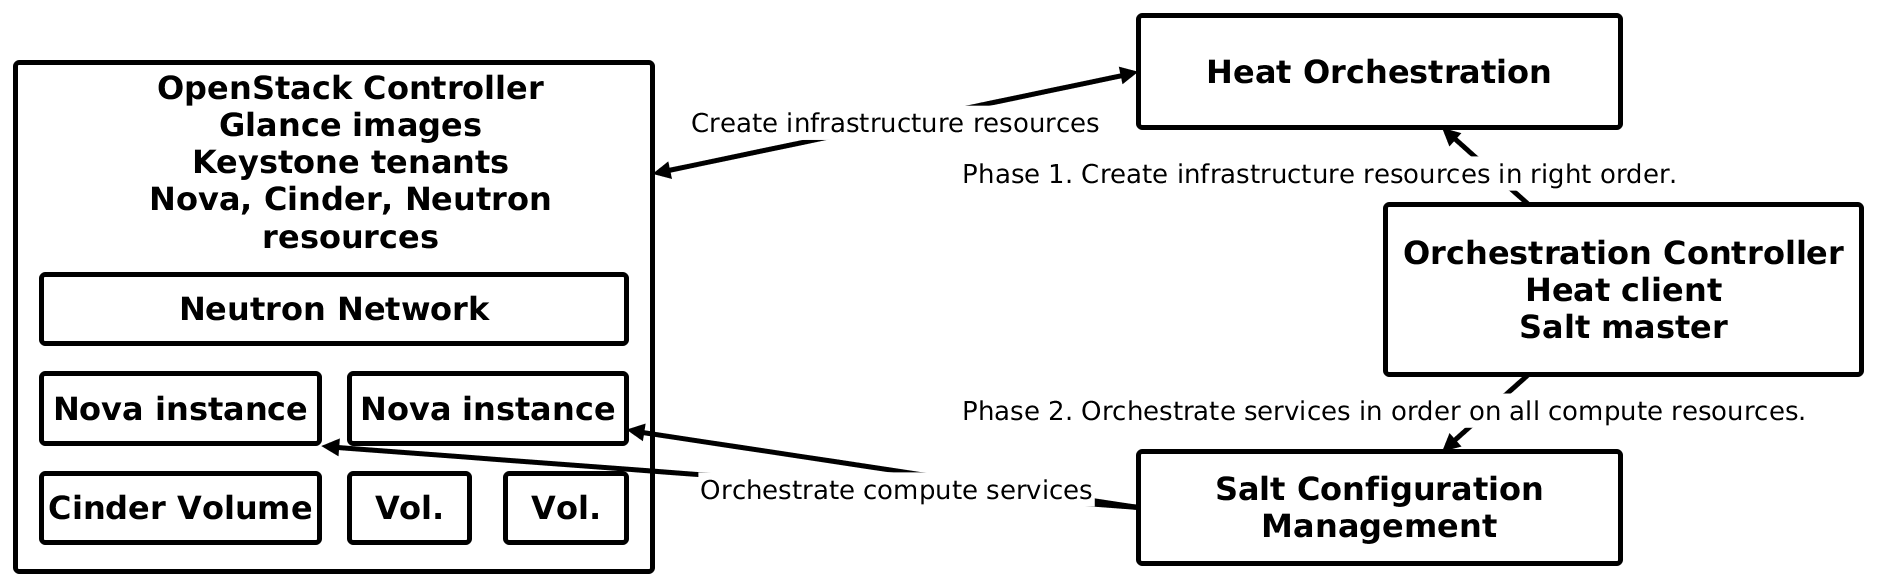
The entire process for this test is processed by the Salt orchestration runner [1]. The following code shows simple salt orchestration runner for deploying and configuring our application heat stacks covered in next part.
setup_host:
 salt.state:
 - tgt: 'master.tcpcloud.eu'
 - sls:
    - reclass.storage
    - salt.master
    - heat.client

cmd.run:
 salt.function:
 - tgt: 'master.tcpcloud.eu'
 - arg:
    - cd /srv/heat/env; source /root/keystonerc; ./create_stack.sh <stack_name> <stack_env>

configure_node:
 salt.state:
 - tgt: '*<stack_env>*'
 - highstate: True
This functionality can be implemented by bash script or Jenkins job as well. So what does the salt runner do? First it gets the metadata and provisioning services (salt formulas) on the orchestration controller in shape, then it calls heat to create resources. Our script waits for the completion of the stack creation. Then finally the salt master is called to enforce entire service stack (salt highstate) on all newly created compute resources. With our simple stack we can do it in just one configuration step, for more complicated stacks more steps would be required.
Out Testing Application Stack
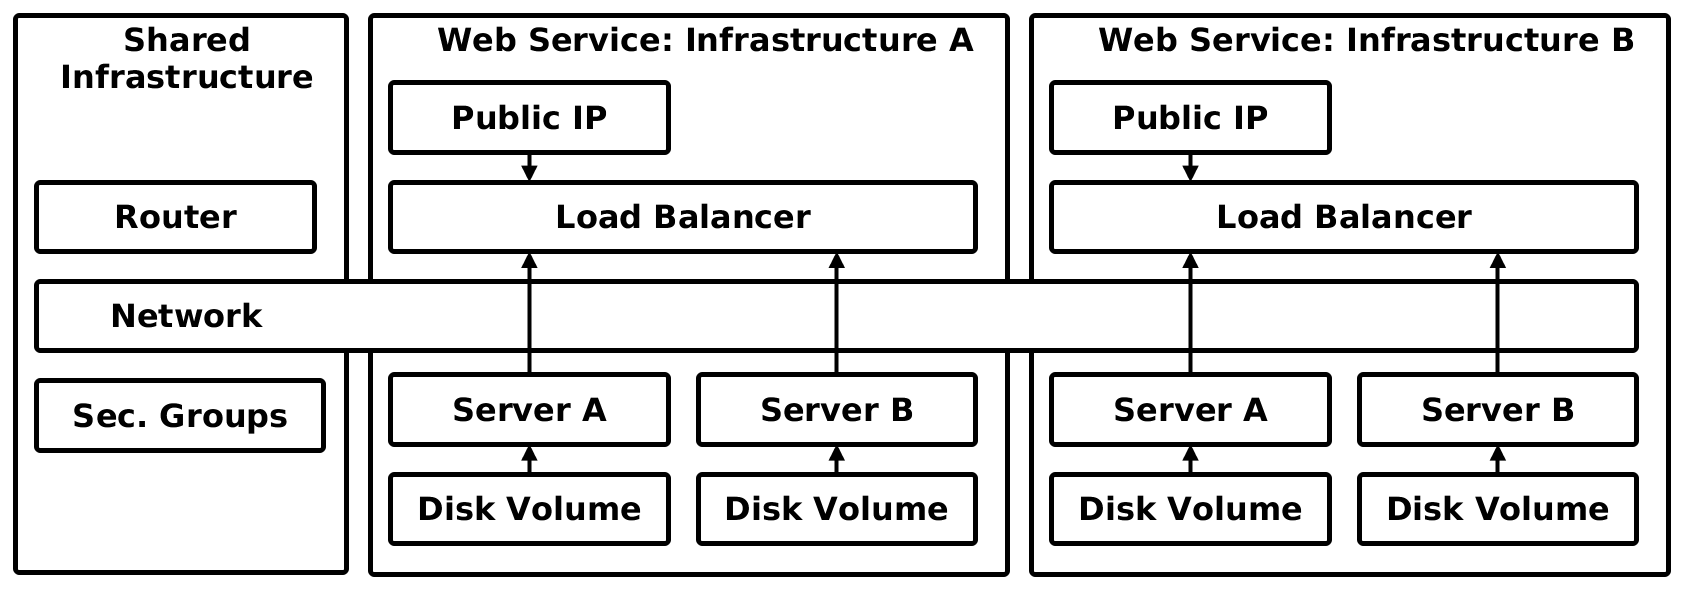
We tested the capabilities of Heat with OpenContrail resources on multiple application stacks with 2 web services booted from block volumes with load balancer in front. We have several kind of resources that were needed to be created before we could start the configuration orchestration:
- Network: Private Neutron network where all instances, load balancers and router are connnected.
- Public IP: Neutron Floating IP from public network pool tha is associated with the load balancers.
- Router: Shared Neutron Router implementing SNAT for all compute nodes within the private network.
- Security Group: Shared security/firewall rules for orchestration and application services.
- Disk Volume: Cinder block device with server image of ubuntu trusty with cfntools preinstalled.
- Server: Nova Compute Instance is virtual server booted from block device and connected to virtual network having specific firewall rules (and little more). We tested for block device IBM SVC and Hitachi VSP cinder drivers.
- Load Balancer: OpenContrail implementation of Neutron LBaaS Resource, works as 2 separate HA proxies with balanced IP.
The following schema shows our the heat stack within one testing tenant. There are multiple web Service infrastructures (A, B), each have the same resource definition in heat, just the metadata (environmental parameters) differs.
Following code shows the complete creation of our testing in heat. It’s in the new HOT format which is our opinion a good leap forward to better readability and usability of these templates.
heat_template_version: 2013-05-23
description: Web Service Stack
parameters:
  lb_pool_name:
    type: string
    description: Name of the loadbalancer
  server01_name:
    type: string
    description: Name of the server01 - instance/volume
  server02_name:
    type: string
    description: Name of the server02 - instance/volume
  public_net_id:
    type: string
    description: ID of the public network
  private_net_id:
    type: string
    description: ID of the private network
  private_subnet_id:
    type: string
    description: ID of the private network subnet
  server_flavor:
    type: string
    description: Instance type for the servers
    default: m1.small
    constraints:
      - allowed_values: [m1.tiny, m1.small, m1.medium, m1.large]
  volume_source:
    type: string
    description: Source volume for clonned volumes
resources:
  server_volume_01:
    type: OS::Cinder::Volume
    properties:
      name: { get_param: server01_name }
      size: 20
      source_volid: { get_param: server_volume }
  server_instance_01:
    type: OS::Nova::Server
    properties:
      block_device_mapping:
      - volume_id: { get_resource: server_volume_01 }
        device_name: vda
      flavor: { get_param: server_flavor }
    name: { get_param: server01_name }
      networks:
      - network: { get_param: private_net_id }
    security_groups:
      - default
      user_data_format: RAW
      user_data: |
        #!/bin/bash -v
  server_volume_02:
    type: OS::Cinder::Volume
    properties:
      name: { get_param: server02_name }
      size: 20
      source_volid: { get_param: server_volume }
  server_instance_02:
    type: OS::Nova::Server
    properties:
      block_device_mapping:
      - volume_id: { get_resource: server_volume_02 }
        device_name: vda
      flavor: { get_param: server_flavor }
    name: { get_param: server02_name }
      networks:
      - network: { get_param: private_net_id }
    security_groups:
      - default
      user_data_format: RAW
      user_data: |
        #!/bin/bash -v
  neutron_ping_healt_monitor:
    type: OS::Neutron::HealthMonitor
    properties:
      admin_state_up: True
      delay: 20
      max_retries: 10
      timeout: 10
      type: PING
  neutron_pool:
    type: OS::Neutron::Pool
    properties:
      admin_state_up: True
      lb_method: ROUND_ROBIN
      name: { get_param: lb_pool_name }
      protocol: HTTP
      monitors:
      - { get_resource: neutron_ping_healt_monitor }
      subnet_id: { get_param: private_subnet_id }
      vip:
        protocol_port: 80
        admin_state_up: True
        subnet: { get_param: vip_subnet_id }
  neutron_pool_member_instance_01:
    type: OS::Neutron::PoolMember
    properties:
      address: { get_attr: [ server_instance_01, first_address ] }
      admin_state_up: True
      pool_id: { get_resource: neutron_pool }
      protocol_port: 80
      weight: 1
  neutron_pool_member_instance_02:
    type: OS::Neutron::PoolMember
    properties:
      address: { get_attr: [ server_instance_02, first_address ] }
      admin_state_up: True
      pool_id: { get_resource: neutron_pool }
      protocol_port: 80
      weight: 1
  neutron_floatingip:
    type: OS::Neutron::FloatingIP
    properties:
    floating_network_id: { get_param: public_net_id }
      port_id: { "Fn::Select" : [ "port_id", { get_attr: [ neutron_pool , vip ] } ] }
For this template parameters that define the environment are needed. And are defined by the following YAML object.
parameters:
  public_net_id: <uuid>
  private_net_id: <uuid>
  private_subnet_id: <uuid>
  lb_pool_name: web-stg-lb-pool
  server01_name: web-stg01
  server02_name: web-stg02
  server_flavor: m1.small
  volume_source: <uuid>
Graphical User Interface
Along the automated shell guns we can operate the stack using the horizon-based GUI. We have adapted the GUI to see
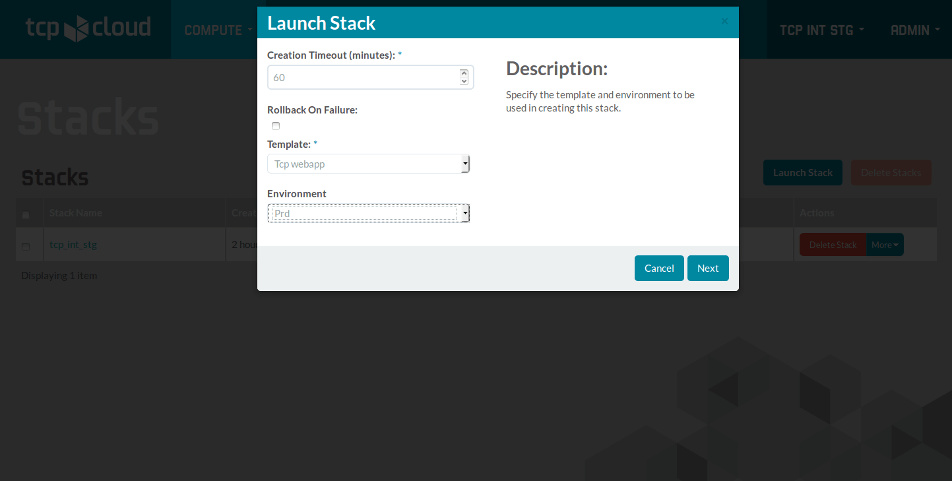
As the Heat orchestration GUI has limited options it can be used for example by developers without deeper knowledge of underlying service stack to setup their working or staging environments.
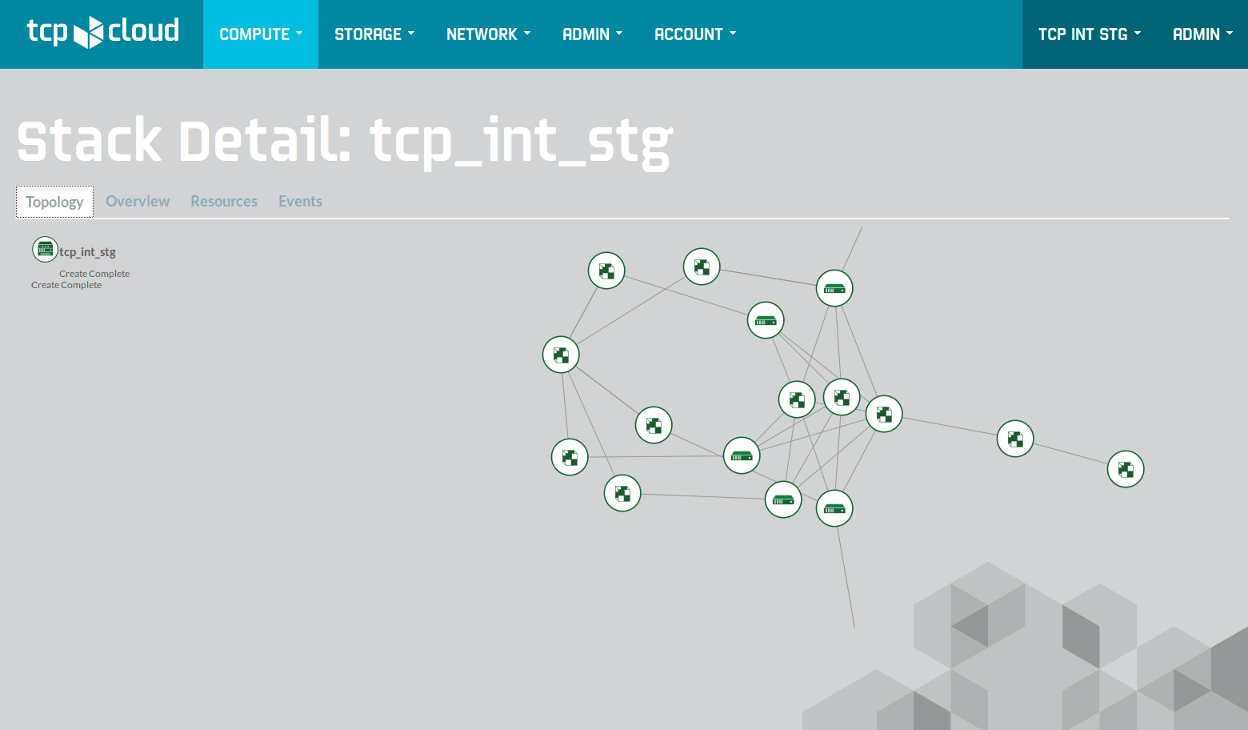
The following screen shows application stack with 5 server instance booted from volumes, connected to the same network with router and 2 floating IP’s hidden above and below the graph borders.
Conclusion
Setting up Heat templates can solve previously unsolvable issues in virtual infrastructure life-cycles and that is creation and deletion of not-compute resources that compute resources rely on (network and storage resources mostly). Heat allows to create expandable range of resources that are created exactly in the right order. The compute servers are part of the resource stack and can be created and directed to configuration management of your choice. We have used the Salt configuration tool, but tools like Puppet, Chef or Ansible can be used as well.
Information sources
- http://docs.saltstack.com/en/latest/topics/tutorials/states_pt5.html#orchestrate-runner
- opencontrail.org
Ales Komarek & Jakub Pavlik
TCP Cloud Engineers


