

How to Build a Kubernetes Development Environment
Learn to configure desktop virtual machines for evaluating "big software" and learning Kubernetes development
Learning container and cloud-native development, DevOps, and public/private cloud operations means tackling a lot of technologies, and learning how they work individually and together. This tutorial shows you how to set up a desktop Linux virtual machine as an extensible “home base” environment for this kind of work. (P.S. You can use a VM, set up exactly this way, when evaluating any Mirantis product. Solutions like Lens – the Kubernetes IDE – run right on the desktop itself. Enterprise solutions, like Mirantis Kubernetes Engine and Mirantis Container Cloud, deploy on multiple servers, but require a ‘bootstrap’ machine to access webUIs, download assets, run setup scripts, and perform other critical tasks.)
Why Linux? These days, many kinds of desktop coding and DevOps tools (e.g., Lens – the Kubernetes IDE, Docker, VScode, etc.) are available in versions for Mac and Windows laptops. Still other tools are accessed primarily through a browser, so work on any desktop system. But Linux is dominant in datacenters and in clouds, and many open source tools and infrastructure components run only on Linux. Finally, Linux — with its plethora of tools — provides a mature and comprehensive platform for web and cloud application development: in some senses, the standard environment. So it makes sense to prioritize Linux when building environments for doing cloudy work.
There are, of course, good ways to create development and deployment environments on Mac and Windows. In Mac’s case, the OS resembles Linux very closely (though there are real differences). In Windows’ case, Windows Subsystem for Linux and its ecosystem of partner solutions are emerging as a very practical toolkit for doing Linux things. So Linux virtual machines aren’t the only possible solution.
Why virtual machines? You’ve heard the expression: “move fast and break things.” Linux users tend to break things pretty often. While modern Linux is itself very, very stable (as in “servers that run for years without a fault” stable), coders moving fast, customizing, and trying new software locally can snarl up a system to the point where restabilizing it is time-consuming.
Virtual machines solve this problem nicely. As long as you regularly save your critical code and documents in a remote repository (e.g., Github), there’s really nothing to worry about, as long as you have a snapshot of your machine taken when it was recently in a stable state. Just power down the broken VM, restore the clean snapshot, pull your repo, and you’re back in business.
Another reason virtual machines are great for proofs-of-concept, product evaluation and learning is that you can easily create a clean workstation environment for each project, and save lots of such machines efficiently for later access (local disk space is cheap). This tends to be much simpler, safer, and overall faster than using one VM for multiple projects, especially when you’re installing and/or deploying complicated software.
Note: this is both a very basic and a very opinionated guide. What we’re describing, here, is a toolkit that works well for us, and has evolved over (yikes) seven or eight years of doing cloud projects. We’re not going to spend a lot of energy justifying choices and methods, beyond nodding sagely and saying “Oh, we tried that. But this saves us more time.”
Obviously, there are many other ways to approach building and managing development environments, doing desktop virtualization, etc., both in general and in narrower contexts. You’ll almost certainly encounter, learn about, and probably adopt some of these tools, over time, and make them part of your own way of working.
Prerequisites
To follow this tutorial, you’ll need a laptop or desktop Windows, Mac, or indeed Linux machine with internet access. As usual, the faster your CPU runs and the more cores it has, and the more RAM you have installed in your system, the better. A fast, large Solid State Disk (SSD) is also very helpful and will improve virtual machine performance.
Step 1: Install VirtualBox
VirtualBox is “free as in beer” proprietary desktop virtualization software from Oracle that runs on Linux, Mac, and Windows. To install it, just visit virtualbox.org, click the download link, and launch the executable. When you first start VirtualBox, it should automatically offer to download its Extensions Pack — do this, and install it.
Step 2: Download Ubuntu Desktop
Visit https://ubuntu.com/download/desktop to download the latest Long Term Support (LTS) version of Ubuntu Desktop Edition (at time of writing, this was 20.04.20). The downloadable is an .iso image file.
Time-saver: If your project requires hosts (e.g., target machines on which you plan to deploy Kubernetes) you may save a little time by also downloading a copy of Ubuntu Server 18.04.5 LTS, which is a recent version of Ubuntu Server supported by Mirantis for all of its products.
Step 3: Create and configure a new VirtualBox virtual machine
Start VirtualBox, and click on the top menu: Machine>New (or press CTRL-N).

Select Linux and Ubuntu (64-bit) from the popdowns. Give your machine a generic name that identifies it by operating system and version. You’ll use this initial VM image to create new VMs as you need them (a process called “cloning”).
Click Next, and assign a reasonable amount of RAM to your VM. For Ubuntu Desktop, as little as 4GB will serve. For various reasons, however, we tend to run fairly large desktop VMs, since having enough RAM is handy for when you want to run lots of tools at the same time, or host big, multi-container applications (like Kubernetes manager nodes). This VM has 12GB of RAM.

On the next screen, select the radio button to create a virtual hard disk file.

And select the radio button to use VDI format for the virtual disk.

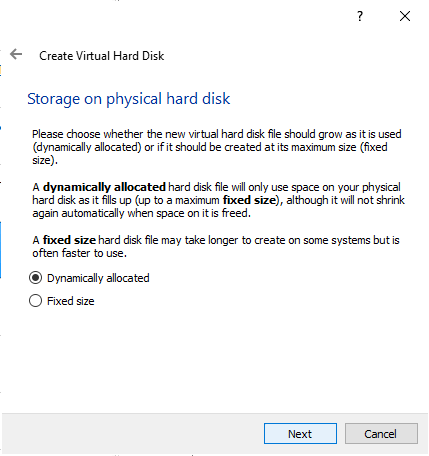
On the next screen, determine if you want to create a dynamically-sized or fixed virtual hard disk file. Dynamic disks grow as they get filled up, so consume less of your mass storage. Fixed-size disks consume all their allocated space immediately, but run a little faster. If you plan on building a lot of containers, you may find the extra speed useful and worth the mass storage cost. Likewise, if you’re deploying infrastructure nodes (e.g., Kubernetes workers) that will then run workloads of their own, the extra speed of a fixed-size disk may be desirable, if you have the SSD space to spare.
Finally, pick the size of your virtual hard disk. 10GB — the default — is sufficient for most projects. Kubernetes nodes may require 25GB or more.

Click Create to tell VirtualBox to create your virtual hard disk.
FREE EBOOK
Learn Kubernetes 5 Minutes at a Time
A hands-on introduction to Kubernetes for developers
Next, click to highlight your new VM in the left-hand menu and select Settings>System>Processor. A typical desktop work VM will profit by being given two or more virtual CPUs (vCPUs). A Kubernetes node can use more, if your physical CPU has sufficient cores available.

Next, click the Network tab. VirtualBox offers many options for networking. VMs for cloudy work, however, have some special requirements:
They may need to conveniently access other VMs running on your local host.
They may need to conveniently access VMs running on other VirtualBox hosts on the same wired or wireless LAN (for example, many people use old and spare laptops, all attached to the same LAN, to build home labs).
You may need to access this VM from your host or vice-versa.
All these machines are somewhat protected behind a home router and NAT (unless you’ve pinholed the router to enable access to a webserver VM — a popular application).
You don’t want to mess with networking any more than you need to.
For this reason, we recommend using VirtualBox “bridged” networking unless you know you have reason not to do so. This networking mode gives each virtual machine you start a class C LAN IP address (i.e., 192.168.x.x) assigned by your local DHCP server (usually that home router), which is reachable from your host and any other machine (or similarly-configured VM) on your local network. Most home routers will, by default, reserve assigned IP addresses for long periods of time unless reset. So for all but the most long-term projects, this setup gives you directly-accessible IPs for all your VMs (no need for local tunneling or other shenanigans), and you can trust those IPs to stay the same, even when you power down VMs for periods of time.

Next, click on the Display tab. Default settings are fine here, but make sure that Graphics Controller is set to VMSVGA. Depending on your graphics card, you may want to play with enabling/disabling 3D Acceleration, which can make Gnome desktop work a little faster.

Finally, click the Storage tab. Here, you’re going to click on the icon of the CD-ROM drive (which is now empty) and use the popdown menu on the right (little CD icon) to ‘Choose a disk file …’ to browse to your newly-downloaded Ubuntu Desktop .iso. The popdown will also display links to install disk files you’ve used before.

Click ‘OK.’
Now you’re ready to install Ubuntu to the virtual drive of your VM. Double-click the VM’s name in the left-hand menu to start it. It will work for a while, then display Ubuntu install options. Pick the option that says “Install Ubuntu.”
Thereafter, Ubuntu will take you through a fairly quick group of setup screens. You’ll need to confirm the kind of keyboard you’re using, determine the scope of the installation (in general, we elect to load only a browser and basic applications, elect to download third-party drivers, and elect to apply all recent updates during installation), pick a username and password, and confirm that you want to install Ubuntu to the VM’s hard disk, erasing its current contents (of which there aren’t any).
Ubuntu usually installs without a hiccup. Your VM will automatically restart when installation is complete. You’ll be prompted to remove the boot disk (the CD ROM in this case), but you can just press any key to pass this prompt. Log in with your username and password.
Step 4: Correctly size Ubuntu’s display
In VirtualBox environments, Ubuntu 20.04 starts by assuming that your physical display is the size of a VirtualBox terminal screen (i.e., too small). So the first thing you’ll want to do is right-click on the Gnome desktop background, pop up the menu, select Display Settings, and click on Resolution. We always select a resolution close to the actual pixel size of our physical display (1920 x 1080 — the closest Ubuntu dimensions are 1920 x 975). Once this setting is selected, you can fullsize the VM’s window and the Ubuntu display will scale seamlessly to make use of the space.
Step 5: Install VirtualBox Guest Additions
Guest Additions are helper software that lets VirtualBox virtual machines interoperate with functions of the host machine, like clipboards and the file system. We generally only use it to support bi-directional shared clipboard, which is a huge time-saver: you can cut and paste from your host to applications and terminal windows on your Ubuntu VM, and vice-versa. Among other things, this makes it much easier to follow recipes that include many terminal commands (like Mirantis product trial installation recipes).
To install Guest Additions, at the top of the VirtualBox Ubuntu display, you’ll see a little menu with an item Devices. Click Devices>Optical Drives and at the bottom of the resulting popdown, you’ll see an item ‘Insert Guest Additions CD Image’ Click that. A message will pop up asking if you want to run the autostart software this CD image contains. Click Yes. VirtualBox will ask for your password to confirm that you want to proceed. The Guest Additions will then build and install automatically.
When complete, go back to the top menu and click Devices>Shared Clipboard> and select ‘Bidirectional.’ Then reboot your Ubuntu VM, using the Power Off option in the top right popdown menu, or by opening a terminal (CTRL-ALT-T) and entering:
sudo shutdown -r nowYou’ll have to give your password to enter sudo mode (equivalent to becoming the root user for the duration of a single command). But we’ll fix that in a second. When your machine reboots, your bidirectional clipboard should be operational.
Step 6: Passwordless sudo
By default, Ubuntu Desktop (and server) both set up to insist that you enter a password before executing commands in sudo mode. This can be annoying. If you’d like to enter sudo without being asked for a password, here’s how to fix it. Note: on some cloud platforms, like Amazon Web Services EC2, Ubuntu is preconfigured with passwordless sudo for the administrative user by default.
Start by opening a terminal window with CTRL-ALT-T. Then start the visudo program (you’ll need to provide your password, but this is the last time):
sudo visudoAt the bottom of this file, add the line:
$USER ALL=(ALL) NOPASSWD: ALL… where $USER is a system-created shell variable that contains your username.
Save and exit. Then log out of the machine (Log Out option, upper right hand popdown menu) and back in. You should now be able to perform sudo actions without providing your password
Step 7: Power down and snapshot your VM
At this point, it makes sense to ensure that you can always return your VM to its current known good state. To do this, first power down the VM (don’t restart), whose window will close. Then select the VM in the left-hand menu, and click the green plus sign (+, also marked “Take”) in the upper bar. In just a second or so, you’ll be able to name your snapshot, and see it recorded in this VM’s list of available snapshots. You can return your VM to its present state, recovering instantly from any foul-ups, by powering it down, right-clicking this snapshot, and selecting ‘Restore.’
You can also clone the snapshot to create new, clean desktop virtual machines for each new project you begin. As you evolve your map of applications you find beneficial to use (see below), you’ll also want to take a base snapshot later in the process, so you can deliver clones with a full complement of applications ready to go.
Remember, when you start a clone, you’re starting an image of a machine frozen at a particular point in (past) time. So the first thing you should do with such a ‘new’ machine is to apply updates:
sudo apt-get update
sudo apt-get upgrade
Step 8: Add Useful Applications
Your Ubuntu machine comes with many useful applications already available, among them:
A browser (Firefox)
git version control – used to manage branched directories of software under development, and interact with remote repositories (e.g., on GitHub).
Python 3 – a recent release of Python 3 — good for many kinds of application programming, in particular, operational automation
In the next steps, you’ll use the Ubuntu Software utility (start this by clicking on the little orange suitcase with the “A” on it, in the left-hand Favorites bar) to add several important applications. In most cases, versions available through the Software utility are recent enough to be immediately usable.
In the future, in rare cases, you may encounter situations where you truly need the latest version of an application, in which case, a best practice is to use the Software utility to remove any existing installation of the application, and then install the application using the manual process prescribed by its maker (vendor, open source project, etc.).
All the following applications are available in fairly recent versions through Ubuntu Software:
A Programming Text Editor/IDE
These days, lots of people are using Visual Studio Code (VSCode). A very good alternative is Atom, the project forked to produce VSCode.
kubectl – the Kubernetes CLI
Kubectl is the classic way of managing Kubernetes clusters. You can skip installing kubectl if you instead elect to install and use Lens – the Kubernetes IDE, which installs and manages multiple versions of kubectl for you.
Postman – the REST API explorer
Postman is an application used to explore and work with standard REST APIs. You’ll use it frequently to explore remote services and cloud frameworks when writing automation.
Step 9: Install Docker
The simplest way to install Docker on Ubuntu is to use snap:
sudo snap install dockerIt then often makes sense to make your administrative user part of the Docker group, so they can call the Docker CLI without using sudo:
sudo groupadd docker
sudo usermod -aG docker $USER
Then you can reload settings for the docker group, making this effective:
newgrp dockerStep 10: Final Steps
At this point, your system is pretty-well tuned up and ready for real work. For container development, your next step is probably to install open source Docker, for which we’ve provided a separate mini tutorial. You’ll also want to install Lens – the Kubernetes IDE — the easiest way to visualize and interact with Kubernetes clusters. After that, you should be ready to start learning container development, or move on and try deploying one of Mirantis Kubernetes products.
Choose your cloud native journey.
Whatever your role, we`re here to help with open source tools and world-class support.