
OpenStack Networking Tutorial: Single-host FlatDHCPManager
In a previous post about OpenStack networking, my colleague Piotr Siwczak explained how FlatManager and FlatDHCPManager works in a multi-host network setup.
Here, I will explain how FlatDHCPManager works with single-host networking. It is perhaps easier to understand; it also happens to be the default mode you get when installing OpenStack using one of the easy ways (by using the Puppet recipes). (I will not consider FlatManager, as it is not very widely used).
Table of contents
- General idea - basic topology of this network mode
- Network Configuration - how node configuration shouldlook like before and after starting a VM
- Controller node, no VMs - pristine controller
- Compute node, no VMs - pristine compute node
- Starting a VM
- Controller node, VM created - what changed on the controller
- Compute node, VM created - what changed on the compute node
- VM guest OS - network settings inside the VM
- Understanding Packet Flow- extremely detailed explanations of traffic routing at all levels
- L2 flow - how Ethernet unicasts and broadcasts work between nodes and VMs
- L3 flow - how IP addressing and routing works between nodes and VMs
- How a VM gets an IP address - what happens during the DHCP exchange on VM boot
- Pinging VM from controller - how controller ↔ VM traffic is routed
- Pinging VM from compute node - why you can't reach a VM from a compute node
- Pinging VM from VM - how traffic is routed between VMs
- Pinging outside world from VM - how a VM would reach outside world
- Troubleshooting - general recommendations and tools
- What's next
- Conclusion
General idea
With single-host FlatDHCP, there's just one instance of nova-network; dnsmasq, typically running on the controller node, is shared by all the VMs.
Contrast that to multi-host FlatDHCP networking, where each compute node also hosts its own instance of the nova-network service, which provides the DHCP server (dnsmasq) and default gateway for the VMs on that node.
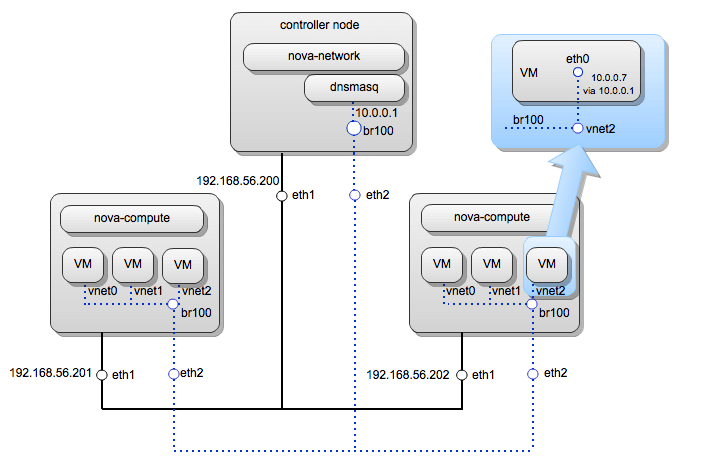
In this setup, the br100 interface and an associated physical interface eth2 on the compute nodes don't have an assigned IP address at all; they merely serve as an L2 interconnect that allows the VMs to reach nova-network and each other. Nova-network essentially functions as an L2 switch.
VM virtual interfaces are attached to br100 as well. The VMs have their default gateway set (in the guest OS configuration) to 10.0.0.1, which means that all external traffic from VMs is routed through the controller node. Traffic within 10.0.0.0/24 is not routed through the controller, however.
Network Configuration
Let us consider an actual example:
- 1 controller node
- 2 compute nodes,
- eth1 hosting the management network (the one through which compute nodes can communicate with the controller and nova services)
- eth2 hosting the VM network (the one to which VMs will be attached).
We'll start with a look at all aspects of the network configuration on the controller and one of the compute nodes: before and after starting a VM.
Controller node, no VMs
The controller's network configuration looks like this (it changes very little when VMs are spawned):
Interfaces:
openstack@controller-1:~$ ip a
... (loopback has the metadata service on 169.254.169.254) ...
3: eth1:  mtu 1500 qdisc pfifo_fast state UNKNOWN qlen 1000
    link/ether 08:00:27:9d:c4:b0 brd ff:ff:ff:ff:ff:ff
    inet 192.168.56.200/24 brd 192.168.56.255 scope global eth1
    inet6 fe80::a00:27ff:fe9d:c4b0/64 scope link
       valid_lft forever preferred_lft forever
4: eth2:  mtu 1500 qdisc pfifo_fast master br100 state UNKNOWN qlen 1000
    link/ether 08:00:27:8f:87:fa brd ff:ff:ff:ff:ff:ff
    inet6 fe80::a00:27ff:fe8f:87fa/64 scope link
       valid_lft forever preferred_lft forever
5: br100:  mtu 1500 qdisc noqueue state UP
    link/ether 08:00:27:8f:87:fa brd ff:ff:ff:ff:ff:ff
    inet 10.0.0.1/24 brd 10.0.0.255 scope global br100
    inet6 fe80::7053:6bff:fe43:4dfd/64 scope link
       valid_lft forever preferred_lft forever

openstack@compute-1:~$ cat /etc/network/interfaces
...
iface eth2 inet manual
  up ifconfig $IFACE 0.0.0.0 up
  up ifconfig $IFACE promisc
NOTE:
eth2 is configured to use promiscuous mode! This is extremely important. It is configured in the same way on the compute nodes. Promiscuous mode allows the interface to receive packets not targeted to this interface's MAC address. Packets for VMs will be traveling through eth2, but their target MAC will be that of the VMs, not of eth2, so to let them in, we must use promiscuous mode.
Bridges:
openstack@controller-1:~$ brctl show
bridge name bridge id   STP enabled interfaces
br100   8000.0800278f87fa no    eth2
Routes:
openstack@controller-1:~$ route -n
Kernel IP routing table
Destination     Gateway         Genmask         Flags Metric Ref    Use Iface
0.0.0.0         192.168.56.101  0.0.0.0         UG    100    0        0 eth1
10.0.0.0        0.0.0.0         255.255.255.0   U     0      0        0 br100
169.254.0.0     0.0.0.0         255.255.0.0     U     1000   0        0 eth1
192.168.56.0    0.0.0.0         255.255.255.0   U     0      0        0 eth1
Dnsmasq running:
openstack@controller-1:~$ ps aux | grep dnsmasq
nobody    2729  0.0  0.0  27532   996 ?        S    23:12   0:00 /usr/sbin/dns
masq --strict-order --bind-interfaces --conf-file= --domain=novalocal --pid-fi
le=/var/lib/nova/networks/nova-br100.pid --listen-address=10.0.0.1 --except-in
terface=lo --dhcp-range=10.0.0.2,static,120s --dhcp-lease-max=256 --dhcp-hosts
file=/var/lib/nova/networks/nova-br100.conf --dhcp-script=/usr/bin/nova-dhcpbr
idge --leasefile-ro
root      2730  0.0  0.0  27504   240 ?        S    23:12   0:00 /usr/sbin/dns
masq --strict-order --bind-interfaces --conf-file= --domain=novalocal --pid-fi
le=/var/lib/nova/networks/nova-br100.pid --listen-address=10.0.0.1 --except-in
terface=lo --dhcp-range=10.0.0.2,static,120s --dhcp-lease-max=256 --dhcp-hosts
file=/var/lib/nova/networks/nova-br100.conf --dhcp-script=/usr/bin/nova-dhcpbr
idge --leasefile-ro
Nova configuration file:
openstack@controller-1:~$ sudo cat /etc/nova/nova.conf
--public_interface=eth1
--fixed_range=10.0.0.0/24
--flat_interface=eth2
--flat_network_bridge=br100
--network_manager=nova.network.manager.FlatDHCPManager
... (more entries omitted) ...
Dnsmasq configuration file:
openstack@controller-1:~$ cat /var/lib/nova/networks/nova-br100.conf
(empty)
eth1 is the management network interface (controlled by --public_interface). The controller has address 192.168.56.200, and we have a default gateway on 192.168.56.101.
eth2 is the VM network interface (controlled by --flat_interface). As said, it functions basically as an L2 switch; it doesn't even have an IP address assigned. It is bridged with br100 (controlled by --flat_network_bridge).
br100 usually doesn't have any IP address assigned as well, but on the controller node it has dnsmasq listening on 10.0.0.1 (it is the DHCP server spawned by nova and used by VMs to get an IP address) because it's the beginning of the flat network range (--fixed_range).
The dnsmasq config (/var/lib/nova/networks/nova-br100.conf) is empty so far, because there are no VMs. Do not fear the two dnsmasq processes - they're a parent and a child, and only the child is doing actual work.
The interfaces eth1 and eth2 existed and were configured in this way before we installed OpenStack. OpenStack didn't take part in their configuration (though if eth2 had an assigned IP address, it would be moved to br100 - I'm not sure why that is needed).
However, interface br100 was created by nova-network on startup (the code is in /usr/lib/python2.7/dist-packages/nova/network/linux_net.py, method ensure_bridge; it is called from the initialization code of nova/network/l3.py - the L3 network driver; look for the words L3 and bridge in /var/log/nova/nova-network.log).
NOTE:
In fact, I think that on the controller node we could do just as well without br100, directly attaching dnsmasq to eth2. However, on compute nodes br100 also bridges with VM virtual interfaces vnetX, so probably the controller is configured similarly for the sake of uniformity.
Let us also look at iptables on the controller (nova only ever touches the filter and nat tables, so we're not showing raw):
root@controller-1:/home/openstack# iptables -t filter -S
-P INPUT ACCEPT
-P FORWARD ACCEPT
-P OUTPUT ACCEPT
-N nova-api-FORWARD
-N nova-api-INPUT
-N nova-api-OUTPUT
-N nova-api-local
-N nova-filter-top
-N nova-network-FORWARD
-N nova-network-INPUT
-N nova-network-OUTPUT
-N nova-network-local
-A INPUT -j nova-network-INPUT
-A INPUT -j nova-api-INPUT
-A FORWARD -j nova-filter-top
-A FORWARD -j nova-network-FORWARD
-A FORWARD -j nova-api-FORWARD
-A OUTPUT -j nova-filter-top
-A OUTPUT -j nova-network-OUTPUT
-A OUTPUT -j nova-api-OUTPUT
-A nova-api-INPUT -d 192.168.56.200/32 -p tcp -m tcp --dport 8775 -j ACCEPT
-A nova-filter-top -j nova-network-local
-A nova-filter-top -j nova-api-local
-A nova-network-FORWARD -i br100 -j ACCEPT
-A nova-network-FORWARD -o br100 -j ACCEPT
-A nova-network-INPUT -i br100 -p udp -m udp --dport 67 -j ACCEPT
-A nova-network-INPUT -i br100 -p tcp -m tcp --dport 67 -j ACCEPT
-A nova-network-INPUT -i br100 -p udp -m udp --dport 53 -j ACCEPT
-A nova-network-INPUT -i br100 -p tcp -m tcp --dport 53 -j ACCEPT
Basically, this means that incoming DHCP traffic on br100 is accepted, and forwarded traffic to/from br100 is accepted. Also, traffic to the nova API endpoint is accepted too. Other chains are empty.
There are also some rules in the nat table:
openstack@controller-1:~$ sudo iptables -t nat -S
-P PREROUTING ACCEPT
-P INPUT ACCEPT
-P OUTPUT ACCEPT
-P POSTROUTING ACCEPT
-N nova-api-OUTPUT
-N nova-api-POSTROUTING
-N nova-api-PREROUTING
-N nova-api-float-snat
-N nova-api-snat
-N nova-network-OUTPUT
-N nova-network-POSTROUTING
-N nova-network-PREROUTING
-N nova-network-float-snat
-N nova-network-snat
-N nova-postrouting-bottom
-A PREROUTING -j nova-network-PREROUTING
-A PREROUTING -j nova-api-PREROUTING
-A OUTPUT -j nova-network-OUTPUT
-A OUTPUT -j nova-api-OUTPUT
-A POSTROUTING -j nova-network-POSTROUTING
-A POSTROUTING -j nova-api-POSTROUTING
-A POSTROUTING -j nova-postrouting-bottom
-A nova-api-snat -j nova-api-float-snat
-A nova-network-POSTROUTING -s 10.0.0.0/24 -d 192.168.56.200/32 -j ACCEPT
-A nova-network-POSTROUTING -s 10.0.0.0/24 -d 10.128.0.0/24 -j ACCEPT
-A nova-network-POSTROUTING -s 10.0.0.0/24 -d 10.0.0.0/24 -m conntrack ! --ctstate DNAT -j ACCEPT
-A nova-network-PREROUTING -d 169.254.169.254/32 -p tcp -m tcp --dport 80 -j DNAT --to-destination 192.168.56.200:8775
-A nova-network-snat -j nova-network-float-snat
-A nova-network-snat -s 10.0.0.0/24 -j SNAT --to-source 192.168.56.200
-A nova-postrouting-bottom -j nova-network-snat
-A nova-postrouting-bottom -j nova-api-snat
These rules will become more important in the coming posts on floating IPs and granting VMs access to outside world (they are responsible for masquerading traffic from the VMs as if it originated on the controller, etc.), but currently the only important rule is this one: -A nova-network-PREROUTING -d 169.254.169.254/32 -p tcp -m tcp --dport 80 -j DNAT --to-destination 192.168.56.200:8775. It makes the nova metadata service "listen" on the link-local address 169.254.169.254 by doing DNAT from that address to its actual bind address on the controller, 192.168.56.200:8775.
Compute node, no VMs
Interfaces:
openstack@compute-1:~$ ip a
... (localhost) ...
2: eth1:  mtu 1500 qdisc pfifo_fast state UNKNOWN qlen 1000
    link/ether 08:00:27:ee:49:bd brd ff:ff:ff:ff:ff:ff
    inet 192.168.56.202/24 brd 192.168.56.255 scope global eth1
    inet6 fe80::a00:27ff:feee:49bd/64 scope link
       valid_lft forever preferred_lft forever
3: eth2:  mtu 1500 qdisc noop state DOWN qlen 1000
    link/ether 08:00:27:15:85:17 brd ff:ff:ff:ff:ff:ff
... (virbr0 - not used by openstack) ...

openstack@compute-1:~$ cat /etc/network/interfaces
...
iface eth2 inet manual
  up ifconfig $IFACE 0.0.0.0 up
  up ifconfig $IFACE promisc
Note that eth2 is configured to use promiscuous mode, just as on the controller!
Uninteresting stuff:
openstack@compute-1:~$ brctl show
... (only virbr0) ...

openstack@compute-1:~$ sudo iptables -S
... (only virbr0 related stuff) ...
Routes:
openstack@compute-1:~$ route -n
Kernel IP routing table
Destination     Gateway         Genmask         Flags Metric Ref    Use Iface
0.0.0.0         192.168.56.101  0.0.0.0         UG    100    0        0 eth1
169.254.0.0     0.0.0.0         255.255.0.0     U     1000   0        0 eth1
192.168.56.0    0.0.0.0         255.255.255.0   U     0      0        0 eth1
192.168.122.0   0.0.0.0         255.255.255.0   U     0      0        0 virbr0
We see that the compute node, just as the controller node, has two interfaces: eth1 for the management network (192.168.56.202, routed through the external DHCP server 192.168.56.101) and eth2 for the VM network (no IP address). It doesn't have a bridge interface yet, because nova-network is not running here and no VMs have been started, so the "L3 driver", mentioned before, has not been initialized yet.
All of this configuration was also done before installing openstack.
The peculiar thing about the compute node is that there's an entry for 169.254.0.0/16 - that's for the nova metadata service (which is part of nova-api and is running on the controller node, "listening", with the help of an iptables rule, on 169.254.169.254, while actually listening on 192.168.56.200:8775). The 169.254.x.x subnet is reserved in the IPv4 protocol for link-local addresses. This entry is present here to avoid routing traffic to the metadata service through the default gateway (as link-local traffic must not be routed at all, only switched).
Starting a VM
Now let's fire up a VM!
openstack@controller-1:~$ nova boot --image cirros --flavor 1 cirros
...
openstack@controller-1:~$ nova list
+--------------------------------------+--------+--------+----------------------+
|                  ID                  |  Name  | Status |       Networks       |
+--------------------------------------+--------+--------+----------------------+
| 5357143d-66f5-446c-a82f-86648ebb3842 | cirros | BUILD  | novanetwork=10.0.0.2 |
+--------------------------------------+--------+--------+----------------------+
...
openstack@controller-1:~$ nova list
+--------------------------------------+--------+--------+----------------------+
|                  ID                  |  Name  | Status |       Networks       |
+--------------------------------------+--------+--------+----------------------+
| 5357143d-66f5-446c-a82f-86648ebb3842 | cirros | ACTIVE | novanetwork=10.0.0.2 |
+--------------------------------------+--------+--------+----------------------+

openstack@controller-1:~$ ping 10.0.0.2
PING 10.0.0.2 (10.0.0.2) 56(84) bytes of data.
64 bytes from 10.0.0.2: icmp_req=4 ttl=64 time=2.97 ms
64 bytes from 10.0.0.2: icmp_req=5 ttl=64 time=0.893 ms
64 bytes from 10.0.0.2: icmp_req=6 ttl=64 time=0.909 ms
So, the VM was allocated IP address 10.0.0.2 (the next section will explain how it happened), booted and is pingable from the controller (interestingly, it is not supposed to be pingable from the compute node in this network mode).
NOTE:
(from Piotr Siwczak): From the controller node running in single-host mode you will be always able to ping all instances as it acts as a default gateway to them (br100 on the controller has address 10.0.0.1). And by default all traffic to VMs in the same network is allowed (by iptables) unless you set --allow_same_net_traffic=false in /etc/nova/nova.conf. In this case only traffic from 10.0.0.1 will be allowed.
Now let us see how the configuration of the controller and compute node have changed.
Controller node, VM created
When nova-network was creating this instance, it chose an IP address for it from the pool of free fixed IP addresses (network configuration of an instance is done in nova/network/manager.py, method allocate_for_instance). The first available IP turned out to be 10.0.0.2 (availability of fixed and floating IPs is stored in the Nova database). Then, dnsmasq was instructed to assign the VM's MAC address with the IP address 10.0.0.2.
openstack@controller-1:~$ cat /var/lib/nova/networks/nova-br100.conf
fa:16:3e:2c:e8:ec,cirros.novalocal,10.0.0.2
While booting, the VM got an IP address from dnsmasq via DHCP, as is reflected in syslog:
openstack@controller-1:~$ grep 10.0.0.2 /var/log/syslog
Jul 30 23:12:06 controller-1 dnsmasq-dhcp[2729]: DHCP, static leases only on 10.0.0.2, lease time 2m
Jul 31 00:16:47 controller-1 dnsmasq-dhcp[2729]: DHCPRELEASE(br100) 10.0.0.2 fa:16:3e:5a:9b:de unknown lease
Jul 31 01:00:45 controller-1 dnsmasq-dhcp[2729]: DHCPOFFER(br100) 10.0.0.2 fa:16:3e:2c:e8:ec
Jul 31 01:00:45 controller-1 dnsmasq-dhcp[2729]: DHCPREQUEST(br100) 10.0.0.2 fa:16:3e:2c:e8:ec
Jul 31 01:00:45 controller-1 dnsmasq-dhcp[2729]: DHCPACK(br100) 10.0.0.2 fa:16:3e:2c:e8:ec cirros
Jul 31 01:01:45 controller-1 dnsmasq-dhcp[2729]: DHCPREQUEST(br100) 10.0.0.2 fa:16:3e:2c:e8:ec
Jul 31 01:01:45 controller-1 dnsmasq-dhcp[2729]: DHCPACK(br100) 10.0.0.2 fa:16:3e:2c:e8:ec cirros
All other things didn't change (iptables, routes etc.).
Thus: creating an instance only affects the controller's dnsmasq configuration.
Compute node, VM created
The compute node configuration changed more substantially when the VM was created.
openstack@compute-1:~$ ip a
... (all interfaces as before) ...
10: vnet0:  mtu 1500 qdisc pfifo_fast master br100 state UNKNOWN qlen 500
    link/ether fe:16:3e:2c:e8:ec brd ff:ff:ff:ff:ff:ff
    inet6 fe80::fc16:3eff:fe2c:e8ec/64 scope link
       valid_lft forever preferred_lft forever
The vnet0 interface appeared. This is the virtual network interface for the VM. Its MAC address was initialized from /var/lib/nova/instances/instance-XXXXXXXX/libvirt.xml. You can take a look at /var/lib/nova/instances/instance-XXXXXXXX/console.log to see how the VM is behaving. If you see some network errors, that's a bad sign. In our case, all is fine:
openstack@compute-1:~$ sudo cat /var/lib/nova/instances/instance-00000009/console.log
...
Starting network...
udhcpc (v1.18.5) started
Sending discover...
Sending select for 10.0.0.2...
Lease of 10.0.0.2 obtained, lease time 120
deleting routers
route: SIOCDELRT: No such process
adding dns 10.0.0.1
cloud-setup: checking http://169.254.169.254/2009-04-04/meta-data/instance-id
cloud-setup: successful after 1/30 tries: up 4.74. iid=i-00000009
wget: server returned error: HTTP/1.1 404 Not Found
failed to get http://169.254.169.254/latest/meta-data/public-keys
Starting dropbear sshd: generating rsa key... generating dsa key... OK
===== cloud-final: system completely up in 6.82 seconds ====
  instance-id: i-00000009
  public-ipv4:
  local-ipv4 : 10.0.0.2
...
So, the instance also thinks it's gotten the IP address 10.0.0.2 and default gateway 10.0.0.1 (also as a DNS server). It also attempted to download a "user data" script from the metadata service at 169.254.169.254, succeeded, then tried to download the public key for the instance, but we didn't assign any (thus HTTP 404), so a new keypair was generated.
Some more changes happened to iptables:
openstack@compute-1:~$ sudo iptables -S
-P INPUT ACCEPT
-P FORWARD ACCEPT
-P OUTPUT ACCEPT
-N nova-compute-FORWARD
-N nova-compute-INPUT
-N nova-compute-OUTPUT
-N nova-compute-inst-9
-N nova-compute-local
-N nova-compute-provider
-N nova-compute-sg-fallback
-N nova-filter-top
-A INPUT -j nova-compute-INPUT
-A FORWARD -j nova-filter-top
-A FORWARD -j nova-compute-FORWARD
... (virbr0 stuff omitted) ...
-A OUTPUT -j nova-filter-top
-A OUTPUT -j nova-compute-OUTPUT
-A nova-compute-FORWARD -i br100 -j ACCEPT
-A nova-compute-FORWARD -o br100 -j ACCEPT
-A nova-compute-inst-9 -m state --state INVALID -j DROP
-A nova-compute-inst-9 -m state --state RELATED,ESTABLISHED -j ACCEPT
-A nova-compute-inst-9 -j nova-compute-provider
-A nova-compute-inst-9 -s 10.0.0.1/32 -p udp -m udp --sport 67 --dport 68 -j ACCEPT
-A nova-compute-inst-9 -s 10.0.0.0/24 -j ACCEPT
-A nova-compute-inst-9 -j nova-compute-sg-fallback
-A nova-compute-local -d 10.0.0.2/32 -j nova-compute-inst-9
-A nova-compute-sg-fallback -j DROP
-A nova-filter-top -j nova-compute-local
As the network driver was initialized, we got a bunch of basic compute node rules (all except for those referencing nova-compute-inst-9).
When the instance's network was initialized, we got rules saying that traffic directed to the VM at 10.0.0.2 is processed through chain nova-compute-inst-9 - accept incoming DHCP traffic and all incoming traffic from the VM subnet, drop everything else. Such a chain is created per every instance (VM).
NOTE:
In this case the separate rule for DHCP traffic is not really needed – it would be accepted anyway by the rule allowing incoming traffic from 10.0.0.0/24. However, this would not be the case if allow_same_net_traffic were false, so this rule is needed to make sure DHCP traffic is allowed no matter what.
Also, some network filtering is being done by libvirt itself, e.g. protection against ARP spoofing etc. We won't focus on these filters in this document (mostly because so far I've never needed them to resolve a problem), but in case you're interested, look for filterref in the instance's libvirt.xml file (/var/lib/nova/instances/instance-XXXXXXXX/libvirt.xml) and use the commands sudo virsh nwfilter-list, sudo virsh nwfilter-dumpxml to view the contents of the filters. The filters are established by code in nova/virt/libvirt/connection.py and firewall.py. Their configuration resides in /etc/libvirt/nwfilter.
VM guest OS network configuration
Now let us see how the network configuration looks on the VM side.
openstack@controller-1:~$ ssh cirros@10.0.0.2
cirros@10.0.0.4's password:
$ ip a
1: lo:  mtu 16436 qdisc noqueue state UNKNOWN
    link/loopback 00:00:00:00:00:00 brd 00:00:00:00:00:00
    inet 127.0.0.1/8 scope host lo
    inet6 ::1/128 scope host
       valid_lft forever preferred_lft forever
2: eth0:  mtu 1500 qdisc pfifo_fast state UP qlen 1000
    link/ether fa:16:3e:06:5c:27 brd ff:ff:ff:ff:ff:ff
    inet 10.0.0.2/24 brd 10.0.0.255 scope global eth0
    inet6 fe80::f816:3eff:fe06:5c27/64 scope link tentative flags 08
       valid_lft forever preferred_lft forever
$ route -n
Kernel IP routing table
Destination     Gateway         Genmask         Flags Metric Ref    Use Iface
0.0.0.0         10.0.0.1        0.0.0.0         UG    0      0        0 eth0
10.0.0.0        0.0.0.0         255.255.255.0   U     0      0        0 eth0
We see that the VM has its eth0 interface assigned IP address 10.0.0.2, and that it uses 10.0.0.1 as the default gateway for everything except 10.0.0.0/24.
That is all for the network configuration, congratulations if you read all the way to here! Now let us consider the packet flow.
Understanding Packet Flow
In this section we'll examine how (and why) packets flow to and from VMs in this example setup. We'll consider several scenarios: how the VM gets an IP address, ping VM from controller, ping VM from compute node, ping VM from another VM.
How packets flow at L2 level
We need to first consider how packets are routed in our network at the lowest level - namely ethernet packets, addressing devices by their MAC address - because we'll need this to understand how they flow at a higher level.
Thankfully, this is simple.
All machines (all compute nodes and the controller) are connected via the physical network fabric attached to their eth2 interface (remember that we have two physical networks in this setup: eth1 for the management network and eth2 for the VM network, and for security we keep them physically separate). They all have the br100 bridge connected to eth2. A bridge is essentially a virtual L2 switch.
Compute nodes also have the VM virtual interfaces vnetX bridged to br100.
So, ethernet broadcast packets reach all the machines' eth2 and br100, as well as all the VM's vnetX (and consequently all the guest OS interfaces).
Ethernet unicast packets flow in a similar fashion through physical switches forming this network and through the virtual switches implemented by br100 (read How LAN switches work and Linux bridge docs; further details aren't important in this context).
How packets flow at L3 level
While L2 ethernet packets address devices by their MAC address, the L3 level is all about IP packets, whose endpoints are IP addresses.
To send an IP packet to address X, one finds the MAC address corresponding to X via ARP (Address Resolution Protocol) and sends an L2 packet to this MAC address.
ARP works like this: we send an L2 broadcast packet "who has IP address X?" and whoever has it, will respond to our MAC address via L2 unicast: "Hey, that's me, my MAC is Y". This information will be cached in the OS "ARP cache" for a while to avoid doing costly ARP lookups for each and every IP packet (you can always view the cache by typing arp -n).
When we instruct the OS to send a packet to a particular IP address, the OS also needs to determine:
- Through which device to send it - this is done by consulting the routing table (type
route -n). E.g. if there's an entry 10.0.0.0 / 0.0.0.0 / 255.255.255.0 / br100, then a packet to 10.0.0.1 will go through br100. - What source IP address to specify. This is usually the default IP address assigned to the device through which our packet is being routed. If this device doesn't have an IP assigned, the OS will take an IP from one of the other devices. For more details, see Source address selection in the Linux IP networking guide.
It is very important here that eth2 (the VM network) interface is in promiscuous mode, as described previously. This allows it to receive ethernet packets and forward them to the VM interfaces even though the target address of the packets is not the eth2 MAC address.
Now we're ready to understand the higher-level packet flows.
How the VM gets an IP address
Let us look in detail what was happening when the VM was booting and getting an IP address from dnsmasq via DHCP.
DHCP works like this:
- You send a DHCPDISCOVER packet to find a DHCP server on your local network;
- A server replies with DHCPOFFER and gives you their IP address and suggests an IP address for you;
- If you like the address, you send DHCPREQUEST;
- The server replies with DHCPACK, confirming your right to assign yourself this IP address;
- Your OS receives the DHCPACK and assigns this IP address to the interface.
So, when the VM is booting, it sends a DHCPDISCOVER UDP broadcast packet via the guest OS's eth0, which is connected by libvirt to the host machine's vnet0. This packet reaches the controller node and consequently our DHCP server dnsmasq which listens on br100, etc.
I won't show the tcpdump here; there's an example in the next section.
Ping VM from controller
Let us look in detail at how it happens that ping 10.0.0.2 succeeded when ran on the controller (remember that 10.0.0.2 is the IP address assigned by Openstack to the VM we booted).
What happens when we type ping 10.0.0.2? We send a bunch of ICMP packets and wait for them to return. So:
- We consult the routing table (route -n) and find the entry "10.0.0.0 / 0.0.0.0 / 255.255.255.0 / br100" which says that packets to 10.0.0.x should be sent via the br100 interface. This also means that the return address will be 10.0.0.1 (as it's the IP assigned to br100 on the controller).
- We send an ARP broadcast request "who has IP 10.0.0.2? Tell 10.0.0.1" through br100 (note that I had to manually delete the ARP cache entry with "arp -d 10.0.0.2" to be able to demonstrate this, because it was already cached after the DHCP exchange mentioned in the previous section. Actually this ARP exchange already happened during that prior DHCP exchange, and it only happened again because I forced it to do so.):
openstack@controller-1:~$ sudo tcpdump -n -i br100
...
01:38:47.871345 ARP, Request who-has 10.0.0.2 tell 10.0.0.1, length 28 - This ARP packet gets sent through br100, which is bridged with eth2 – so it is sent to eth2, from where it is physically broadcast to all compute nodes on the same network. In our case there's two compute nodes.
- The first node (compute-1) receives the ARP packet on eth2, and, as it is bridged to br100 together with vnet0, the packet reaches the VM. Note that this does not involve iptables on the compute node, as ARP packets are L2 and iptables operate above that, on L3.
- The VM's OS kernel sees the ARP packet "who has 10.0.0.2?" and replies to 10.0.0.1 with an ARP reply packet, "That's me!"It already knows the MAC address of 10.0.0.1 because it's specified in the ARP packet. This ARP reply packet is sent through the guest side of vnet0, gets bridged to the host side, then to br100 and, via eth2, lands on controller. We can see that in the tcpdump:
01:38:47.872036 ARP, Reply 10.0.0.2 is-at fa:16:3e:2c:e8:ec (oui Unknown), length 46
- In fact, compute-2 also receives the ARP packet, but since there's no one (including VMs) to answer an ARP request for 10.0.0.2 there, it doesn't play any role in this interaction. Nevertheless, you would see an identical ARP request in a tcpdump on compute-2.
- Now we know the VM's mac address. Now we send an ICMP echo-request packet:
01:38:47.872044 IP 10.0.0.1 > 10.0.0.2: ICMP echo request, id 4654, seq 1, length 64
This successfully reaches the VM as a result of the following sequence of iptables rules firing on the compute node:
-A FORWARD -j nova-filter-top
-A nova-filter-top -j nova-compute-local
-A nova-compute-local -d 10.0.0.2/32 -j nova-compute-inst-9
-A nova-compute-inst-9 -s 10.0.0.0/24 -j ACCEPT - This packet reaches the VM as already described, and the VM's OS replies with an ICMP echo-reply packet:
01:38:47.872552 IP 10.0.0.2 > 10.0.0.1: ICMP echo reply, id 4654, seq 1, length 64
As the VM's routing table includes 10.0.0.0/24 via 0.0.0.0 dev eth0, the packet does not get routed through the controller and is instead sent "as is" to VM's eth0 and routed the usual way.
This concludes the roundtrip and we get a nice message:
openstack@controller-1:~$ ping 10.0.0.2
PING 10.0.0.2 (10.0.0.2) 56(84) bytes of data.
64 bytes from 10.0.0.2: icmp_req=1 ttl=64 time=1.33 ms
We would see similar tcpdumps if we did tcpdump -i eth2 or tcpdump -i br100 or tcpdump -i vnet0 on the compute node. They could differ only if something went wrong, which would be a good reason to check the routes and iptables and understand why, for example, a packet that exited the controller's eth2 didn't enter the compute node's eth2.
Whew!
Ping VM from compute node
Don't worry, this won't be as long, because the ping will fail:
openstack@compute-1:~$ ping 10.0.0.2
PING 10.0.0.2 (10.0.0.2) 56(84) bytes of data.
ping: sendmsg: Operation not permitted
This message means that the compute node is not allowed to send ICMP packets (prohibited by iptables). In this case, the packet travels the following path along iptables:
-A OUTPUT -j nova-filter-top
-A nova-filter-top -j nova-compute-local
-A nova-compute-local -d 10.0.0.2/32 -j nova-compute-inst-9
-A nova-compute-inst-9 -j nova-compute-sg-fallback
-A nova-compute-sg-fallback -j DROP
What happened is that the ACCEPT rule from nova-compute-inst-9 didn't fire, because the packet was going to be routed through the default gateway at eth1 and its source address was the one on eth1, 192.168.56.202, which is not inside 10.0.0.0/24.
Since the packet got dropped by iptables as described, it was never physically sent over the wire via eth1.
Ping VM from VM
This won't be long too, as we already saw how L3 packet routing works from/to VMs.
Basically, when one VM pings another, it uses similar L2 broadcasts to know its MAC address, and similar L3 packet flow to route the ping request and reply. Even the sequence of iptables rules allowing this interaction will be the same as in the "ping from controller" case.
Ping outer world from VM
If we try to ping something outside 10.0.0.0/24 from a VM, this traffic will be routed through the VM's default gateway, 10.0.0.1, which is on the controller. However, in the current setup no such ping will ever succeed, as VMs are only allowed to communicate with 10.0.0.0/24 (though if you try, you will see the packets in tcpdump on the controller).
Giving VMs access to the outside world is a topic for a subsequent post.
Troubleshooting
In this section I'll give general troubleshooting advice and pointers to useful tools. First, let's say you cannot ping your instance from the controller (as said, believe it or not, you shouldn't be able to ping it from the compute node).
Don't worry and don't dig too deep, check the most obvious things first: imagine what you'd do if you were a lot less skilled with network debugging tools. In 90% of the cases, the problem is something stupid.
First, gather all the information you can before making any changes.
When you do make changes:
- If you're debugging on a VM, do a snapshot so you can start from scratch if you mess up the network configuration.
- Avoid trying to "fix" something that's supposed to have been set up by the system (the problem is likely to be caused by incorrect input to the system, e.g. wrong config files, not by its incorrect output).
- Avoid irreversible actions.
- Record all your actions. This increases the chances that you'll be able to revert them.
First of all, check if the instance has actually booted properly. Do not rely on indirect signs (like the status being ACTIVE in nova list); go and VNC or virsh console to it. Or, if you cannot do that, find which compute node is supposed to have started it, go there and look at virsh list; then at the instance's console.log (it's supposed to have something meaningful inside); do a virsh screenshot; copy it to somewhere where you can view it; and then see what's going on! Perhaps you uploaded a wrong image or misconfigured virtualization, etc. This might seem like the most obvious thing, but yours truly has been through this tale of sorrows more than once.
If the instance didn't boot well or at all, check nova-compute and nova-network services; perhaps they aren't feeling well either - check their logs (typically in /var/log/nova) for errors, exceptions or signs of hangs. Try restarting them. Check if dnsmasq is running. If something's not running, try running it by hand (under sudo of course) and see when/why it crashes or hangs. Sometimes strace may help debug permission or connection errors. It can be used to attach to a running process too (strace -p).
Then use tcpdump to see how far your packets go and to isolate a place where they disappear. Can your ICMP request packets escape the source node? Do they reach the destination physical node? Do they get lost somewhere on the way between the node's physical interface and the VM's virtual interface? (perhaps ICMP traffic is prohibited by the security group) Does the VM emit reply packets? And so on. Do tcpdump of the VM network interface (perhaps also bridge interface and VM virtual interface vnetX) both on the controller and the compute node. Examples of successful tcpdumps were given in the previous section.
Once you isolate a place where packets disappear, check why they disappear.
- Are they routed properly? (check
ifconfig,route -n) - Are they dropped by iptables? (check
iptables -S; if you feel adventurous, consult the iptables flowchart and use iptables tracing which will show you how exactly the iptables rules fire - don't forget to disable it when you're done).
You can use the following tools to inspect the network configuration:
ifconfigandip addrto show network interface configuration.arp -nto show the ARP cache, which usually allows you to understand whether the L2/L3 packet flow is working as expected.route -nto inspect the routes.brctlto inspect the bridge configuration.tcpdumpto intercept packets through various interfaces.iptablesto show the iptables configuration and to add logging/tracing with the LOG and TRACE targets.virshto inspect all aspects of a VM - from its configuration to its current state.
What's next
In further posts we'll cover the remaining network modes (VLAN networking) and floating IPs. Also, the post on multi-host FlatDHCP networking will be continued with more detail.
Conclusion
This post gave a very detailed (perhaps overly so) overview of the processes happening at all levels, allowing the OpenStack network to operate. My intention was not only to explain this particular network mode, but also to equip readers with a working understanding of low-level network operation details and with a toolset to use in their own debugging scenarios, as these are issues that I struggled with a lot when doing my first steps in OpenStack network debugging.
I would like to thank Piotr Siwczak for his extremely valuable comments and corrections.


