
Running a Stateful App at Scale with Kubernetes
One of the biggest challenges for implementing cloud native technologies is learning the fundamentals—especially when you need to fit your learning into a busy schedule.
In this series, we’ll break down core cloud native concepts, challenges, and best practices into short, manageable exercises and explainers, so you can learn five minutes at a time. These lessons assume a basic familiarity with the Linux command line and a Unix-like operating system—beyond that, you don’t need any special preparation to get started.
In the last lesson, we learned how to deploy a stateful application or service as a StatefulSet, and how to use custom resources and operators. This gave us the final pieces necessary to complete the decomposition of our monolithic To Do app.
Table of Contents
How to Use Kubernetes Secrets with Environment Variables and Volume Mounts
How to Use StatefulSets and Create a Scalable MySQL Server on Kubernetes
Running a Stateful Web App at Scale on Kubernetes ← You are here
The final countdown
This lesson will conclude our decomposition project. By the end, we’ll have an application broken out into three services: a MySQL server, an API server, and a web interface. Locally, each of these services will be broken out into its own independent project directory.
We’re not decomposing and Kubernetizing this app for kicks; we’re migrating to this substrate for its availability and resilience. If demand for our application spikes, Kubernetes can provision (and then load balance) replicas to handle the load and avoid a bottleneck. Breaking an application down into independent functionalities can make the process faster and more efficient by only provisioning the specific components under demand.
In order to understand scaling, we need to explore how Kubernetes manages incoming traffic and how it runs applications at scale.
Our agenda for this lesson, then, is as follows:
Decompose and deploy the To Do app
Deploy the MySQL server and storage resources
Build the API server
Build the web client
Deploy the services to Kubernetes
Use the Horizontal Pod Autoscaler
Understand the Ingress and Gateway resources
Deploying the MySQL server and storage resources
Start Minikube and check that your MySQL pods from the previous lesson are running on the cluster. As a reminder, we’re using the InnoDBCluster custom resource and MySQL Kubernetes Operator to run a horizontally-scalable set of replica MySQL servers.
% minikube start
% kubectl get pods
% kubectl get pods
NAME                                 READY   STATUS    RESTARTS        AGE
todo-mysql-0                         2/2     Running   4 (4m ago)      19h
todo-mysql-1                         2/2     Running   4 (3m12s ago)   19h
todo-mysql-2                         2/2     Running   4 (3m12s ago)   19h
todo-mysql-router-8445df87bd-6sjjh   1/1     Running   7 (116s ago)    19h
(If the Pods are not present, follow the instructions under Introducing custom resources and operators in the previous lesson and then return here.)
The stateful components of our web app should be up and running. Now it’s time to connect the API server and the web client.
Building the API Server
First, we’ll implement our API server. In our new services-based architecture, this component will be responsible for handling requests from the web client and interfacing with the database accordingly. For our To Do app, that means handling requests to…
Read the tasks from the database
Add a new task
Update the status of a task
Delete a task
Create a project directory called /scale/ for this chapter, and then a new sub-directory called /todo-api/. Initialize the project:
% npm init -yThis creates a package.json file that holds the organizing metadata for your app. Now create a file called index.js and add the following:
const express = require('express');
const bodyParser = require('body-parser');
const con = require('./models/taskModel');

const app = express();

app.use(bodyParser.urlencoded({
   extended: true
}));

app.use(bodyParser.json());

// Read tasks handler

app.get('/', (req, res) => {
   let query = `SELECT * FROM Todo`;
   let items = []
   con.execute(query, (err, result) => {
       if (err) throw err;
       items = result
       console.log(items)
       res.json(items);
       })
   });

// Status update handler

app.post('/update', (req, res) => {
   let intCheck = req.body.id * 1;
   if (Number.isInteger(intCheck)) {
   console.log(req.body)
   let query = "UPDATE Todo SET status='" + req.body.status + "' WHERE task_id=" + req.body.id;
   con.execute(query, (err, result) => {
       if (err) throw err;
       console.log(result)
   });
} else {
   console.log('There was a problem');
};
});

// Delete handler

app.post('/delete', (req, res) => {
let intCheck = req.body.id * 1;
if (Number.isInteger(intCheck)) {
   console.log(req.body)
       let query = "DELETE FROM Todo WHERE task_id=" + req.body.id
       con.execute(query, (err, result) => {
         if (err) throw err;
         console.log(result);
   })
} else {
   console.log('There was a problem');
}
});

// New task handler

app.post('/', (req, res) => {
   console.log(req.body.task);
   let query = "INSERT INTO Todo (task, status) VALUES ?";
   data = [
       [req.body.task, "ongoing"]
   ]
   con.query(query, [data], (err, result) => {
       if (err) throw err;
       console.log(result);
   })
});

// port where app is served

app.listen(80, () => {
   console.log('The API server has started on port 80');
});
You may wish to compare this to the index.js file in the GitHub repo for the original monolith. While the structure is quite similar, you’ll notice some important differences:
We’re using far fewer modules, since we no longer need to worry about rendering the web client
Several routes are now simple, task-specific addresses: /update to update, /delete to delete
As in the monolith, we’ve broken out the database connection into a separate module called taskModel. We’ve referred to it in our configuration at the top of index.js—now we need to create it. Make a new directory within /todo-api/ called /models/ and a new file there called taskModel.js.
In the last lesson, we created a skeleton for this dedicated API server with a simple Node app that connected to the database and verified the connection. You can copy the code from that skeleton to taskModel.js and add the following modifications:
var mysql = require('mysql2');
var fs = require('fs');

const MYSQLPWD = fs.readFileSync("secrets/password", 'utf8');

var con = mysql.createConnection({
 host: "todo-mysql",
 user: "root",
 password: `${MYSQLPWD}`,
 database: "todo_db"
});

con.connect(function (err) {
   if (err) throw err;
   console.log("Connected to the database!");
   let query = "CREATE TABLE IF NOT EXISTS Todo (task_id int NOT NULL AUTO_INCREMENT, task VARCHAR(255) NOT NULL, status VARCHAR(255), PRIMARY KEY (task_id))";
   con.query(query, (err, result)=>{
     if (err) throw err;
     console.log(result)
 })
});

module.exports = con;
We didn’t have to change much here:
We specified a database in the database connection configuration on line 10.
On lines 13-21, we connect to our database and ensure that the Todo table exists
Line 23 exports the module so the rest of the app can use it
From the /todo-api/ directory:
% npm i mysql2 express body-parserThis command uses the npm package manager to install three modules in your project: the mysql2 driver, the express web app framework, and body-parser, which will help us parse JSON. (As an alternative to the command above, you can simply include those three modules as dependencies in your package.json file.)
In the same directory, we’ll create our standard Dockerfile for Node apps:
# Sets the base image
FROM node:18
# Establishes the working directory for your app within the container
WORKDIR /usr/src/app
# Copies your package.json file and then installs modules
COPY package*.json ./
RUN npm install
# Copies your project files and then runs the app
COPY . .
CMD [ "node", "index.js" ]
Build the container image and then upload it to Docker Hub:
% docker build . -t <Your Docker ID>/todo-api
% docker push <Your Docker ID>/todo-api
Believe it or not, that’s it for our API server. We’re two-thirds of the way through our decomposition. Let’s tackle the web client.
Building the web client
Structurally, the web client will look quite similar to the index.js file of the monolith, or the randomreads web client from Lesson 7. It will use the express and express-handlebars modules to serve the website, and it will use a combination of express and the Fetch API to route HTTP requests to the API server.
In your /scale/ project directory, create a new directory called /todo-web/. Initialize the project:
% npm init -yCreate an index.js file and add the following:
const express = require('express');
const { engine } = require('express-handlebars');
const bodyParser = require('body-parser');
const ENDPOINT = 'todo-api'
const app = express();

app.use(express.static('public'));

app.engine('handlebars', engine({
   helpers: {
       isCompleted: function (status) {
           if (status == "completed") {
               return true
           } else {
               return false
           }
       },
   },
   defaultLayout: 'main',
}));
app.set('view engine', 'handlebars');
app.set('views', './views');

app.use(bodyParser.urlencoded({
   extended: true
}));

app.use(bodyParser.json());
The lines above will include and initialize our major module dependencies like express and express-handlebars.
If you compare this to the original monolithic index.js, you’ll see that here we establish an ENDPOINT constant up top and assign it the hostname we will use for the API server. Now we can simply interpolate the constant whenever we want to communicate with the API server (and if we need to change the hostname, we only need to change it once).
Now add the following below the previous lines in index.js:
// Upon GET request, send a GET request to the API server

app.get('/', async (req, res) => {
   fetch(`http://${ENDPOINT}/`)
       .then(response => response.json())
       .then(data => res.render('index', {
           items: data
       }
       ));
});

// Redirect POST requests to the API

app.post('/', (req, res) => {
   const data = { task: `${req.body.task}` };
   fetch(`http://${ENDPOINT}/`, {
       method: 'POST',
       body: JSON.stringify(data),
       mode: 'cors',
       headers: {
           'Content-Type': 'application/json',
       },
   })
       .then(res.redirect('/'))
});

// Route updates

app.get('/:status/:id', (req, res) => {
   const data = { id: `${req.params.id}`, status: `${req.params.status}`};
   fetch(`http://${ENDPOINT}/update`, {
       method: 'POST',
       body: JSON.stringify(data),
       mode: 'cors',
       headers: {
           'Content-Type': 'application/json',
       },
   })
       .then(res.redirect('/'))
});

// Route deletions

app.get('/:id', (req, res) => {
   const data = { id: `${req.params.id}` };
   fetch(`http://${ENDPOINT}/delete`, {
       method: 'POST',
       body: JSON.stringify(data),
       mode: 'cors',
       headers: {
           'Content-Type': 'application/json',
       },
   })
       .then(res.redirect('/'))
});

// Port where app is served

app.listen(80, () => {
   console.log('The web server has started on port 80');
});
When we receive a GET request to the base route, we use the Fetch API to send a GET request to the API server, then take the task data we receive and return it to the frontend.
When we receive requests to the specified routes for task additions, status updates, and deletions, we use the Fetch API to send JSON payloads via POST request to the API server. Then passes on the relevant information to update the database; we then redirect to the base route and see the homepage updated to reflect the latest changes.
The routes for updates and deletions resemble those used by the monolith more than in the API server. The web client uses the same route handling paths for individual task IDs and status updates as the monolith, but the API server is decoupled and can use its own simpler routes.
For the website itself, we’ll need to create a /views/ folder in the project directory. Here, we can simply copy the index.handlebars and /layouts/main.handlebars files over from the monolith.
Here’s todo-web/views/index.handlebars:
<div class="container">
<h1>todos</h1>
<form method="POST" action="/" >
<input type="text" name="task" id="task" placeholder="What do you need to do? ↵" autocomplete="off" required>
</form>
</div>
<div id="tasks_container">
{{#each items}}
<p id="item_style">
{{#if (isCompleted status)}}
<span class="completed">{{task}}</span>
<a href="/{{task_id}}" id="emoji">🗑</a><a href="/ongoing/{{task_id}}" id="emoji">❎</a>
{{else}}
<span class="ongoing">{{task}}</span>
<a href="/{{task_id}}" id="emoji">🗑</a><a href="/completed/{{task_id}}" id="emoji">✅</a>
{{/if}}
</p>
{{/each}}
</div>
And here’s the layout wrapper todo-web/views/layouts/main.handlebars:
<!DOCTYPE html>
<html>
  <head>
     <title>Todo App</title>
     <link rel="stylesheet" type="text/css" href="/styles/index.css">
     <link rel="preconnect" href="https://fonts.googleapis.com">
     <link rel="preconnect" href="https://fonts.gstatic.com" crossorigin>
     <link href="https://fonts.googleapis.com/css2?family=Roboto&display=swap" rel="stylesheet">
     <meta charset="UTF-8">
  </head>
  <body>
     {{{body}}}
  </body>
</html>
A final piece of housekeeping—we need to create a /public/ folder inside todo-web/ to hold a couple of assets: a stylesheet and a favicon. You can grab those from this project’s GitHub page.
From the todo-web/ directory:
% npm i express express-handlebars body-parser(Or include those three modules as dependencies in your package.json file.)
Write our standard Dockerfile in the same directory:
# Sets the base image
FROM node:18
# Establishes the working directory for your app within the container
WORKDIR /usr/src/app
# Copies your package.json file and then installs modules
COPY package*.json ./
RUN npm install
# Copies your project files and then runs the app
COPY . .
CMD [ "node", "index.js" ]
Build the container image and then upload it to Docker Hub:
% docker build . -t <Your Docker ID>/todo-web
% docker push <Your Docker ID>/todo-web
Our decomposition is complete. All that remains is to deploy the API server and web client to Kubernetes.
Deploying your services to Kubernetes
Create a manifest in scale/manifests called todo-app.yml:
apiVersion: v1
kind: Service
metadata:
 labels:
   app: todo-api
 name: todo-api
spec:
 ports:
 - port: 80
   protocol: TCP
   targetPort: 80
 selector:
   app: todo-api
 type: ClusterIP
---
apiVersion: apps/v1
kind: Deployment
metadata:
 labels:
   app: todo-api
 name: todo-api
spec:
 replicas: 1
 selector:
   matchLabels:
     app: todo-api
 template:
   metadata:
     labels:
       app: todo-api
   spec:
     containers:
     - image: ericgregory/todo-api:latest
       name: todo-api
       ports:
       - containerPort: 80
       volumeMounts:
       - name: secrets
         mountPath: "usr/src/app/secrets"
     volumes:
       - name: secrets
         secret:
           secretName: mysqlpwd
           defaultMode: 0400

---

apiVersion: v1
kind: Service
metadata:
 labels:
   app: todo-web
 name: todo-web
spec:
 ports:
 - port: 80
   protocol: TCP
   targetPort: 80
 selector:
   app: todo-web
 type: LoadBalancer
---
apiVersion: apps/v1
kind: Deployment
metadata:
 labels:
   app: todo-web
 name: todo-web
spec:
 replicas: 1
 selector:
   matchLabels:
     app: todo-web
 template:
   metadata:
     labels:
       app: todo-web
   spec:
     containers:
     - image: ericgregory/todo-web:latest
       name: todo-web
       ports:
       - containerPort: 80
Here we’re defining Service and Deployment resources for both the API server (todo-api) and the web client (todo-web). At this point, everything in this manifest should be familiar.
Instances of todo-api access the Secret containing the database password via volume mounts, and are served by means of a ClusterIP Service—so they are directly accessible only on the cluster.
Instances of todo-web are served by a Service with the LoadBalancer type, so traffic to the web client can be apportioned between instances by an external load balancer. More on this in a moment.
Deploy with kubectl:
% kubectl apply -f todo-app.ymlIn Lens, click the Overview tab and select Pods. Choose the todo-web instance (it will have a random alphanumeric code appended to the end) and scroll down to the Forward button.
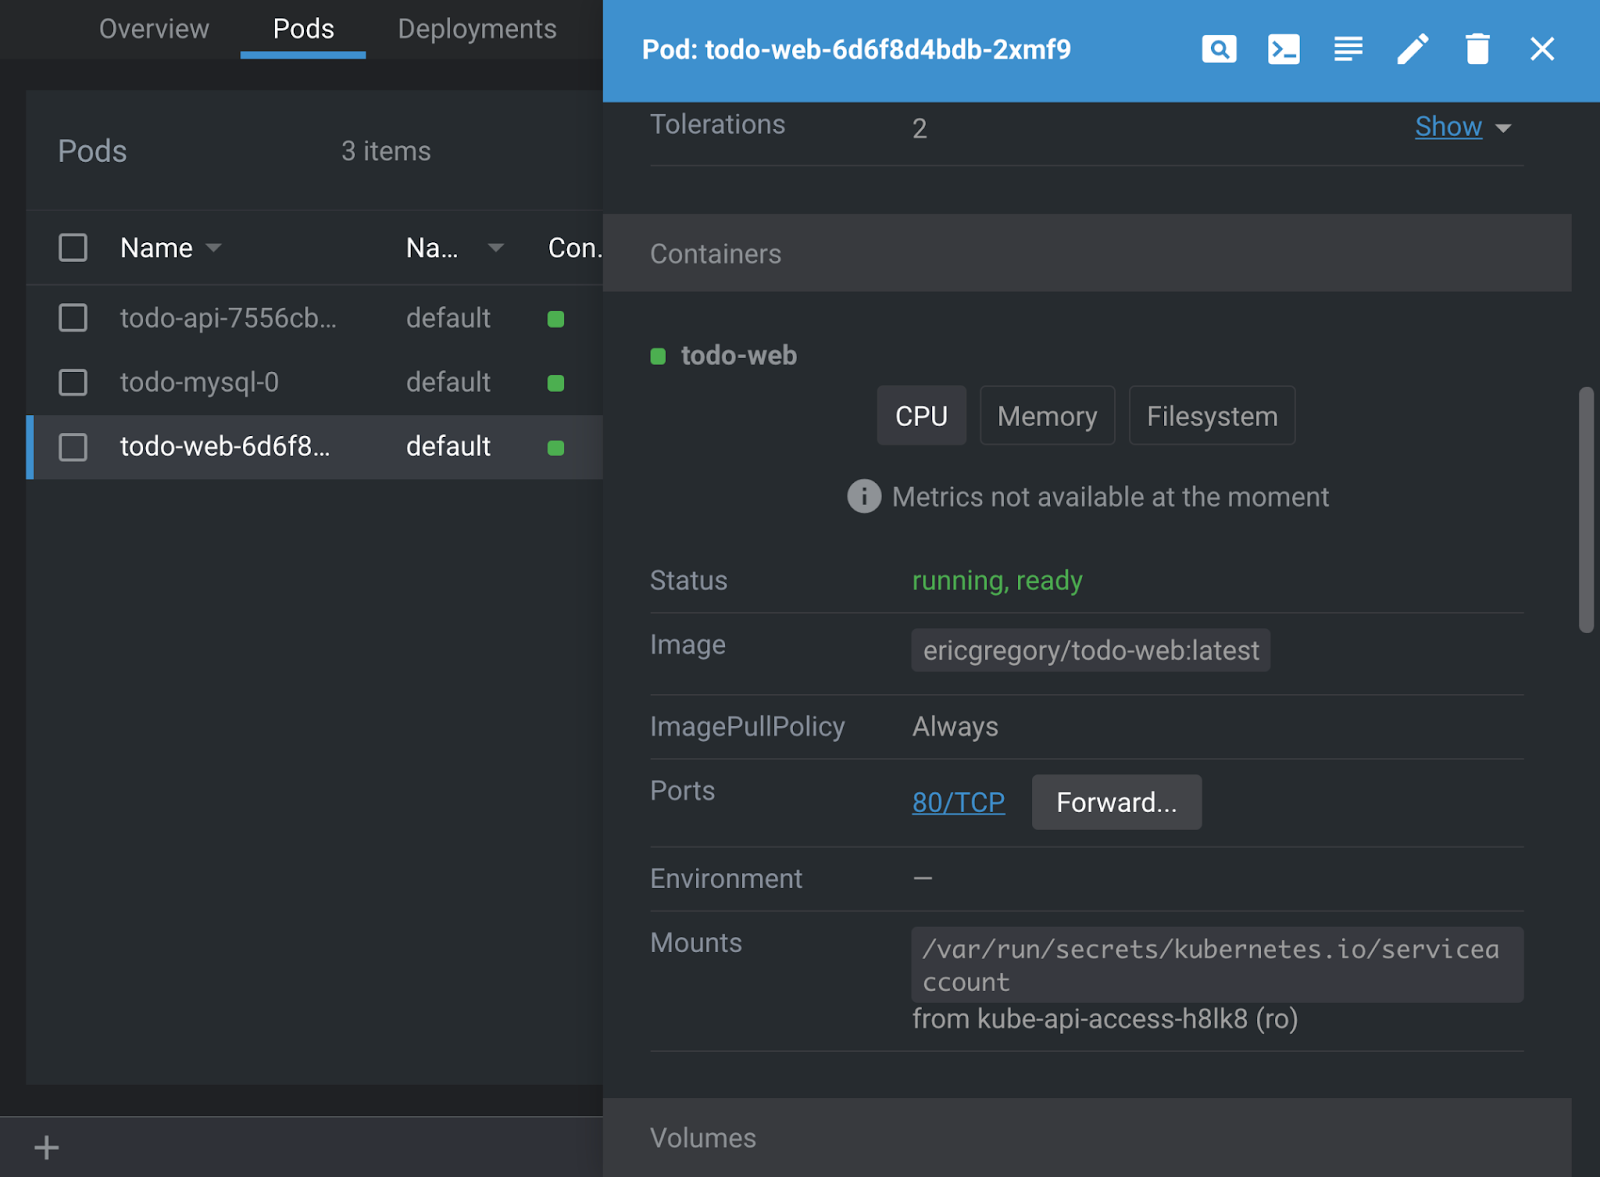
This will create a port forward to your local machine. Click the button and press Start to “Open in browser.”

Your application is running on Kubernetes. Test it out—adding tasks, deleting tasks, and updating status should all work as expected. Well done!
Matters of scale
Our manifests specified one replica, or one instance, of the todo-api and todo-web workloads. Accordingly, we have one Pod for each.
But suppose we wanted to scale up and run more instances. This can be managed through the Deployment objects for the API server and web client, and the custom InnoDBCluster resource for the database server (which in turn manages a StatefulSet).
In Lens, click on the Deployments tab and select a Deployment. In the upper-right corner, you’ll see an icon with four outward-facing arrows. Click it to bring up the Scale pane. Here you can use a slider to increase or decrease the number of replicas. Try changing it to 3 and clicking Scale.

If you check the Pods pane, you’ll find that the desired replicas have been added.
In addition to manual scaling, Kubernetes can automatically scale a Deployment (or StatefulSet) using a core Kubernetes resource called the Horizontal Pod Autoscaler. This resource monitors a pre-defined metric that is pertinent to your application (latency, say, or utilization) and adjusts up or down within defined constraints, striving to remain as near as possible to your defined optimum value.
Suppose we want our API server to autoscale such that there are always a minimum of two replicas and a maximum of five, while trying to remain as close as possible to a target CPU utilization percentage of 80%. We can express this declaratively through a YAML manifest as below:
apiVersion: autoscaling/v1
kind: HorizontalPodAutoscaler
metadata:
 name: todo-api
spec:
 maxReplicas: 5
 minReplicas: 2
 scaleTargetRef:
   apiVersion: apps/v1
   kind: Deployment
   name: todo-api
 targetCPUUtilizationPercentage: 80
We can also express our intention imperatively through kubectl:
% kubectl autoscale deployment todo-api --min=2 --max=5 --cpu-percent=80Run the command above and check your running Pods using either Lens or kubectl get pods. While system resources will vary, you’ll likely find that a new replica of todo-api has been added.
Ingress and Gateway
Most of our application’s traffic during this lesson took place within the cluster—with the exception of our accessing the web client through a port forward. We could have achieved a similar result by using Minikube’s service command (in this case, it would have been minikube service todo-web) as we’ve done in the past.
These are both “hacky” means of getting to a cluster running on the cluster from outside. But a real-world app will need a more reliable, systematic means of managing “north-south” traffic, meaning traffic in and out of the cluster. Before we finish for the day, we should discuss some of the ways a cluster administrator might approach this issue.
Ingress
The first approach is using the Ingress API. With the Ingress API, you can use Ingress objects to define rules for routing traffic from outside the cluster to services inside the cluster, and back out again.
Of course, we saw in previous lessons that it is possible to access services within the cluster using Service types such as NodePort or LoadBalancer (paired with a cloud provider’s load balancer). But both approaches are unwieldy. The Ingress object is an abstraction for, well, ingress, enabling you to define and manage a path inside–along with often-complex routing rules that can be used by multiple Services, instead of maintaining all of those Services’ load balancer implementations individually.
These Ingress objects are then handled by an Ingress controller, which an operator will have installed. Ingress controllers may be platform-specific, like Azure’s Ingress controller, or generic, like the NGINX Ingress Controller. (In a cloud setting, operation of an Ingress controller will naturally cost money.) Minikube comes with an Ingress add-on, in fact, which is really just an implementation of the NGINX Ingress Controller.
If you’d like to dig deeper on Ingress, you can learn more here.
Gateway
A newer alternative to Ingress is the Gateway API. Originally conceived as a successor to Ingress, the Kubernetes maintainers now describe Gateway as a “superset of Ingress functionality,” adding more fine-grained and standardized options. Like Ingress, Gateway is a resource you can use to provide specifications for a vendor-provided Gateway controller. The Gateway implementation sits at the door to your cluster and routes requests from outside to an appropriate destination inside.
But where Gateway builds on Ingress is its standardization and its expressivity. Previously, functionalities like weighted traffic routing or routing across namespaces required heavy annotation and custom solutions—with Gateway, you can be a lot more standard and portable in implementations of those features. Additionally, Gateway explicitly supports HTTP, TCP, UDP, and TLS, where Ingress by default really only plays nice with HTTP. As part of the Gateway API, routes with these protocols can now be explicitly modeled using route objects such as HTTPRoute.
Gateway is a welcome addition for developers, since it provides some new tools and means that, ideally, you can utilize more standardized routes, defined now through a Route object, without having to worry as much about the particularities of Gateway or Ingress configurations. The YAML for a Route might look like this:
apiVersion: gateway.networking.k8s.io/v1beta1
kind: HTTPRoute
metadata:
 name: httproute-example
spec:
 parentRefs:
 - name: todo-org
The parentRefs parameter defines the Gateways to which this route is attached—in this case, the gateway maintained by a hypothetical ToDo organization. Now the route is decoupled from the gateway, and if you need to make any configuration changes, you can simply do that at the Gateway level.
Gateway is a relatively recent addition—the Gateway, GatewayClass, and HTTPRoute resources graduated to beta in July 2022. Notably, the TCPRoute, TLSRoute, and UDPRoute resources are still in alpha.
You can learn more at the Kubernetes Gateway API Reference.
In Review....
Our decomposition is complete, and we’ve discussed two major approaches to north-south traffic.
In our next and final lesson, we’ll recommend your next steps into more advanced Kubernetes usage, with tips for further study on topics like security, logging and monitoring, and CI/CD.

