
Taking Your Next Steps with Kubernetes

One of the biggest challenges for implementing cloud native technologies is learning the fundamentals—especially when you need to fit your learning into a busy schedule.
In this series, we’ll break down core cloud native concepts, challenges, and best practices into short, manageable exercises and explainers, so you can learn five minutes at a time. These lessons assume a basic familiarity with the Linux command line and a Unix-like operating system—beyond that, you don’t need any special preparation to get started.
This series has aimed to give you the fundamental grounding you need to get started with Kubernetes as a developer. But there is much more to learn as you progress into more advanced Kubernetes usage, and there are many different directions you can take your study from here.
Many of those paths involve branching out into the wider Kubernetes ecosystem, including open source projects—many maintained by the Cloud Native Computing Foundation—and vendor offerings. But it’s a big world out there! Where should you start? In this final installment, we’ll outline some major topics you may wish to pursue going forward as you continue your Kubernetes journey.
Table of Contents
How to Use Kubernetes Secrets with Environment Variables and Volume Mounts
How to Use StatefulSets and Create a Scalable MySQL Server on Kubernetes
Taking Your Next Steps with Kubernetes← You are here

These lessons assume a basic understanding of containers. If you need to get up to speed on Docker and containerization, download our free ebook, Learn Containers 5 Minutes at a Time. This concise, hands-on primer explains:
- The key concepts underlying containers—and how to use core tools like image registries
- Fundamentals of container networking that are essential for understanding container orchestrators like Kubernetes
- How to deploy containerized apps in single-container and multi-container configurations
Helm and Kustomize for application packaging and templating
For all its myriad abstractions, Kubernetes doesn’t really include an abstraction for a big-picture application like our To Do app—which was, of course, quite a small web app in the scheme of things. Kubernetes thinks in terms of the individual components that work together to comprise a larger application.
That can be challenging, especially when a lot of configuration goes into a single component of the app. In the course of our decomposition project, we needed to configure manifests for…
Three Services
Two Deployments
A StatefulSet
A StorageClass
A Secret
…and that was without getting into resources for more advanced production usage. YAML manifests can add up quickly, and important configuration details may be spread out between them.
Helm is an open source package manager for Kubernetes, and it goes some way toward addressing the problem of configuration sprawl by bundling and templatizing the various YAML manifests for an application, making it easier to install, manage, and publish your apps.
Helm is maintained outside of the Kubernetes core. By default, it is used as a command line tool, similar to but completely separate from kubectl. You can also use Helm with a graphical user interface through Lens.
With Helm, you can install, manage, and delete or roll back pre-packaged “charts” (Helm’s name for packages) through the abstraction of the “release”—the resource that represents the application as a whole.
The second major reason you might use Helm is that it enables you to create and use templated packages. That means the creators of a package can write their charts with parameterized “blanks” that a user can fill in with their own information. For example, if we were to create a chart for the app we wrote that checks database connectivity every five minutes, we might make the database server hostname a user-fillable parameter. That way, users can quickly and easily specify the hostname for their own database server when they install the app.
Helm is frequently framed as being in competition with Kustomize, a templating engine built into the Kubernetes core.
Both provide solutions to YAML configuration sprawl with some degree of templating functionality. But the templating in Kustomize is much more granular, enabling you to create multiple “patches” for the same configuration files, “kustomizing” them for different environments or needs. Though there is some overlap in their functionality, Helm and Kustomize have different aims and use-cases and are best understood as complementary tools.
Further learning:
This hands-on tutorial is a good place to start learning about Kustomize.
To learn more about Helm, you can check out my video tutorial that walks through installing and publishing charts, as well as best practices for Helm usage.
Developer workflow and CI/CD
By this point, you will have gathered that code may go through quite a few steps before being deployed to Kubernetes. Depending on the project and your Kubernetes infrastructure, it might go through steps including:
Writing code
Committing to source control
Building and pushing container images
Packaging in Helm charts
Over the course of this series, we’ve been going through these steps manually and then deploying to our local developer cluster to verify that our code is working on Kubernetes. In real-world use, we might then push our code to our production cluster.
This is one possible Kubernetes development workflow, and it brings a major benefit: by using containers on the dev side, you can achieve parity between your dev and prod (and any other) environments.
But I’ll wager you can see the pain-points immediately. As soon as you start debugging with any intensity, you’ll be going through your build steps—including, at bare minimum, container build steps—over and over again. And you may be further tripped up by local container configuration issues.
An alternative workflow moves build steps off of the developer’s machine and out into a standardized pipeline that runs to the production cluster. This is continuous integration (CI)–or the automation of build steps—and continuous delivery (CD), and it can be particularly impactful when working with Kubernetes.
In this approach, developers work on their local machines and publish code changes to a git repository. The code is automatically containerized and packaged and then deployed to a hosted cluster—perhaps a dedicated dev cluster, or a developer namespace on a larger cluster. (We’ll talk more about namespaces in a moment.)
This can bring much less friction on the dev side. It is also much more standardized—and as a result, potentially more secure. But it depends, of course, on a CI/CD system. It is possible to plug in several popular generic CI/CD systems such as CircleCI or GitHub Actions. There are also a handful of common Kubernetes-specific solutions that may be installed on the cluster itself:
Jenkins X brings the longstanding Jenkins project to Kubernetes, where it uses git as a source of truth to drive continuous integration and delivery.
Argo is a widely used suite of CI/CD tools for Kubernetes, also utilizing git as a source of truth. While it covers many use cases, at the time of this writing there are several notable security advisories for ArgoCD that readers should be aware of.
Now, there can be a downside to this approach—you’re potentially missing out on the environmental parity you had developing on a local cluster. Once again, you’re haunted by the old specter of code running differently on your machine than in production—a problem that containers were meant to have solved.
Fortunately, there are open source tools to address this problem. Lagoon is an application delivery platform for Kubernetes that not only delivers local code to production but also uses Docker to maintain a development environment with identical images and service configurations to the production environment. Lagoon is particularly tailored to web applications that can be especially challenging to develop on Kubernetes—and fits into a larger CI/CD pipeline.
Further learning:
Read the Getting Started guide for Lagoon
Kubernetes security
When you introduce a complex substrate layer like Kubernetes, you inevitably expand your “attack surface,” or the available avenues of attack in your applications and infrastructure. This necessitates security controls within your system as well as new ways of thinking about security.
Let’s break our quick tour of Kubernetes security down into four general topics:
Isolation and access control
CI/CD and security
Service meshes
Observability
Isolation and role-based access control
Just as Linux namespaces can provide the process isolation underlying containers, Kubernetes namespaces enable you to completely isolate environments on the same cluster from one another, effectively creating a set of virtual clusters. This has a range of uses—from isolating sensitive workloads to defining dev/test/prod environments to creating distinct cluster environments for different users or teams.

You’re always working within a namespace on Kubernetes—by default, resources are deployed to the default namespace. If you start Minikube, you can get a look at other namespaces on your cluster with…
% kubectl get namespaces…or by selecting the Namespaces tab in Lens. You’ll notice that there are dedicated namespaces like kube-system for system components, and that makes sense—those system components are running as resources on the cluster, but most users won’t need or want access to them. Putting them on a separate namespace introduces a layer of separation and keeps those components out of the way. Namespaces can also be defined with strict rules determining who can do what within the environment.
As developers, we probably won’t have to worry about creating namespaces very often, but we’ll need to be able to use them. Fortunately, that’s a simple matter of context-setting. If I know I need to use a namespace called development where I’ve been assigned the user ID ericgregory, I can run the following command with kubectl:
% kubectl config set-context dev --namespace=development --cluster=minikube --user=ericgregory
% kubectl config use-context dev
Here I’m creating a new context called dev—specifying the relevant namespace, user ID, and cluster name—and then switching over to that context.
We don’t actually need kubectl to change this configuration—all the command is doing is updating our kubeconfig file, which configures the connection between clients like kubectl or Lens and the cluster(s). You can view this file by running kubectl config view, and you can typically find your kubeconfig by navigating to your local user directory and looking for a hidden directory called .kube. (There’s nothing special about this directory; you can place it anywhere and set the KUBECONFIG environment variable to that location.)
On Linux and Mac, you can use this quick command from the local user directory to open the kubeconfig with nano:
% nano ./.kube/config
Now you might ask, “What’s this about user IDs?”
In addition to namespaces, the second important tool operators can use to manage permissions on the cluster is role-based access control (RBAC). When in use, RBAC enables operators to create roles on the system and then associate those roles with individual users and service accounts. Effective RBAC implementations will define role permissions and policies on the principle of least privilege, so that any given user account (or service account) has only the access required to do its job.
CI/CD and security
You may have heard discussion of security “shifting left.” This expression means that, relative to more traditional conceptions of security that emphasized perimeter defenses for a production application, some of today’s most important security considerations take place earlier in the build-and-deployment process—further to the “left” on the development pipeline.
These are typically questions of “supply-chain security,” which deals with the components—often open-source—that enter a project at the development stage. Vulnerabilities or malware may be present in container images you download from Docker Hub or modules you download from a package manager like npm and incorporate into your code. From there, the vulnerability or malware may worm its way into your cluster.
If you were developing without a CI/CD system, it would be a good idea for you to manually scan your container images for known vulnerabilities (perhaps using a tool like Snyk) and otherwise investigate your dependencies and their associated security advisories. That’s a heavy “shift left” of responsibilities.
More likely, you will be using a CI/CD system, which has an important part to play in security. A security-conscious CI/CD process should…
Draw images from a private container image registry with base images approved for developer use
Automatically scan images for known vulnerabilities during the build process
Use container image signing to verify image provenance
These functionalities will generally require cluster components to support them—for example, a private image registry such as Mirantis Secure Registry and a container runtime such as Mirantis Container Runtime will need to integrate with one another and with a CI/CD system to facilitate a secure, automated workflow.
Service meshes
Some Kubernetes clusters will use an external component called a service mesh to manage network traffic within the cluster—what is sometimes known as “east-west” traffic. Service meshes are a topic both deep and wide—so much so that Mirantis Press has published an entire book on them, Service Mesh for Mere Mortals.
There are many potential benefits to service meshes, including latency improvements and simplified service discovery, but the one I want to mention here is encrypted pod-to-pod and service-to-service communication.
With vanilla, out-of-the-box Kubernetes, east-west traffic is unencrypted. You may have flagged that in the course of our decomposition project—our todo-web and todo-api services communicated with old-fashioned, unencrypted http. Under ideal circumstances, that might be fine, but if a malicious actor gains access to the cluster, this gives them a foothold to gather data and even escalate permissions. Service meshes can enable us to use TLS. They can also contribute to our final security topic…
Observability
I said before that cloud native security involves a shift left to earlier stages of the development cycle. But that’s not the only change in mindset—Kubernetes also compounds the importance of observability, including monitoring and logging. In a system as complex as Kubernetes, it’s important for organizations to prepare for the eventuality of malicious software getting onto the cluster. Robust monitoring and logging systems can help teams detect when something untoward is happening on the cluster.
As I mentioned previously, service meshes can help with observability, but there are many dedicated open source tools as well. Two of the most popular are:
Fluentd + ElasticSearch: Vanilla Kubernetes’ logging functionality is pretty rudimentary, simply collecting and storing container runtime logs.
The open source Fluentd collects much richer logs, acting as a “unified logging layer” and consolidating logs from components like databases, web servers, and cloud providers.
ElasticSearch serves as a data store for those logs.
Consolidated logging is obviously helpful not only for security, but for debugging, system optimization, and other purposes.
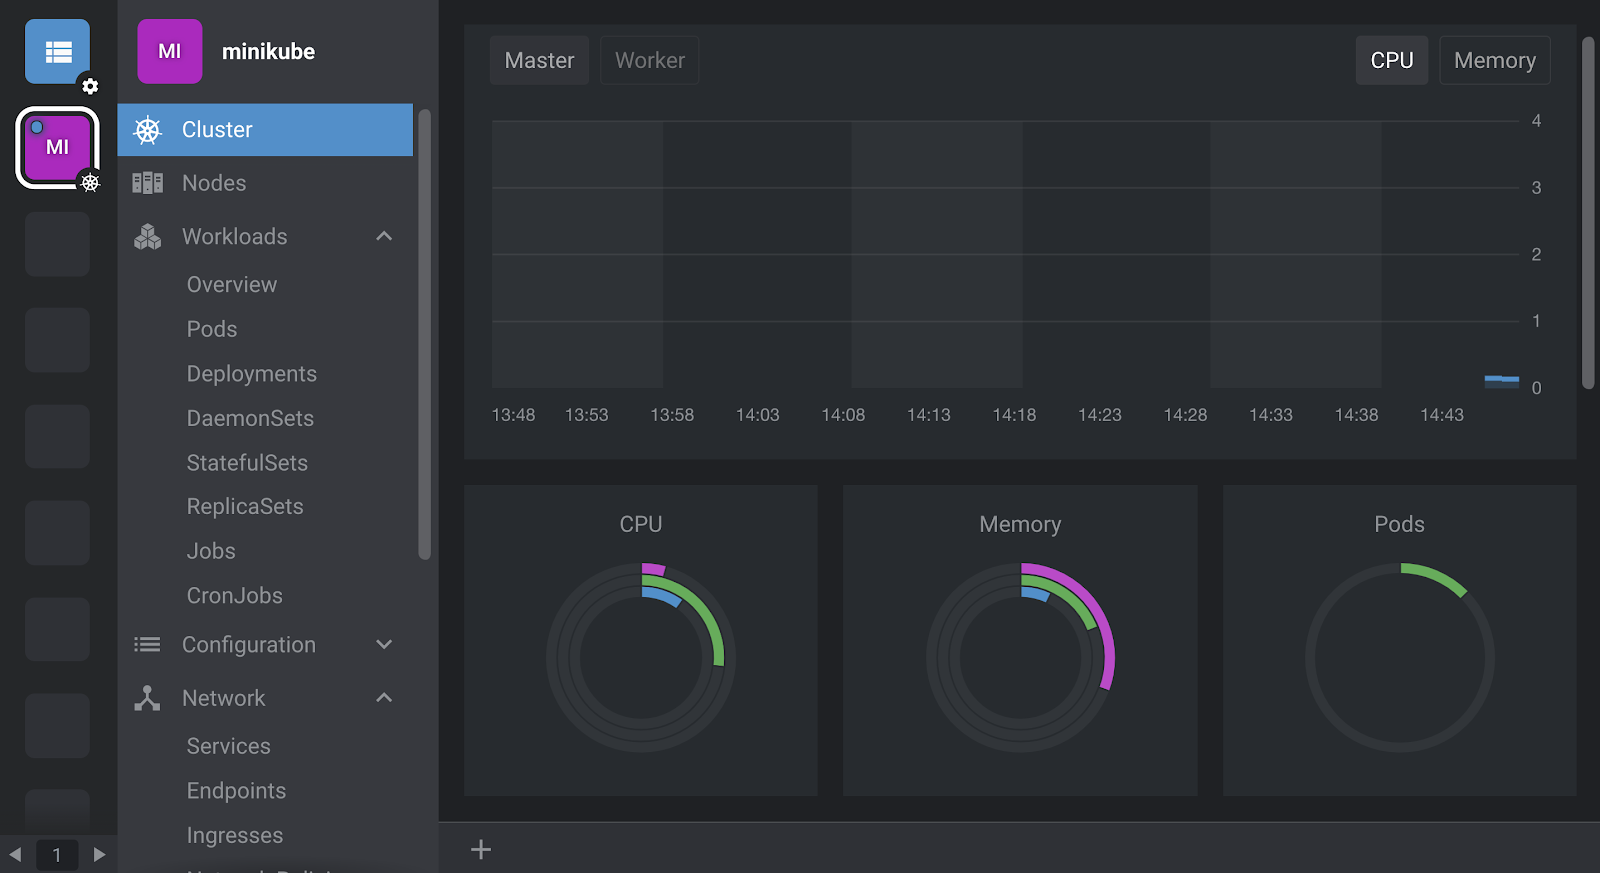
Prometheus: This popular CNCF-sponsored project is the standard for Kubernetes monitoring, providing rich, query-able metrics and alerting (and its own API endpoints for extension and integration).
Prometheus underlies the monitoring features in Lens, but you’ll need to manually enable it. To set up metrics, right click on the cluster icon in Lens' left-hand menu and select Settings.
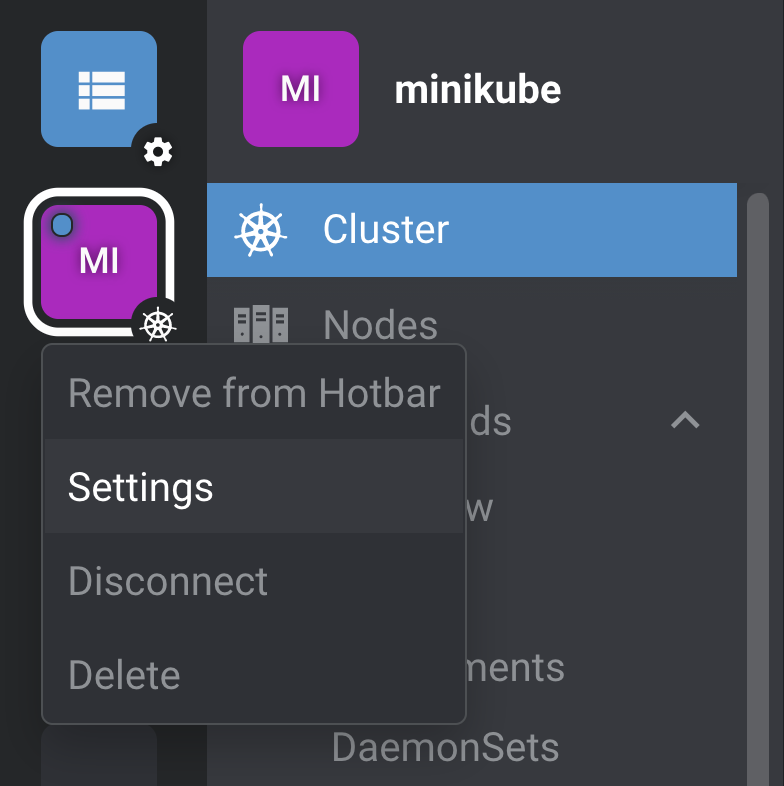
On the Settings pane, select Lens Metrics to enable a new instance. If you choose this option, Prometheus will take a minute or two to start. Press ESC to exit the Settings pane. Lens will connect to your Prometheus and cluster metrics will automatically appear on your dashboard.
Further learning:
The U.S. National Security Agency (NSA) and Cybersecurity Infrastructure Security Agency (CISA) maintain a Kubernetes Hardening Guide with detailed, technical guidance for Kubernetes security. At the time of this writing, the most recent update was March 2022.
The Cloud Native Computing Foundation maintains a Cloud Native Security Whitepaper with extensive guidance on Kubernetes security practices.
Service Mesh for Mere Mortals by Bruce Basil Matthews is a free, full-length ebook from Mirantis Press with hands-on exercises using the Istio service mesh.
Conclusion
That ends our whistlestop tour of Kubernetes for developers. I hope this has helped you build a basic grounding in cloud native development that will serve you well in your next steps. Wherever your Kubernetes journey takes you, good luck!


