
Using Kubernetes Services, Part 1

One of the biggest challenges for implementing cloud native technologies is learning the fundamentals—especially when you need to fit your learning into a busy schedule.
In this series, we’ll break down core cloud native concepts, challenges, and best practices into short, manageable exercises and explainers, so you can learn five minutes at a time. These lessons assume a basic familiarity with the Linux command line and a Unix-like operating system—beyond that, you don’t need any special preparation to get started.
So far, we’ve discussed two of the most important types of abstractions you’ll use on a Kubernetes cluster: Pods and Deployments. Pods are the atomic unit of workload scheduling, consisting of a single container or a handful of tightly coupled containers. Deployments give us a unified way to manage and scale our Pods.
But now we need an abstraction to help our containerized workloads communicate—both within the cluster and with the outside world. In Kubernetes, that abstraction is the Service.
Table of Contents
Using Kubernetes Services, Part 1← You are here
How to Use Kubernetes Secrets with Environment Variables and Volume Mounts
How to Use StatefulSets and Create a Scalable MySQL Server on Kubernetes

These lessons assume a basic understanding of containers. If you need to get up to speed on Docker and containerization, download our free ebook, Learn Containers 5 Minutes at a Time. This concise, hands-on primer explains:
- The key concepts underlying containers—and how to use core tools like image registries
- Fundamentals of container networking that are essential for understanding container orchestrators like Kubernetes
- How to deploy containerized apps in single-container and multi-container configurations
What is a Service?
In order to understand Kubernetes Services, it will be helpful to review the problem they are designed to solve.
As we’ve seen, every Pod has its own IP address. This IP address is accessible to any other Pod on the cluster, regardless of the node on which it runs. This relative ease of Pod-to-Pod communication supports a microservices architecture–our microservices can talk to one another using standard protocols.
But there’s one problem. Pods are ephemeral. We have to expect that a given Pod might be deleted and replaced with a replica at any moment. If that Pod is, say, serving an API, another microservice won’t be able to reliably consume the API using the Pod’s dedicated IP address.
The Service abstraction solves that problem by connecting the Deployment of a given piece of software to a Service name that functions similarly to a domain name. In other words, a Kubernetes Service is an abstraction for the networking logistics required to deliver an app’s functionality to clients—whether that means another Pod or a user outside the cluster. In fact, a Service can even route to apps that aren’t on your cluster at all—but we’ll get into that next lesson.
Suppose we want to serve an API that generates random book recommendations. We'd follow these steps.
We deploy the recommendation API across three replica pods.
Now we want to deploy a web interface that consumes that API and serves the information to users. Instead of connecting to the recommendation API via a given replica’s specific IP address, we’ll be able to resolve a hostname like http://randomreads-api via kube-dns, Kubernetes’ own Domain Name System (DNS).
That hostname directs the consumer’s request to any Pod currently running the recommendation API. If the Pod in question is deleted, no problem: future requests will go to a different Pod.
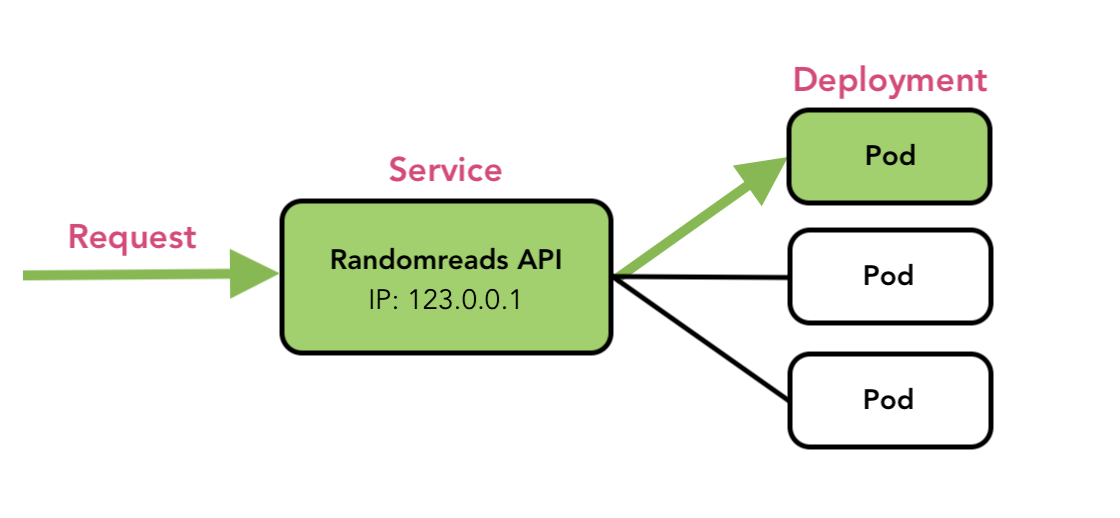
As you can see in the graphic, our Randomreads Service—meaning this particular instance of the Service object—has its own IP address. When the cluster receives a request, it passes it on to the appropriate Service, which in turn passes it to an appropriate Pod that belongs to the specified Deployment.
To understand Services more clearly, let’s build one from scratch.
Exercise: Communication Between Pods
For this exercise, we’ll take the Randomreads API example and actually build it out.
Objectives
Write and containerize an API that serves random book recommendations
Write and containerize a web interface that consumes an API
Run the API as a Service (exposing a Deployment consisting of multiple replica Pods)
Run the web interface as a Service (exposing a Deployment consisting of multiple replica Pods)
I’ll write this simple example with Node.js, a JavaScript runtime designed for network applications. Don’t worry—you don’t need to be proficient with Node to follow the exercise, though some familiarity will yield additional insight into what is going on here. I’m using Node simply because JavaScript is one of the most widely used and understood languages, but most any language would do. One of the benefits of using an API-driven microservices approach is that different teams can use different languages according to suitability for the project at hand, available skill-sets, or simple preference.
(If you tend to work in another language and want to set yourself an additional challenge with this exercise, you may wish to try writing the API and web interface yourself.)
If you’d like to follow along with my code (which is available in full on GitHub), you’ll need to install Node on your system. Alternatively, you can simply read the code segments and deploy the container images I’ve already created, which are available on Docker Hub.
Create a new directory called randomreads and a subdirectory called rr-api. Inside, initialize the project with npm and create a new file called index.js. Additionally, we’re going to use the express module, so we’ll go ahead and install that.
% npm init -y
 % touch index.js
 % npm i express
Add the following code to index.js:
const express = require('express');
const app = express();
app.use(express.static('public'));

// This array stores a group of objects for books we might recommend.

const bookstore = [
{ title: 'My Brilliant Friend', author: 'Elena Ferrante'},
{ title: 'Piranesi', author: 'Susanna Clarke'},
{ title: 'The Summer Book', author: 'Tove Jansson'},
{ title: 'Middlemarch', author: 'George Eliot'},
{ title: 'Song of Solomon', author: 'Toni Morrison'},
{ title: 'The Tale of Genji', author: 'Lady Murasaki'}
]

// This function will generate a random integer.

function getRandomInt(max) {
   return Math.floor(Math.random() * max);
};

/*
This function requests a random integer with a range
defined by the length of the array. Then it indexes
the array and return the appropriate object.
*/

function randomizeBook() {
   let range = bookstore.length;
   let rng = getRandomInt(range);
   return bookstore[rng];
}

// The server responds to GET requests with a JSON object for one of the books from the array.

app.get('/', (req, res) => {
   res.json(randomizeBook());
});

// The server is running on port 80, which is the expected default.

app.listen(80, () => {
   console.log('The web server has started on port 80');
});
For the purposes of this example, our API will simply produce a randomized result from an array baked into the API server itself.
Now let’s create a container image for our API server. We’ll write a Dockerfile reproducing the setup we had to do for our local environment. Create a blank file called Dockerfile in your rr-api directory and add the following:
# Sets the base image
FROM node:18

# Establishes the working directory for your app within the container
WORKDIR /usr/src/app

# Copies your package.json file and then installs modules
COPY package*.json ./
RUN npm install

# Copies your project files and then runs the app
COPY . .
CMD [ "node", "index.js" ]
Save the file, then create a file called .dockerignore in the same directory, adding the following lines. Doing this will prevent any accidental overwrites or confusion of Node modules when the build copies project files over to the container image.
node_modules
 npm-debug.log
Now build the image and publish it to Docker Hub:
% docker build . -t <Your Docker Hub ID>/randomreads-api
 % docker push <Your Docker Hub ID>/randomreads-api
Now your image is available on Docker Hub. If you decided you’d rather use my image, it’s available at ericgregory/randomreads-api. Otherwise, simply enter your own Docker ID in the next command.
Make sure Minikube is running with minikube start. Now we’ll create a Deployment with three replicas:
% kubectl create deployment randomreads-api --image=<Your Docker Hub ID>/randomreads-api --port=80 --replicas=3Before we expose the app as a Service, let’s do a kubectl dry run and take a look at a YAML manifest for a Service:
% kubectl expose deployment randomreads-api --type=NodePort --port=80 -o yaml --dry-run=client
apiVersion: v1
kind: Service
metadata:
  creationTimestamp: null
  labels:
    app: randomreads-api
  name: randomreads-api
spec:
  ports:
  - port: 80
    protocol: TCP
    targetPort: 80
  selector:
    app: randomreads-api
  type: NodePort
status:
  loadBalancer: {}
Note that the spec.selector field uses the app: randomreads-api label to specify which Pods should fulfill this service—in this case, Pods from our randomreads-api Deployment which include that app label.
Let’s go ahead and expose the service for real.
% kubectl expose deployment randomreads-api --type=NodePort --port=80To see the API output from our browser, we can use a handy shortcut provided by Minikube. The following command returns (and usually opens) the URL of an exposed Kubernetes Service:
% minikube service randomreads-api Ta-da! We’ve launched our first original Service on Kubernetes! By now, you should have a much more specific understanding of what was happening under the hood when we started a Service back in our lesson on setting up a Kubernetes learning environment.
Now we still have several objectives before us: We need to write, containerize, and run our web interface in such a way that it consumes data from the randomreads-api on the cluster. But our five minutes are up for now. The next time we use our API Service, we’ll be making a small but important change, so you can delete the randomreads-api Deployment and Service for now:
% kubectl delete service randomreads-api
% kubectl delete deployment randomreads-api
% minikube stop
Next time, we’ll finish our survey of Services and get our web interface and API server working together across the cluster.


