
Setting Up a Kubernetes Learning Environment

One of the biggest challenges for implementing cloud native technologies is learning the fundamentals—especially when you need to fit your learning into a busy schedule.
In this series, we’ll break down core cloud native concepts, challenges, and best practices into short, manageable exercises and explainers, so you can learn five minutes at a time. These lessons assume a basic familiarity with the Linux command line and a Unix-like operating system—beyond that, you don’t need any special preparation to get started.
In the last lesson, we learned how Kubernetes orchestrates containers, who runs Kubernetes, and why. Today, we’ll set up a cluster on our local machine so we can get some hands-on experience.
Setting Up a Kubernetes Learning Environment <- You are here
How to Use Kubernetes Secrets with Environment Variables and Volume Mounts
How to Use StatefulSets and Create a Scalable MySQL Server on Kubernetes
Choices when Accessing Clusters
As we’ll see in the next few lessons, a Kubernetes cluster can run in a wide variety of configurations according to its use case. For learning purposes, we’re going to start with a single-node cluster on our local machine.
In the “real world,” clusters will typically spread across multiple nodes (or machines), each of which will have dedicated roles like managing the cluster or running workloads. In this case, everything will happen on a single node. That will give us a relatively straightforward development environment in which we can figure out the fundamentals, before progressing to more complex configurations.
The first decision we need to make is which version of Kubernetes to install. Because Kubernetes is an open source system, it has given rise to a variety of alternative distributions with their own particular use-cases, just as the Linux kernel is the foundation of numerous Linux distributions. The k0s (pronounced “kay-zeros”) project, for example, is a distribution designed for maximum resource efficiency, so it might run (and scale) anywhere from Raspberry Pis to powerful servers in public or private clouds. The creators of Kubernetes distributions usually try to maintain full compatibility with “upstream” Kubernetes—the original, baseline project—so that users can utilize the full suite of open source tooling developed by the community.
To get started, we’re going to use a distribution called Minikube, which is designed specifically for learning Kubernetes.
Installing Minikube
Minikube requires about 2GB of RAM to run, and it wants 20GB of disk space, which is the amount it assigns for cluster usage by default. (You can configure it to use as little as 2GB if you’re short on space.) It works on macOS, Linux, or Windows, and depending on its configuration, it runs on a container, a virtual machine, a combination of the two, or bare metal. Most people will be running it through VMs, containers, or both. If you have Docker Desktop or Docker Engine installed (as in our previous unit), then you’re ready to get started.
On an x86-64 machine running macOS with the Homebrew Package Manager, installation is a simple terminal command:
% brew install minikubeUsers with other CPU architectures and operating systems will want to consult the official installation instructions to download the version that is right for them.
Once Minikube is installed, make sure Docker is running, and then run the following command in the terminal:
% minikube startYou should see some friendly, emoji-illustrated status updates confirming that the system is running:
👍  Starting control plane node minikube in cluster minikube
🚜  Pulling base image ...
🔄  Restarting existing docker container for "minikube" ...
🐳  Preparing Kubernetes v1.23.1 on Docker 20.10.12 ...
    ▪ kubelet.housekeeping-interval=5m
    ▪ Generating certificates and keys ...
    ▪ Booting up control plane ...
    ▪ Configuring RBAC rules ...
    ▪ Verifying Kubernetes components...
    ▪ Using image gcr.io/k8s-minikube/storage-provisioner:v5
    ▪ Using image kubernetesui/dashboard:v2.3.1
    ▪ Using image k8s.gcr.io/metrics-server/metrics-server:v0.4.2
    ▪ Using image kubernetesui/metrics-scraper:v1.0.7
🌟  Enabled addons: storage-provisioner, metrics-server, default-storageclass, dashboard
🏄  Done! kubectl is now configured to use "minikube" cluster and "default" namespace by default
We can confirm that Kubernetes is running with another command:
% minikube kubectl get nodesThis will list the nodes associated with our Kubernetes cluster. We should get a result that looks something like this:
NAME      STATUS   ROLES                  AGE     VERSION
minikube   Ready    control-plane,master   5m26s   v1.23.1
All right—we have one node, and that makes sense, because we said that this would be a single-node cluster. But what’s kubectl, and why am I using it?
For the answer, we need to break down an important element of Kubernetes development: cluster access.
Exercise: Three ways of looking at a cluster
Users—and software agents—ultimately conduct any interaction with a cluster through the Kubernetes application programming interface (API). But many of those interactions are mediated by other applications that consume the API.
Three of the most commonly used applications for accessing and interacting with the cluster are:
kubectl: A command-line interface (CLI) for managing Kubernetes clusters; comes pre-packaged with most distributions. The proper pronunciation of this tool is a topic of spirited disagreement; I favor “koob-control,” but plenty of people say “koob-C-T-L” or (heartwarmingly) “koob-cuddle.”
The Kubernetes Web Dashboard: A web-based graphical user interface (GUI) for interacting with clusters; comes pre-packaged with most distributions. Note that while it is suitable for learning purposes, the web dashboard can be a source of security vulnerabilities—Tesla, for example, had a cluster hijacked after the web dashboard was configured with elevated privileges and exposed to the Internet.
Lens: A third-party, open source integrated development environment (IDE) for Kubernetes—supported by Mirantis—that enables users to interact with clusters at a granular level via a graphical user interface.
None of these three tools are bound to a given cluster. You can use any of them to interact with multiple clusters from the same machine. But for now, we’re only concerned with our Minikube cluster.
To get a feel for these three methods of interacting with a cluster, we’re going to launch a service—essentially, an abstraction for the delivery of a particular piece of software functionality, as we saw in the last unit. In this case, our service will be an NGINX web server. Next, we’re going to observe our service with each of our three methods of cluster access. Don’t worry too much about the specifics of how we’re launching our service for the time being—in the coming lessons, we’ll examine that process in great detail. For now, we just want to get our feet wet interacting with a cluster.
A note on kubectl
Before we get started, we should very briefly discuss a few of the ways you can run kubectl. As we’ve seen, you already have an installation of kubectl on your system—this is built into Minikube, and you need to preface the kubectl command with minikube if you want to use it. You’re welcome to keep on doing this.
Alternatively, you can use an alias or symbolic link to map the command minikube kubectl to the more concise kubectl. Or if you prefer, you can install a separate instance of the tool which you will activate with the command kubectl. The choice is yours—but note that we’ll be using the simple command kubectl from here on out, so if you decide to use the minikube version without creating an alias or symlink, you’ll need to add minikube to the beginning of these commands.
In the terminal, enter the following command:
% kubectl create deployment nginx-test --image=nginx \
--port=80
At this point, you probably have a pretty good guess as to what this is doing! We’re creating a deployment of an application—NGINX—based on the official NGINX container image, and we’re specifying that the container exposes port 80.
Now enter:
% kubectl expose deployment nginx-test --type=NodePort \
--port=80
This creates a service from the deployment model we defined above; entering the command should return the result:
service/nginx-test exposedNext enter:
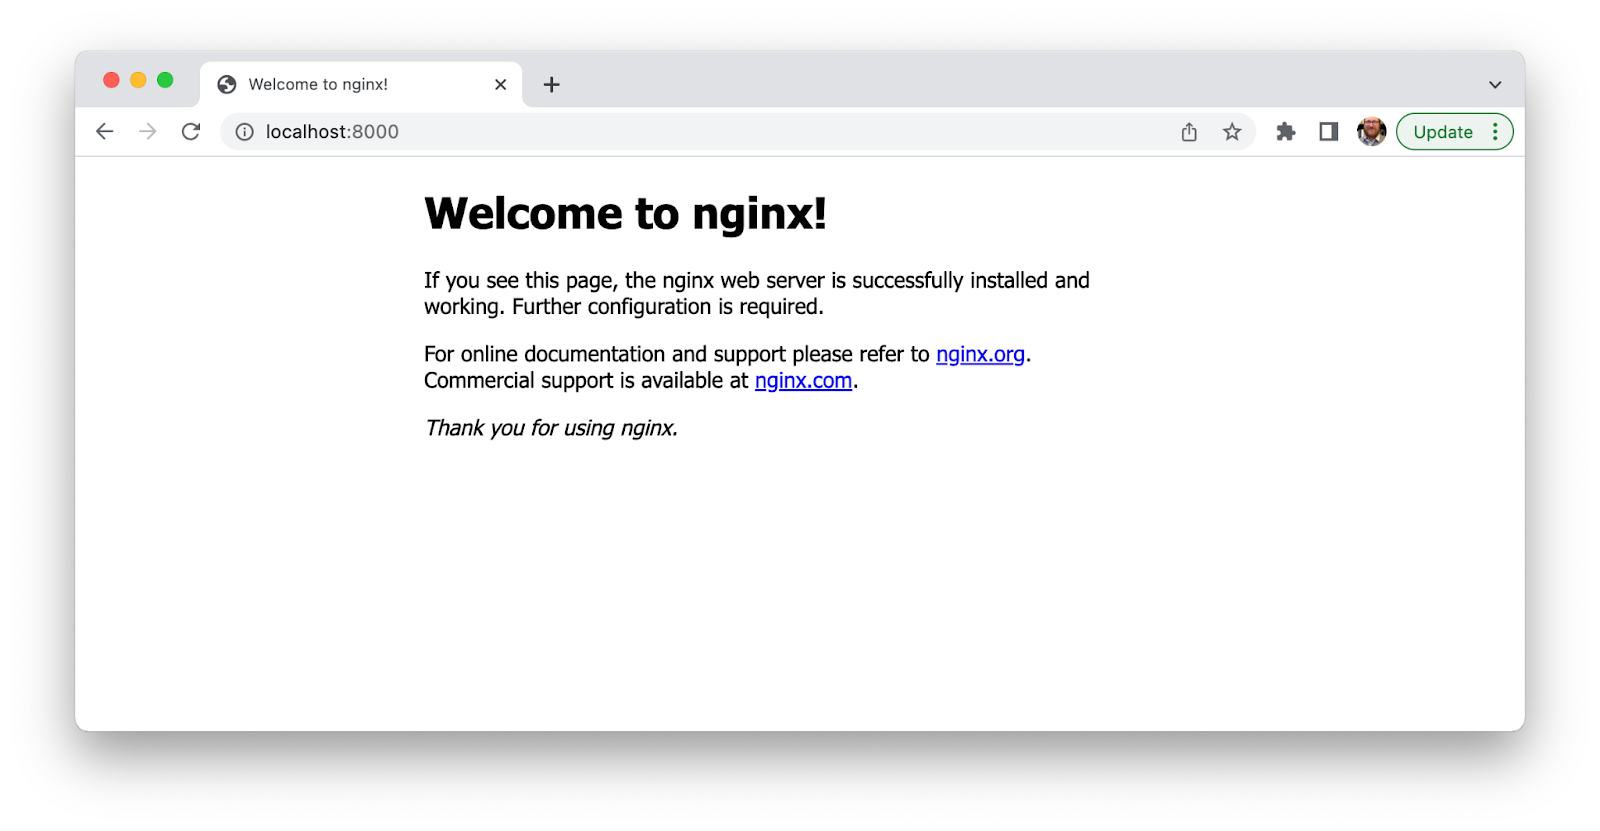
% minikube service nginx-testMinikube will create a network “tunnel” to make the new service accessible on our local machine, and automatically open the service in our web browser. We should see the NGINX welcome page here. (Note that your IP address and port may differ from the ones in the screenshot below.)

Stop the Minikube tunnel by pressing CTRL+C in the terminal. Even though we’ve stopped the tunnel, the service is still running in the cluster. We can get some basic information about it using kubectl:
% kubectl get servicesIf you want to save a few keystrokes, you can use svc instead of services. Either way, this should return something like the following, albeit with different IP addresses, and a different local port number:
NAME        TYPE        CLUSTER-IP      EXTERNAL-IP   PORT(S)        AGE
kubernetes   ClusterIP   10.96.0.1       <none>        443/TCP        4h13m
nginx-test   NodePort    10.100.135.77   <none>        80:30218/TCP   3m
Great. We see our nginx-test service, as well as the Kubernetes service itself.
We can also observe our services through the Kubernetes Web Dashboard. Minikube makes it easy to launch the dashboard from the command line—just enter:
% minikube dashboardThis command will start another process that needs to run continuously in the terminal. In the web browser, click on the Service tab in the left sidebar.
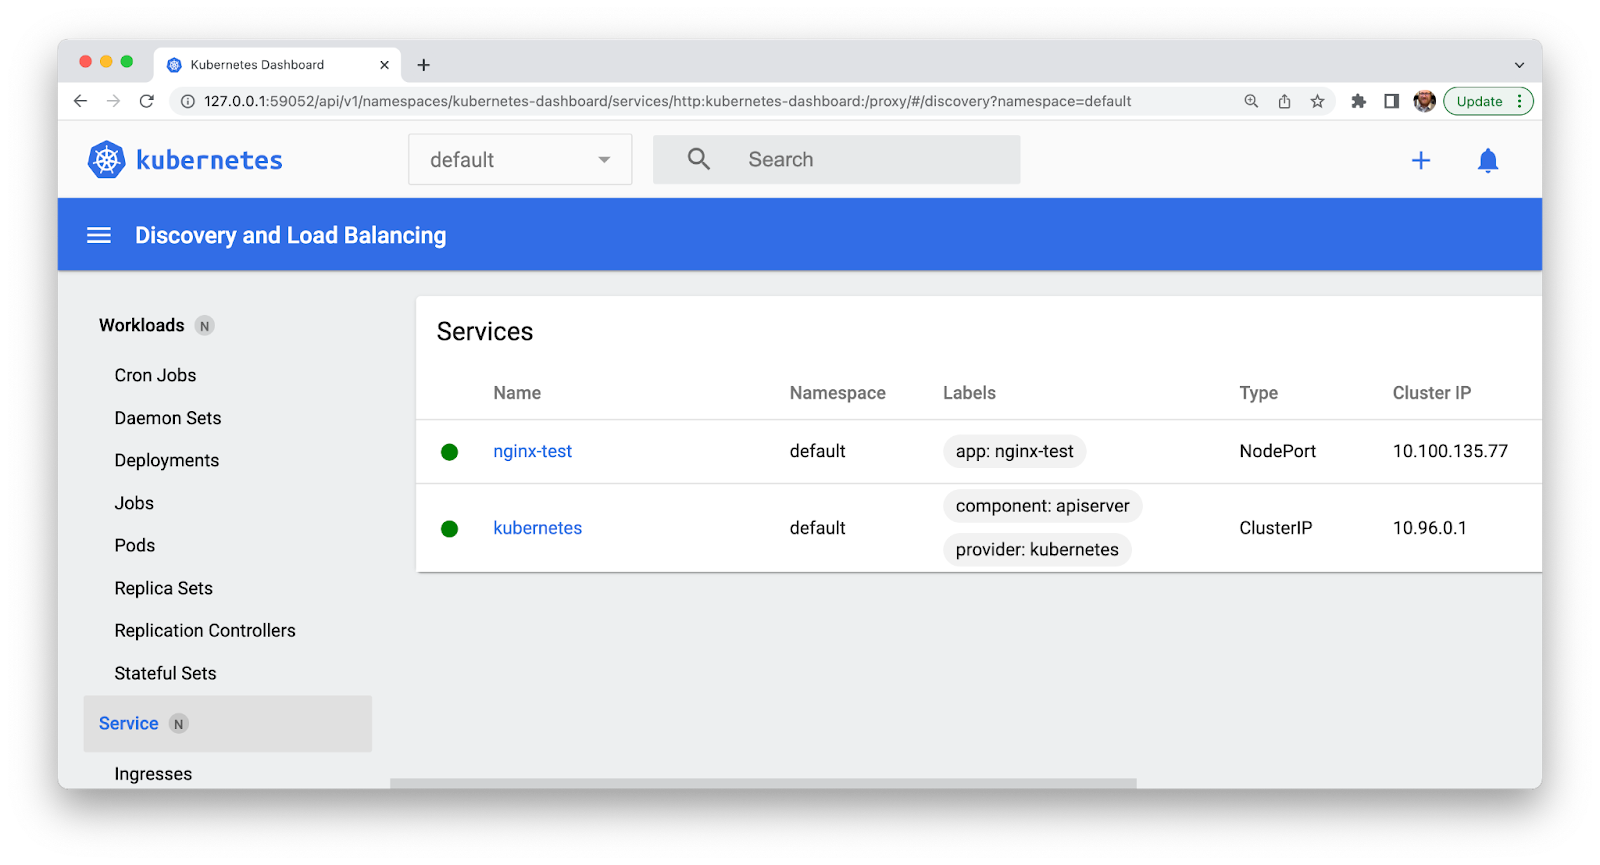
Feel free to click around the Web Dashboard and explore. When you’re finished, we’ll observe our services from one more perspective.
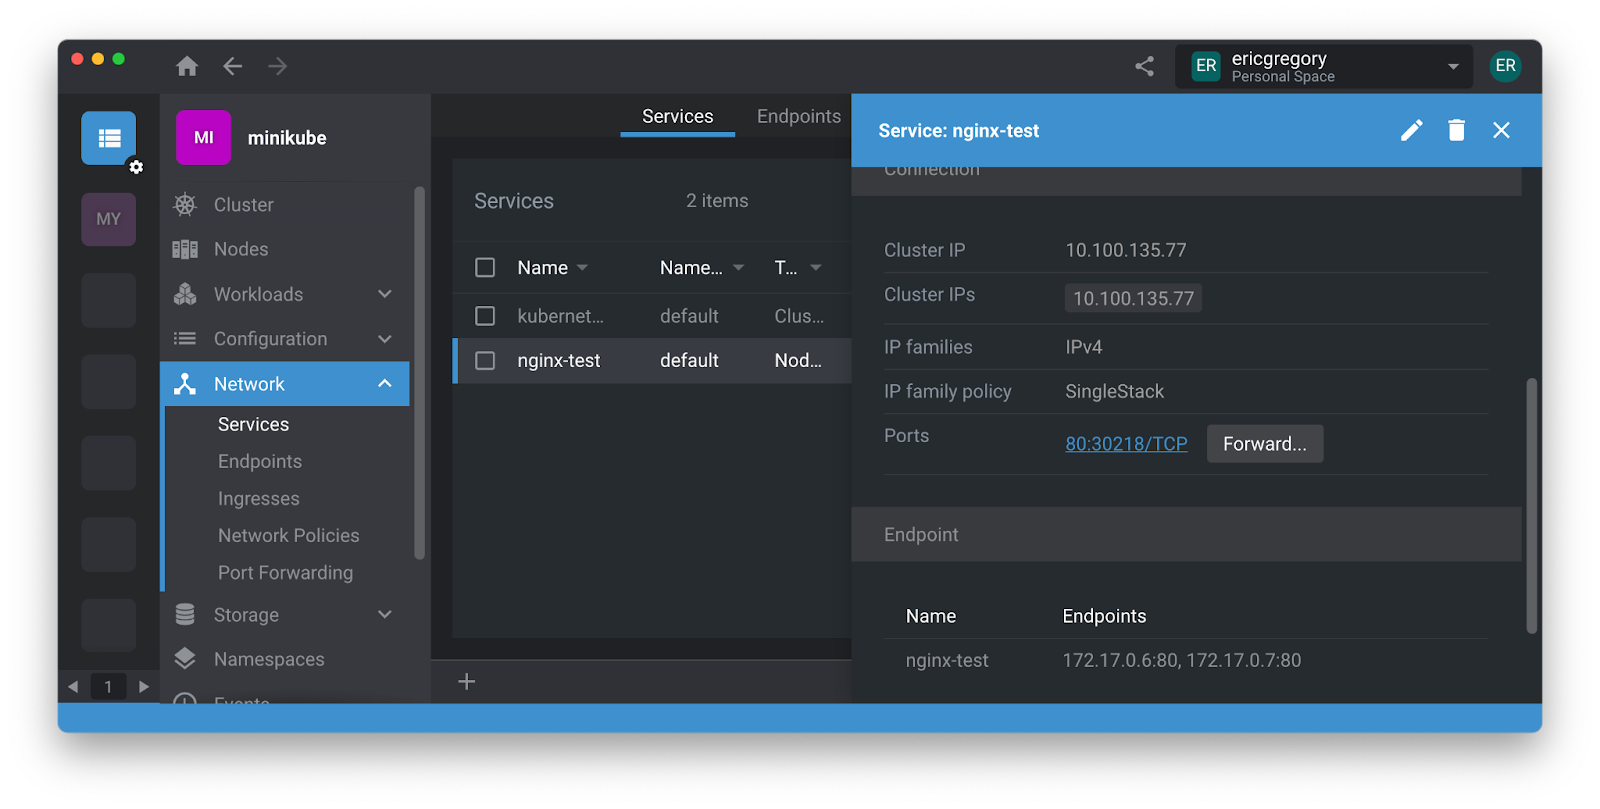
Navigate to k8slens.dev and download Lens Desktop.


% kubectl delete service nginx-test
service "nginx-test" deleted
% kubectl delete deploy nginx-test
deployment.apps "nginx-test" deleted
% minikube stop
✋  Stopping node "minikube"  ...
🛑  Powering off "minikube" via SSH ...
🛑  1 node stopped.
That’s it for today. Next time, we’ll break down the anatomy of a Kubernetes cluster.


