
How to Use Kubernetes Secrets with Environment Variables and Volume Mounts
One of the biggest challenges for implementing cloud native technologies is learning the fundamentals—especially when you need to fit your learning into a busy schedule.
In this series, we’ll break down core cloud native concepts, challenges, and best practices into short, manageable exercises and explainers, so you can learn five minutes at a time. These lessons assume a basic familiarity with the Linux command line and a Unix-like operating system—beyond that, you don’t need any special preparation to get started.
In the last lesson, we used a dynamically provisioned PersistentVolume to store data in Kubernetes—specifically, in a containerized MySQL database. But we cut a corner by configuring the password for our database via an environment variable. That’s an insecure approach that we would never want to use in production.
Why? Environment variables are readily visible within their containers, within Kubernetes logs, in the manifests, and to anyone on the cluster with the ability to view the spec. If an attacker gains access to any of these, they will have access to the database’s root password as well. Sub-optimal, to say the least!
Instead of configuring a password directly through an environment variable, we can use KubernetesSecrets. While they aren’t the be-all and end-all of Kubernetes security, Secrets give us a way to add an additional layer of protection for sensitive data.
As we continue our overall project of decomposing a monolithic To Do app into a set of cloud native services, our next step will be to implement and connect our database and API server with Secrets. Along the way, we’ll learn exactly what Kubernetes Secrets are, secret types, and how they work.
Table of Contents
How to use Kubernetes Secrets with Environment Variables and Volume Mounts ← You are here
How to Use StatefulSets and Create a Scalable MySQL Server on Kubernetes

These lessons assume a basic understanding of containers. If you need to get up to speed on Docker and containerization, download our free ebook, Learn Containers 5 Minutes at a Time. This concise, hands-on primer explains:
- The key concepts underlying containers—and how to use core tools like image registries
- Fundamentals of container networking that are essential for understanding container orchestrators like Kubernetes
- How to deploy containerized apps in single-container and multi-container configurations
What are Kubernetes Secrets?
Kubernetes Secrets are confidential credentials, stored by default in etcd and available for authorized entities to use in authentication throughout the system.
Essentially, Secrets are placeholders for sensitive information. Once we’ve established a Secret in our cluster, we can use that Secret to inject, say, the value of a “password” environment variable for a database container, rather than specifying the password itself.
Secrets can hold either plaintext or base64-encoded data. The latter is a bit more secure, preventing someone in the same room from seeing a password value at a glance, but you shouldn’t mistake this encoding for encryption.
A word of warning
Before we go any further, I should repeat that Secrets are not the be-all end-all of Kubernetes security. Once a container has consumed a Secret via environment variable, the value is freely available within the container. The value is also stored without encryption in etcd. This is not to say you shouldn’t use Secrets, but rather that you should be aware of their limitations, and they should be only one part of your overall security strategy. We’ll discuss some ways to harden your security further in our final lesson.
You might very reasonably ask: If Secrets come with so many caveats, why do we bother to use them? What are they for? The simple answer is that the Secret is a mechanism for abstracting credentials, which then allows us to programmatically utilize and manage those credentials. With a password captured as a Secret, we can define which users, namespaces, or Pods can access that password. The Secret is intended for no more and no less—it isn’t about encryption, but rather conceptual modeling and access control. As a result, it provides a way to integrate external solutions for better security.
The two most common ways for Pods to consume Secrets are through environment variables and as files injected into the Pod through a volume.
Injecting a Secret as an environment variable makes the value available to everything inside the Pod. That can be useful in that multiple elements of your application can access it with ease, but it also means that there is risk of the value being exposed via logs or other processes.
Injecting a Secret by means of a file in a volume can be more secure in the scope of the Pod, since you can make the file only selectively available to components within a container. But it’s also now only as secure as the volume where it’s being stored.
The approach you use may depend on the application you’re working with. In the case of our MySQL server image, we will use an environment variable, because this is how the app is designed to consume credentials. But if we’re designing our own service, we might choose to use the volume-based approach. We’ll use both techniques in today’s exercise.
How to Create a Kubernetes Secret
As with other Kubernetes objects, we can create a Secret straight from kubectl. Enter the following command:
In this command, we have…
Used the standard kubectl create command, and we’ve used it to create a Secret.
Specified that we want a generic Secret (which I’ll explain in a moment)
Named our Secret “test-secret”
Defined a plaintext password value of “octoberfest” to store within the Secret using the --from-literal flag
Suppose we want to change some of the details of our Secret. We can do so with…
This will use your default command line editor to open the Secret file. On my system, I’m viewing the Secret contents with vi:

A couple items to note here:
The password value was automatically base64-encoded. Go ahead and copy this value—we’ll use it in a moment.
The value of the type field is Opaque.
“Opaque” is the default Secret type. When we told kubectl that we wanted a generic Secret, this was what we meant: We want a Secret of the default type. The word “opaque” doesn’t mean a whole lot here—this type could just as easily have been called “generic” or “standard” or “default.” The word opaque is simply assuring us that the value of the Secret is only available to the users, Pods, and namespaces with access…in other words, that it’s doing the basic job of a Secret.
There are several other Secret types available that impose additional constraints on configuration or usage and are pre-defined for specific use-cases. We won’t be using these today, but they’re worth noting for future reference:

Some of these, such as the bootstrap token type, are used by the Kubernetes system itself. Additionally, you can define your own Secret type using a non-empty string as the type value.
Let’s make some changes to our Secret! If you’re using vi for your text editor, you can press i to enter INSERT mode, then add an indented line below the password field. Here, we’ll store a user value of “root” in plaintext, just to demonstrate both editing and plaintext storage. Press ESC and then :w to write/save the file, and then :q to quit vi
If you edit the Secret again, you can see that the user field is still there.

Encoding vs. encryption

A moment ago, I suggested that you copy the base64-encoded password. Try running the following command:

% echo 'b2N0b2JlcmZlc3Q=' | base64 --decode
octoberfest

Remember, anyone who gets hold of your encoded Secret can run that command, too. This is encoding, not encryption.
Now, it’s easy to imagine that you might not want all of your Secrets to be readily editable, not least because someone might accidentally modify them. In such a case, you can make a Secret immutable. To do this, simply add an immutable field set to true in the Secret file:
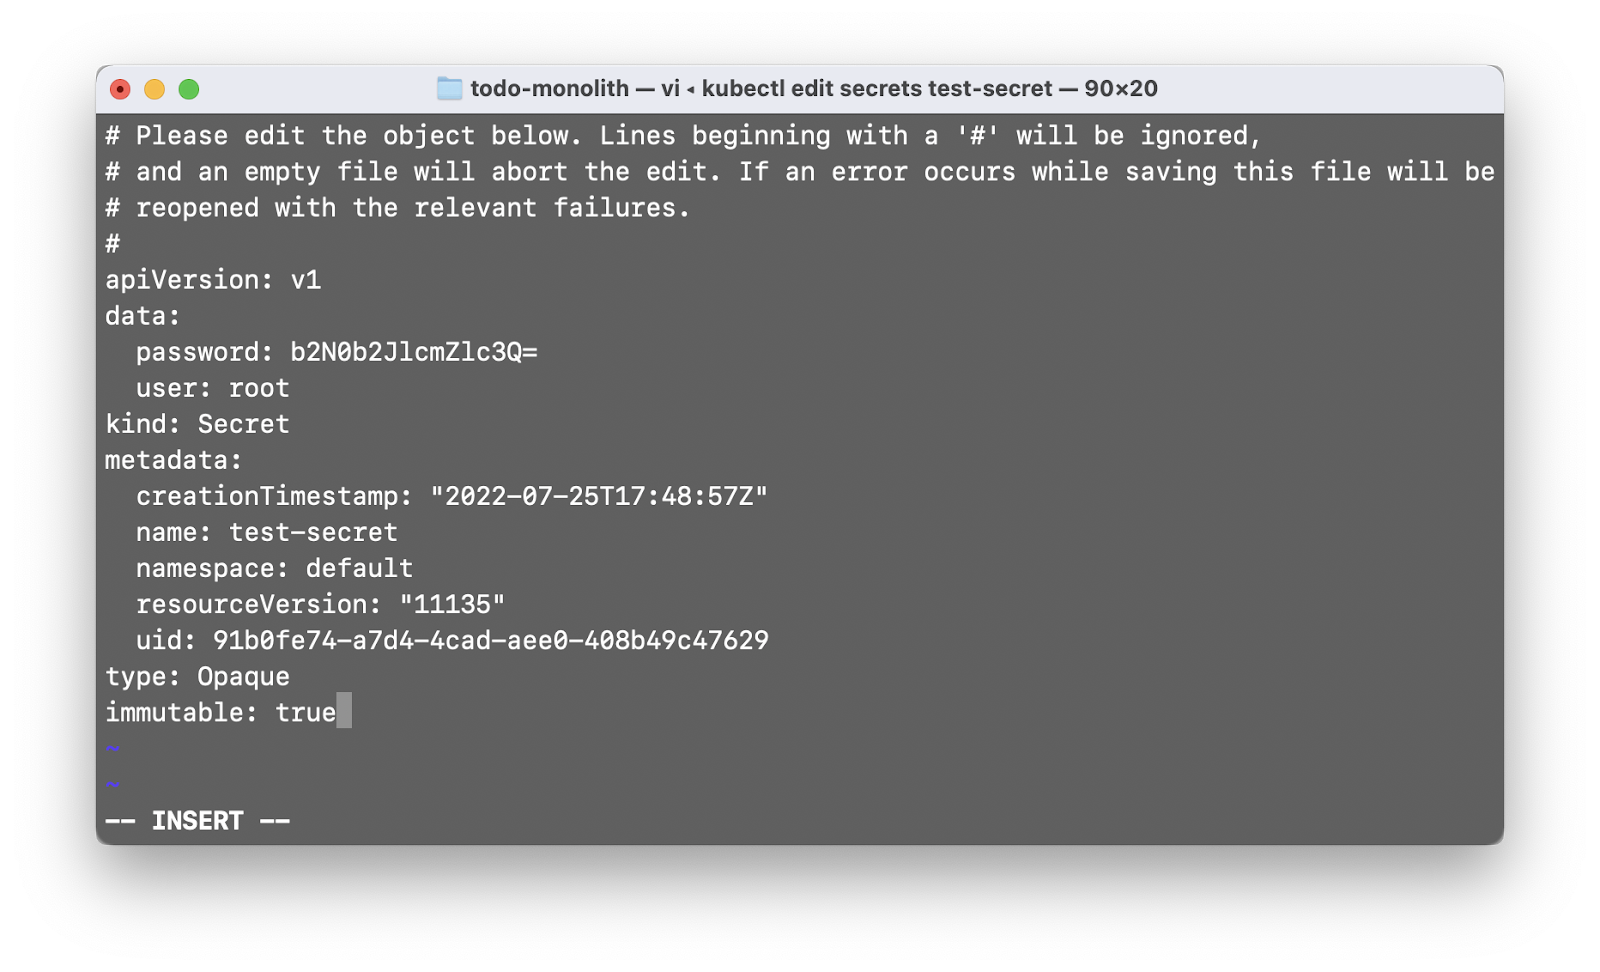
Note: Once you save the file, this particular Secret will no longer be editable (as per your request!). To make any changes, you’ll need to delete this Secret and create a new one.
Immutability not only protects a Secret from accidental modification; it can also help improve performance across your cluster, since an operator can allow the API server to stop watching for changes to immutable Secrets.
Using Lens to manage Secrets
Now, we’ve seen Secret creation and management through kubectl, but that’s not the only way to get the job done. Many users will find it easier to use a graphical user interface.
Back in our lesson on Setting up a Kubernetes learning environment, we downloaded and learned to use Lens, which serves as a GUI and management environment for Kubernetes. Let’s open Lens now, connect to our Minikube cluster, and navigate to the Secrets tab (under Configuration).
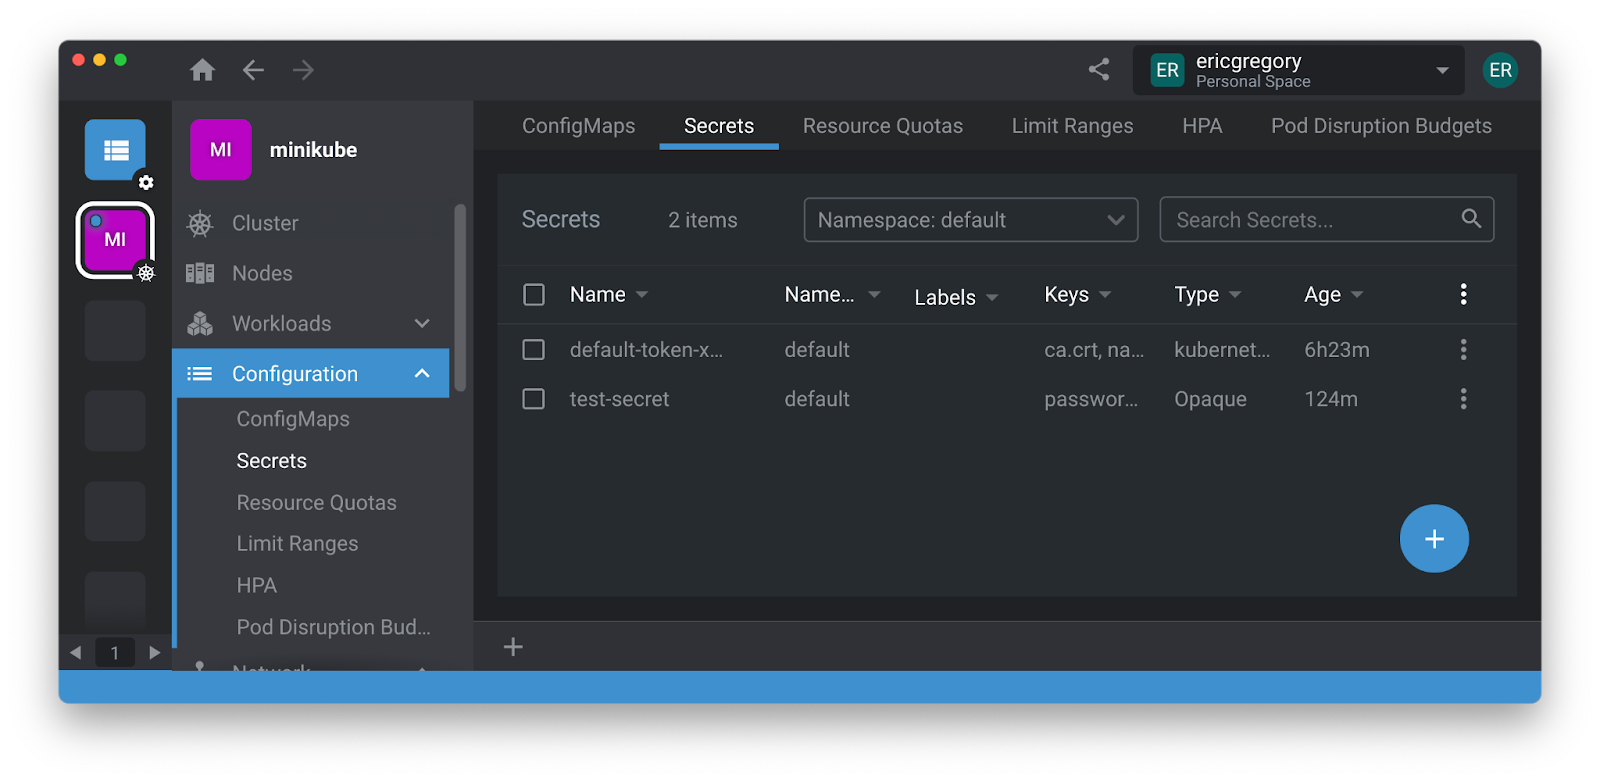
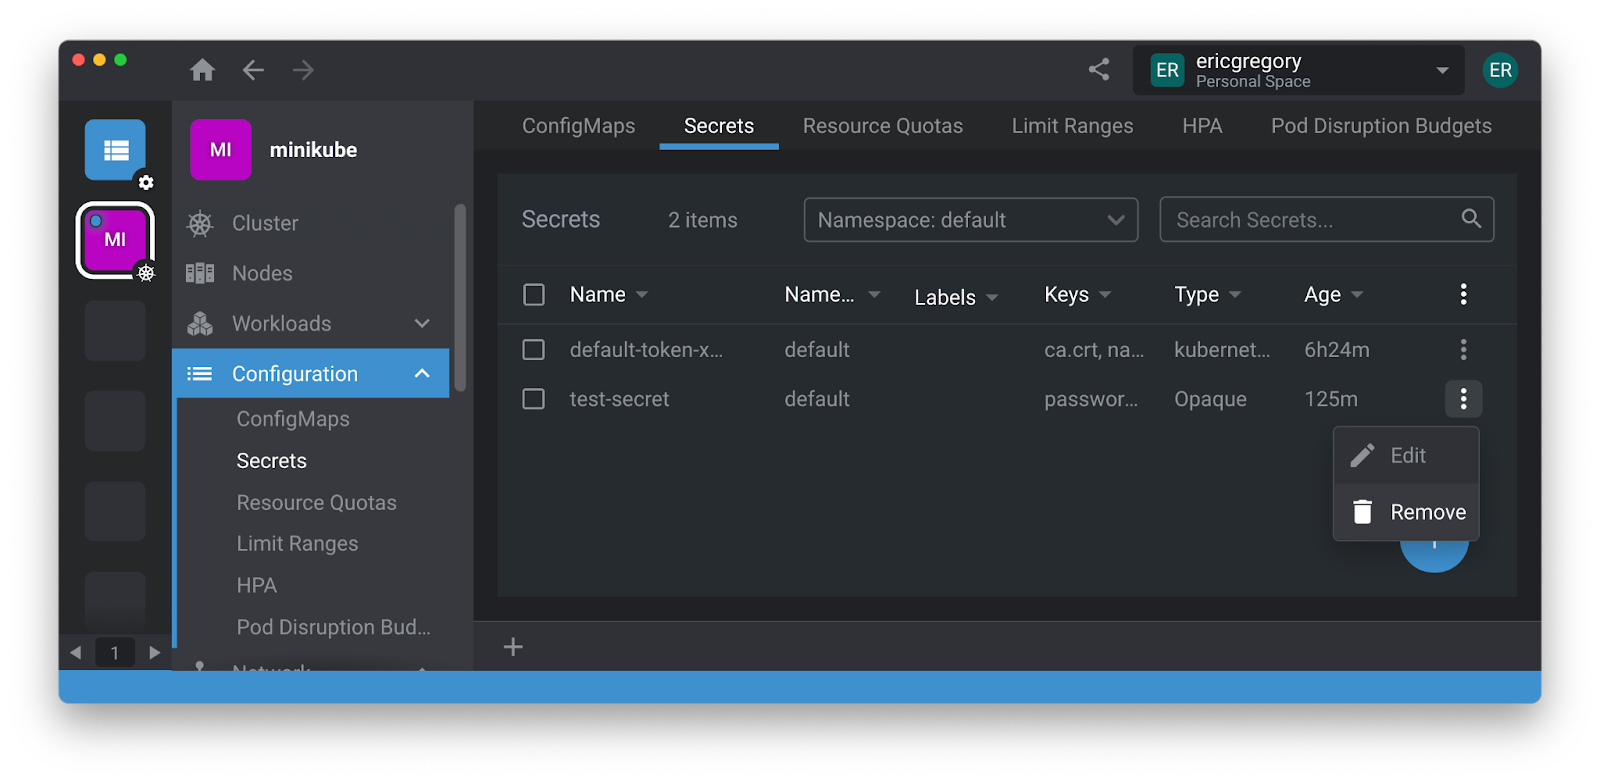
Here we can see a default token used by the system and the now-immutable test-secret we created. Click on the verticalellipsis icon (⋮) for test-secret and select Remove to delete the Secret.
Now let’s create a new Secret. Click the blue plus (+) icon in the lower right corner. Give your new Secret the name mysqlpwd. Click the plus icon beside Data to add a new field, with password as the name and octoberfest as the value. Click Create.

Now the Secret is saved in our cluster. If you return to the command line and run kubectl get secrets, you’ll see mysqlpwd there with one datum, the password.
% kubectl get secrets
NAME                  TYPE                                  DATA   AGE
default-token-x5n8f   kubernetes.io/service-account-token   3      6h35m
mysqlpwd              Opaque                                1      2m2s
Exercise: Keep it Secret, Keep it Safe-ish
Now it’s time to use this Secret. To get our MySQL server running, we’re going to use a single, lengthy YAML file that synthesizes much of what we’ve learned over the past few lessons. (You can find a copy of the YAML file on GitHub here.) Create a new directory for this lesson called /secrets/ and a subdirectory called /manifests/, then inside create a new YAML file called todo-mysql.yml with the code below.
There’s a lot going on here, but don’t worry—we’ll go through the manifest step-by-step:
apiVersion: storage.k8s.io/v1
kind: StorageClass
metadata:
 name: sc-local
provisioner: k8s.io/minikube-hostpath
parameters:
 {}
reclaimPolicy: Delete
volumeBindingMode: Immediate
allowVolumeExpansion: false

---

apiVersion: v1
kind: Service
metadata:
 name: todo-mysql
 labels:
   app: todo-mysql
spec:
 type: ClusterIP
 selector:
   app: todo-mysql
 ports:
   - port: 3306
     protocol: TCP
 clusterIP: "None"

---
apiVersion: apps/v1
kind: StatefulSet
metadata:
 name: todo-mysql
spec:
 selector:
   matchLabels:
     app: todo-mysql
 serviceName: todo-mysql
 replicas: 1
 template:
   metadata:
     labels:
       app: todo-mysql
   spec:
     terminationGracePeriodSeconds: 10
     containers:
     - name: todo-mysql
       image: mysql:8
       ports:
       - containerPort: 3306
         name: todo-mysql
       env:
       - name: MYSQL_ROOT_PASSWORD
         valueFrom:
           secretKeyRef:
             name: mysqlpwd
             key: password
       - name: MYSQL_DATABASE
         value: "todo_db"
       volumeMounts:
       - mountPath: /var/lib/mysql
         name: todo-volume
 volumeClaimTemplates:
 - metadata:
     name: todo-volume
   spec:
     storageClassName: sc-local
     accessModes: [ "ReadWriteOnce" ]
     resources:
       requests:
         storage: 1Gi
The first thing to note is that we’re defining multiple Kubernetes objects in a single manifest, separating the individual specifications with three dashes. That’s a good option to have—it gives us the choice to define related or inter-dependent objects all at once.
We’re defining a StorageClass first, exactly as we did last lesson.
Next we define a simple Service for our MySQL server as we’ve done previously.
Next we’re adding a new kind of resource: an API resource called a StatefulSet.
Don’t worry too much about the StatefulSet at the moment—it’s a big, important topic that we’re going to explore in depth in the next lesson. For now, just note that it is an API resource roughly analogous to a Deployment.
The container spec in the StatefulSet manifest is very similar to the container spec in a Deployment manifest, and we should zoom in on it for a moment because there’s some important work going on here to implement our Secret:
...
     containers:
     - name: todo-mysql
       image: mysql:8
       ports:
       - containerPort: 80
         name: tcp
       env:
       - name: MYSQL_ROOT_PASSWORD
         valueFrom:
           secretKeyRef:
             name: mysqlpwd
             key: password
       - name: MYSQL_DATABASE
         value: "todo_db"
       volumeMounts:
       - mountPath: /var/lib/mysql
         name: todo-volume
...
We’re using the env field to define environment variables for MYSQL_DATABASE and MYSQL_ROOT_PASSWORD, which the MySQL container image is designed to utilize. We’ve defined the values of those variables in two different ways—directly, in the case of todo_db, and through our mysqlpwd Secret for the root password. We’ve defined that with the secretKeyRef field, the value of which is an object identifying the Secret’s name and which piece of data from the Secret that we wish to use.
Let’s use this YAML manifest to create our Storage Class, Service, and StatefulSet all at once. From the /manifests/ directory where our new todo-mysql.yml file is stored:
$ kubectl apply -f todo-mysql.yml
storageclass.storage.k8s.io/sc-local created
service/todo-mysql configured
statefulset.apps/todo-mysql created
Mounting Secrets from volumes
Our next step is to launch our To Do app’s backend service. The backend will access the MySQL server using the root password, which it will consume via the Secret mounted from a volume.
There’s no need to completely decompose our monolith into frontend and backend at this stage. At this point, we’ll stand up a skeleton to perform the bare essentials before moving on to the next steps of decomposition. For our purposes here, the essentials include:
Mounting a Secret from a volume
Connecting to and authenticating with the MySQL server
To implement these functionalities and ensure they’re working properly, we’ll write our skeleton application from scratch. In your /secrets/ directory, create a new folder called /5min-dbcheck/. Within that directory, run:
$ npm init -y
$ npm install --save mysql2
In your index.js file, add the following:
var mysql = require('mysql2');
var fs = require('fs');

const MYSQLPWD = fs.readFileSync("secrets/password", 'utf8');

var con = mysql.createConnection({
   host: "todo-mysql",
   user: "root",
   password: `${MYSQLPWD}`
});

var minutes = 5;
var interval = minutes * 60 * 1000;

setInterval(function() {
 console.log("Performing 5 minute check...");
 con.connect(function(err) {
   if (err) throw err;
   console.log("Connected!");
 });
}, interval);
We’re using Node’s fs (fileSync) module to read a password file that will soon be stored in a /secrets/ directory within container instances of the application.
The value of the fileSync is assigned to the constant MYSQLPWD, which we’re interpolating into the password field for our MySQL connection configuration.
We’re setting the host field in our MySQL connection configuration to the Kubernetes Service name of our MySQL server: todo-mysql
Finally we’re creating a function that runs at five minute intervals, connecting to the database and producing a console message if successful
Now let’s get this running on the cluster. If you’d like to use my code or container image, they are available on GitHub and Docker Hub respectively. To build an image locally, we can use the standard Dockerfile we’ve used for Node applications so far:
# Sets the base image
FROM node:18
# Establishes the working directory for your app within the container
WORKDIR /usr/src/app
# Copies your package.json file and then installs modules
COPY package*.json ./
RUN npm install
# Copies your project files and then runs the app
COPY . .
CMD [ "node", "index.js" ]
Build the container image and then upload it to Docker Hub:
$ docker build . -t <Your Docker ID>/5min-dbcheck
$ docker push <Your Docker ID>/5min-dbcheck
Return to the root project directory for this chapter, where you’ve been storing your manifests. Create a new Deployment manifest called 5min-dbcheck.yml that contains the following:
apiVersion: apps/v1
kind: Deployment
metadata:
 labels:
   app: 5min-dbcheck
 name: 5min-dbcheck
spec:
 replicas: 1
 selector:
   matchLabels:
     app: 5min-dbcheck
 template:
   metadata:
     labels:
       app: 5min-dbcheck
   spec:
     containers:
     - image: ericgregory/5min-dbcheck:latest
       name: 5min-dbcheck
       ports:
       - containerPort: 80
       volumeMounts:
       - name: secrets
         mountPath: "usr/src/app/secrets"
     volumes:
       - name: secrets
         secret:
           secretName: mysqlpwd
           defaultMode: 0400
For the image in the container spec, replace my name with your own Docker ID (or simply use my image).
Everything here should be familiar except for the volumeMounts field for the container spec and the particulars of the volumes spec.
The name field under volumeMounts identifies the storage volume that will be mounted to this container (pointing to the volume defined in the volumes spec below).
The mountPath identifies where in the container filesystem the volume will be mounted.
In the volumes spec…
We name our new volume.
The secret field defines this volume as the bespoke, RAM-backed volume type dedicated to Secrets.
We refer to the Secret we want to use by name and then define its defaultMode as 0400 (the Linux permission notation for Read access by owner), which means the Secret file(s) created by the volume mount will have a permission of 0400.
Launch the new Deployment:
$ kubectl apply -f 5min-dbcheck.yml
deployment.apps/5min-dbcheck created
Now we can check our new app’s logs to verify whether it has mounted the Secret and connected to the database server successfully. We can do this either using kubectl exec as before or by using the Logs button in Lens.
I’ll use Lens—under the Workloads > Pods tab, select the 5min-dbcheck Pod. At the top of the Pod details pane, select the Logs icon.

When the app conducts its connectivity check, you should see “Connected!”

We’ve accomplished quite a bit this lesson:
Using Secrets as environment variables
Using Secrets as volume mounts
Next time, we’ll learn more about the StatefulSet API resource and how it acts as a manager for stateful applications, and then learn how to create a horizontally-scalable database server.


